Instructions for Use — conCIerge
℞only
Version of this document: v1.0, issued 2026-02-01,
valid for the planning software "conCIerge" v1.0 by OtoJig GmbH.
UDI: N/A — exclusive for clinical investigations — . All rights reserved. The software has a target lifetime of 2 years from the date of last release.
The latest versions of all instructions for use are available at: https://otojig.com/IFU/
This document is available in the following languages: 🇬🇧
Description and Identification of the Device
The planning software named "conCIerge" is a stand alone software as a medical device (SaMD).
The OtoJig procedure involves a number of medical devices which, when inter-connected or combined, are intended to achieve the following medical purpose:
The OtoJig system is intended to create a minimally invasive surgical tunnel in the temporal bone and to provide a covered access to the inner ear.
Please consult the Instructions for Use — OtoJig System to achieve the above stated medical purpose, to identify compatible devices, and obtain a safe combination. Note, those Instructions for Use — OtoJig System are replicated in the intraoperative checklists and interactive instruction steps within the app.
To identify the device conCIerge and its version, open the "about" view.
Intended Purpose
ConCIerge is intended to plan minimally invasive access tunnels in the temporal bone.
ConCIerge is an app compatible with iPad OS 26 and at least the following devices:
iPad Pro 11-inch (M4, 2024)
iPad Pro 12.9-inch (6th gen)
Installation instructions
The conCIerge app will be available to download from the Apple App Store.
Make sure to check for updates or enable auto-updates. Ensure that the iPad can connect to the Apple App Store to receive security updates and app updates, at least from time to time.
On the initial start of the app, a pop-up will request the OtoJig-provided credentials for setting up the cryptographic keys.
If the hardware or software platform (OS) is planned to be changed, make sure the compatibility statement above covers the change and/or perform a dry-run in demo mode or using the "Screening" feature.
There are no other maintenance requirements.
Decommissioning
To uninstall the app, simply long-press on the app icon and then choose "delete". Make sure you export/back up any required data (i.e. the planned and past cases) before decommissioning.
Technical instructions
→ See section "Operating instructions".
Data for safe and secure operation includes a "production receipt" from an Otomat production machine. This will be generated and provided by the Otomatic app and can be imported into conCIerge.
Description of the software including essential functions
ConCIerge is a surgical planning software. It supports a "demo" mode for non-medical applications and training purposes. The software aims to provide a best-in-class user experience for surgical planning of minimally invasive access tunnels to the middle or inner ear. An application example is cochlear implantation.
The name relates to a concierge in a hotel who is serving in a helpful and polite manner to make it as comfortable for the guests as possible. In this picture conCIerge shall guide the way and do the heavy lifting so our guests have a pleasant time.
ConCIerge is intended for use by trained ENT surgeons (ENT surgeons who have undergone training in the OtoJig procedure) for planning and, in particular, approving minimally invasive surgical interventions. It allows the user to define an access tunnel that takes into account the individual patient’s anatomy. The planned access tunnel (synonymously called "planned path", "trajectory", or just "path") can be drilled by a surgeon using a combination of specified compatible medical devices manufactured by OtoJig and by OtoJig-approved third parties.
In order to transfer the planned path into reality, OtoJig provides — as described in the Instructions for Use — OtoJig System — a Mini-Stereotactic Frame where an X-Ray Marker can be mounted. The software shall be able to localize that X-Ray Marker in a radiological volume image in order to compute the path relative to the Mini-Stereotactic Frame. The planned path can be exported for a point-of-care Jig production machine called Otomat. The ID of the individualized Positioning Jig is scanned in the operating room to avoid mix-ups. Further, the software shall guide hospital staff intraoperatively through the surgical procedure of creating the planned access tunnel by providing step-by-step instructions for the compatible surgical instruments. For this intraoperative assistance, the software will detect and/or localize certain optical markings like QR-codes based on camera images.
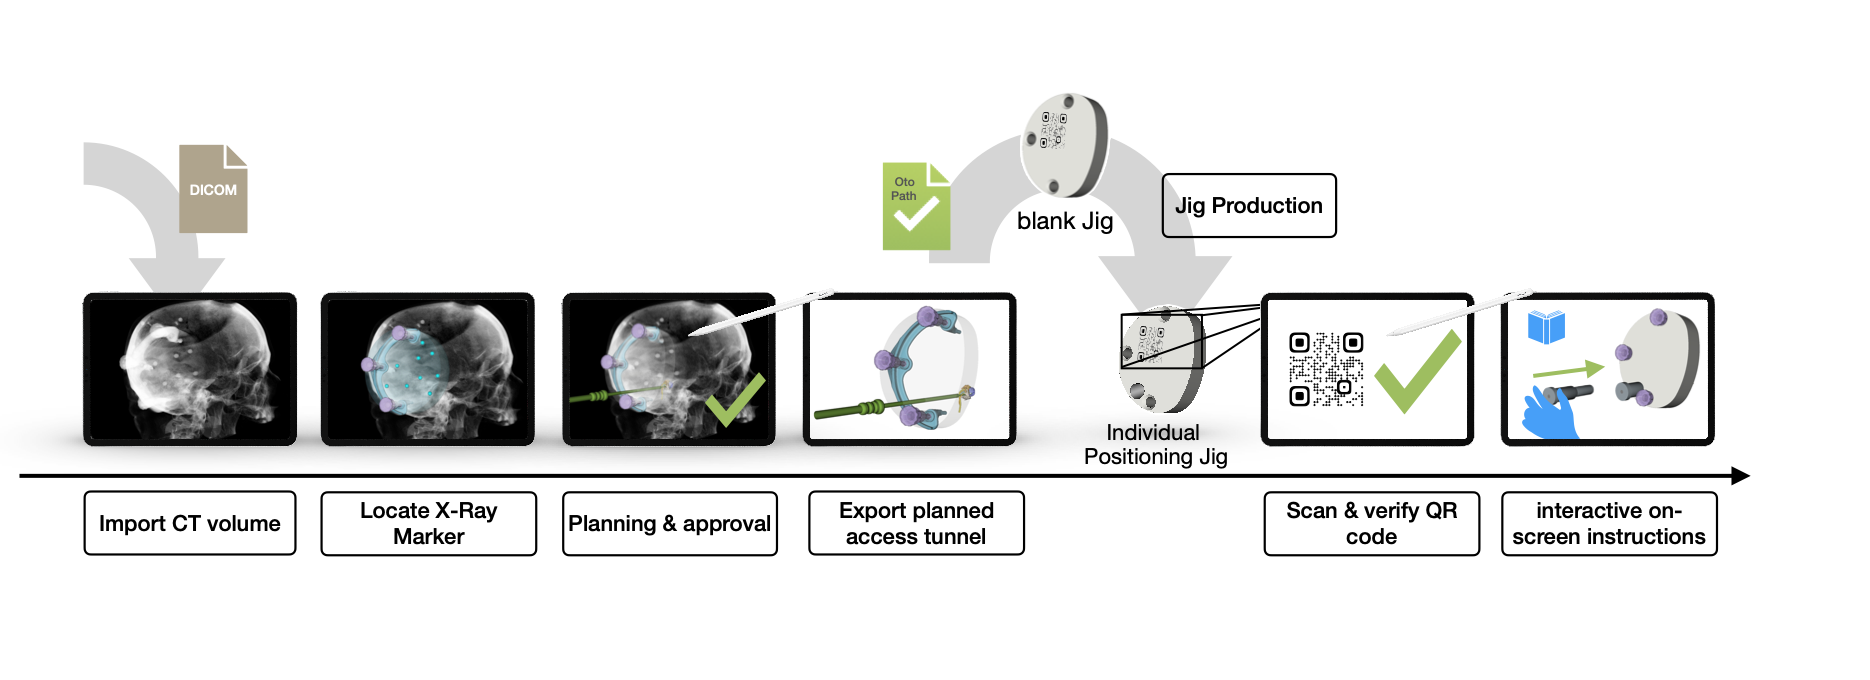
Figure 1.: Schematic illustration of the basic steps and how the iPad software conCIerge works. The Jig production is not part of the software but is shown here for completeness.
Medical Indications, Contraindications & Patient Population
ConCIerge is intended for use with adult patients.
Caution
Do not use the devices for children.
ConCIerge is indicated for:
visualization of computed tomography volume images of the human temporal bone,
planning of minimally invasive access tunnels in the temporal bone, and
assisting surgeons in drilling the planned access tunnels.
ConCierge is contraindicated for:
Visualization of computed tomography volume images and planning of access tunnels is contraindicated for patients where either no computed tomography volume image could be acquired due to medical reasons or where the computed tomography volume image is of insufficient quality, including movement of the patient during acquisition, or other reasons which make it impossible for the surgeons to clearly identify the boundaries of the anatomical structures.
Planning of access tunnels is contraindicated for patients where the planned access tunnel may intersect the segmentations of the facial nerve canal or the wall of the outer ear canal.
The assistance in drilling of a pre-planned access tunnel is contraindicated for patients with cholesteatoma in the surgical area of the planned access tunnel.
Intended User and User Training
Intended user
ConCIerge:
All trained medical professionals (physicians, nurses, technicians) and medical device advisors/experts can operate conCIerge.
Approving segmentations and planned access tunnels have to be performed by a trained ENT surgeon.
Training
Training is required for approving of segmentations and planned access tunnels. ENT surgeons must be trained by OtoJig (or authorized third parties). Training can be conducted remotely by a medical device expert or medical device advisor.
Residual Risks and Undesirable Side-Effects
The planning app conCIerge and the (compatible) medical devices are used in the context of or as part of other surgically invasive procedures such as cochlear implantation, middle ear surgery, or similar surgeries. The risks associated with the OtoJig procedure inherit the primary risks of those (conventional) surgeries, which contain: excessive bleeding, blood clots, death, delayed wound healing, infections, wound dehiscence, breathing difficulties due to infection, inflammation, diffuse swelling, tissue necrosis, necrosis, hematoma, leakage of cerebrospinal fluid, damage to the facial nerve, pain, scarring at the wound site, exanthema, skin lesions, skin irritation, difficulty swallowing, and complications associated with anesthesia. In addition, meningitis is a rare postoperative complication with cochlear implantation, but can be potentially serious. As with all skin incisions, the potentially additional incisions or puncturing of the skin can often lead to local wound healing disorders, infection, inflammation, or itching. The occurrence probability of these risks is influenced by multiple factors, such as surgical technique, skin incisions and the duration of the surgery.
The device related residual risks can be summarized as follows:
There is a very frequent risk that the planned surgery needs to be aborted or switched to conventional surgical techniques, if there are reasons to believe that the procedure cannot be safely completed, in particular if any of the safety measures trigger an alert, including facial nerve monitoring, intraoperative checklists and other risk controls implemented in software.
There is a frequent risk that either no (safe) access tunnel can be planned for a given patient due to anatomic constraints or that no Positioning Jig can be produced for a given planned access tunnel. This results in a non-availability of the minimally-invasive treatment that lead to abort of the surgery or switch to conventional surgical techniques. To alleviate this risk, use the "Screening" feature if there is a pre-operative CT scan available.
There is an occasional risk of temporary or permanent injuries by thermal damage and/or by direct mechanical damage1 when compatible drill bits or the Round Window Opener are guided along the exported path. The risk can result from:
software defects,
cyber-security incidents (including forging, hacking, data manipulation etc.),
planning and approval of an incorrect or unfavorable access tunnel,
compatible drill bits (OtoDrills) deviating from the planned path due to excessive user-applied forces,
inadequate hard tissue (e.g. inhomogeneous bone densities).
There is an occasional risk of damaging the meninges or a blood vessel, which could result in bleeding or infections, during pre-drilling.
There is an occasional risk of delays during surgery: Depending on the level of experience of the user or on the occurrence of software anomalies, the intraoperative planning may take longer than usual and thereby cause negative effects from a prolonged anesthesia duration.
There is an improbable risk of non-availability of treatment due to: iPad device failures or the device running out of battery, or software anomalies, or if the X-Ray Marker cannot be localized in the imported CT volume image.
There are improbable risks related to privacy disclosures resulting from to unauthorized access to user, patient, and/or (medical) planning data or manipulation of the software or data.
Note
Residual risks are described according to the following probabilities per use:
Very frequent: ≥ 1 of 10 (10 %)
Frequent: ≥ 1 of 100 (1 %) to < 1 of 10 (10 %)
Occasional: ≥ 1 of 1,000 (0.1 %) to < 1 of 100 (1 %)
Rare: ≥ 1 of 10,000 (0.01 %) to < 1 of 1,000 (0.1 %)
Improbable: < 1 of 10,000 (0.01 %)
Off-label use, misuse, combination with non-compatible devices, modification of devices or contraindications may lead to additional risks. Depending on the type of misuse, there may be additional risks that cannot be predicted in advance.
Warnings and Precautions
Please read these warnings for a safe and efficient use of the app.
When using conCIerge intraoperatively:
Caution
🇬🇧 Facial nerve monitoring is mandatory.
🇩🇪 Monitoring des Gesichtsnerv ist obligatorisch.
Caution
🇬🇧 The approval has to be performed by a trained ENT surgeon.
🇩🇪 Die Freigabe muss durch einen ausgebildeten HNO-Chirurg:in erfolgen.
Caution
🇬🇧 Make sure the position of the path and its direction as seen through the attached Positioning Jig is approximately as expected for a path that is planned in the mastoid part of the temporal bone and as shown in the planning software in 3D.
🇩🇪 Stellen Sie sicher, dass die Position und Richtung des Pfades durch den angebrachten Positioning Jig hindurch gesehen, in etwa den Erwartungen für einen Pfad entsprechen, der im Mastoid-Bereich verläuft, sowie in der 3D Planung dargestellt.
Known technical issues, limitations, disclaimers
There are no installation restrictions, except for those relating to the operating system and the compute hardware (see section "Intended Purpose"). Please do not use with "jailbroken" devices.
Consider using technical security options such as securing the iPad with a code and/or biometric authentication.
Note
You can restrict the start-up of any app on iOS to require user authentication (e.g. "FaceID") Additionally, you can restrict access to an iPad with a PIN or a password.
The production receipts for patient individualized Positioning Jigs are checked for integrity and authenticity by conCIerge. If the file is corrupted or manipulated, conCIerge will display an appropriate error message and block the use of the corresponding Jig during the surgery.
The computed and displayed distances between 3D models of surgical tools and segmentations of anatomical structures are in millimeter. They are limited by manufacturing tolerances of the surgical devices. The computation is exact up to
0.001mm.It is essential to back up the iPad, as the planned cases are stored per default on the device itself. To transfer cases from one device to another, use the Files app of iPad OS to transfer the files, e.g. using AirDrop. The default location is "on My iPad" under the directory "conCIerge".
Keep the app running in the foreground — a persistence is not implemented, yet.
Expected Clinical Benefits
The use of the OtoJig procedure offers several advantages, including reduced surgical drilling time and less healthy bone volume removal compared to traditional mastoidectomy procedures:
Visualization & optimal path planning: ConCIerge helps surgeons to find and plan their preferred access path and to get a better understanding of the patient's individual anatomy in comparison to standard of care DICOM viewers.
Insertion trajectory: ConCIerge allows to visualize and control the (planned) in-plane angle and the off-plane angle towards the cochlea.
Performance characteristics of the app
The computation of the distances between 3D models and segmentations is exact up to a distance of
0.001mm.The X-Ray Marker can be localized in a suitable CT/CBCT scan typically within
0.04mm or better (expressed as fiducial registration error).
Operating Instructions
The app is designed to be as self-explanatory as possible and provides a context sensitive help at the (?) icon in some parts of the app.
The following sections describe the instructions for a safe usage of the app.
Recommendation
Keep a second iPad ready with conCIerge installed as a backup device.
Recommendation
It is recommended to test each CT/CBCT scanning device and/or each intermediate DICOM exporting software application prior to use by scanning an X-Ray Marker (without patient) and importing the DICOM into conCIerge.
Start-up / shut down
Tap the app icon to start conCIerge. To shut down just close the app window.
conCIerge
Description of the graphical user interface (GUI)
The graphical user interface (GUI) is following the standard control elements provided on the target platform iPad OS.
The initial screen gives access to
Screening for anatomical suitability of potential patients, if a previous CT scan (reconstructed volume) is available.
Create Case for performing a surgery with the OtoJig system.
Create Demo Case for testing and training (not for human use).
The eIFU, available for offline viewing.
The label information ("about").
When entering the "Create Case", then on the left sidebar (can slide in and out) are the steps to follow from top to bottom. The steps are grouped into different phases that can be (un)folded.
Certain tasks in the sidebar may be locked or not shown in the beginning. If this is the case, a previous step has not been checked as completed.
Steps that have been completed, i.e. checked, show a ✓ in the sidebar.
The app can be controlled by different input devices as supported by the OS, and has been tested with touch input, mouse, trackpad or a digital pen (e.g. Apple Pencil).
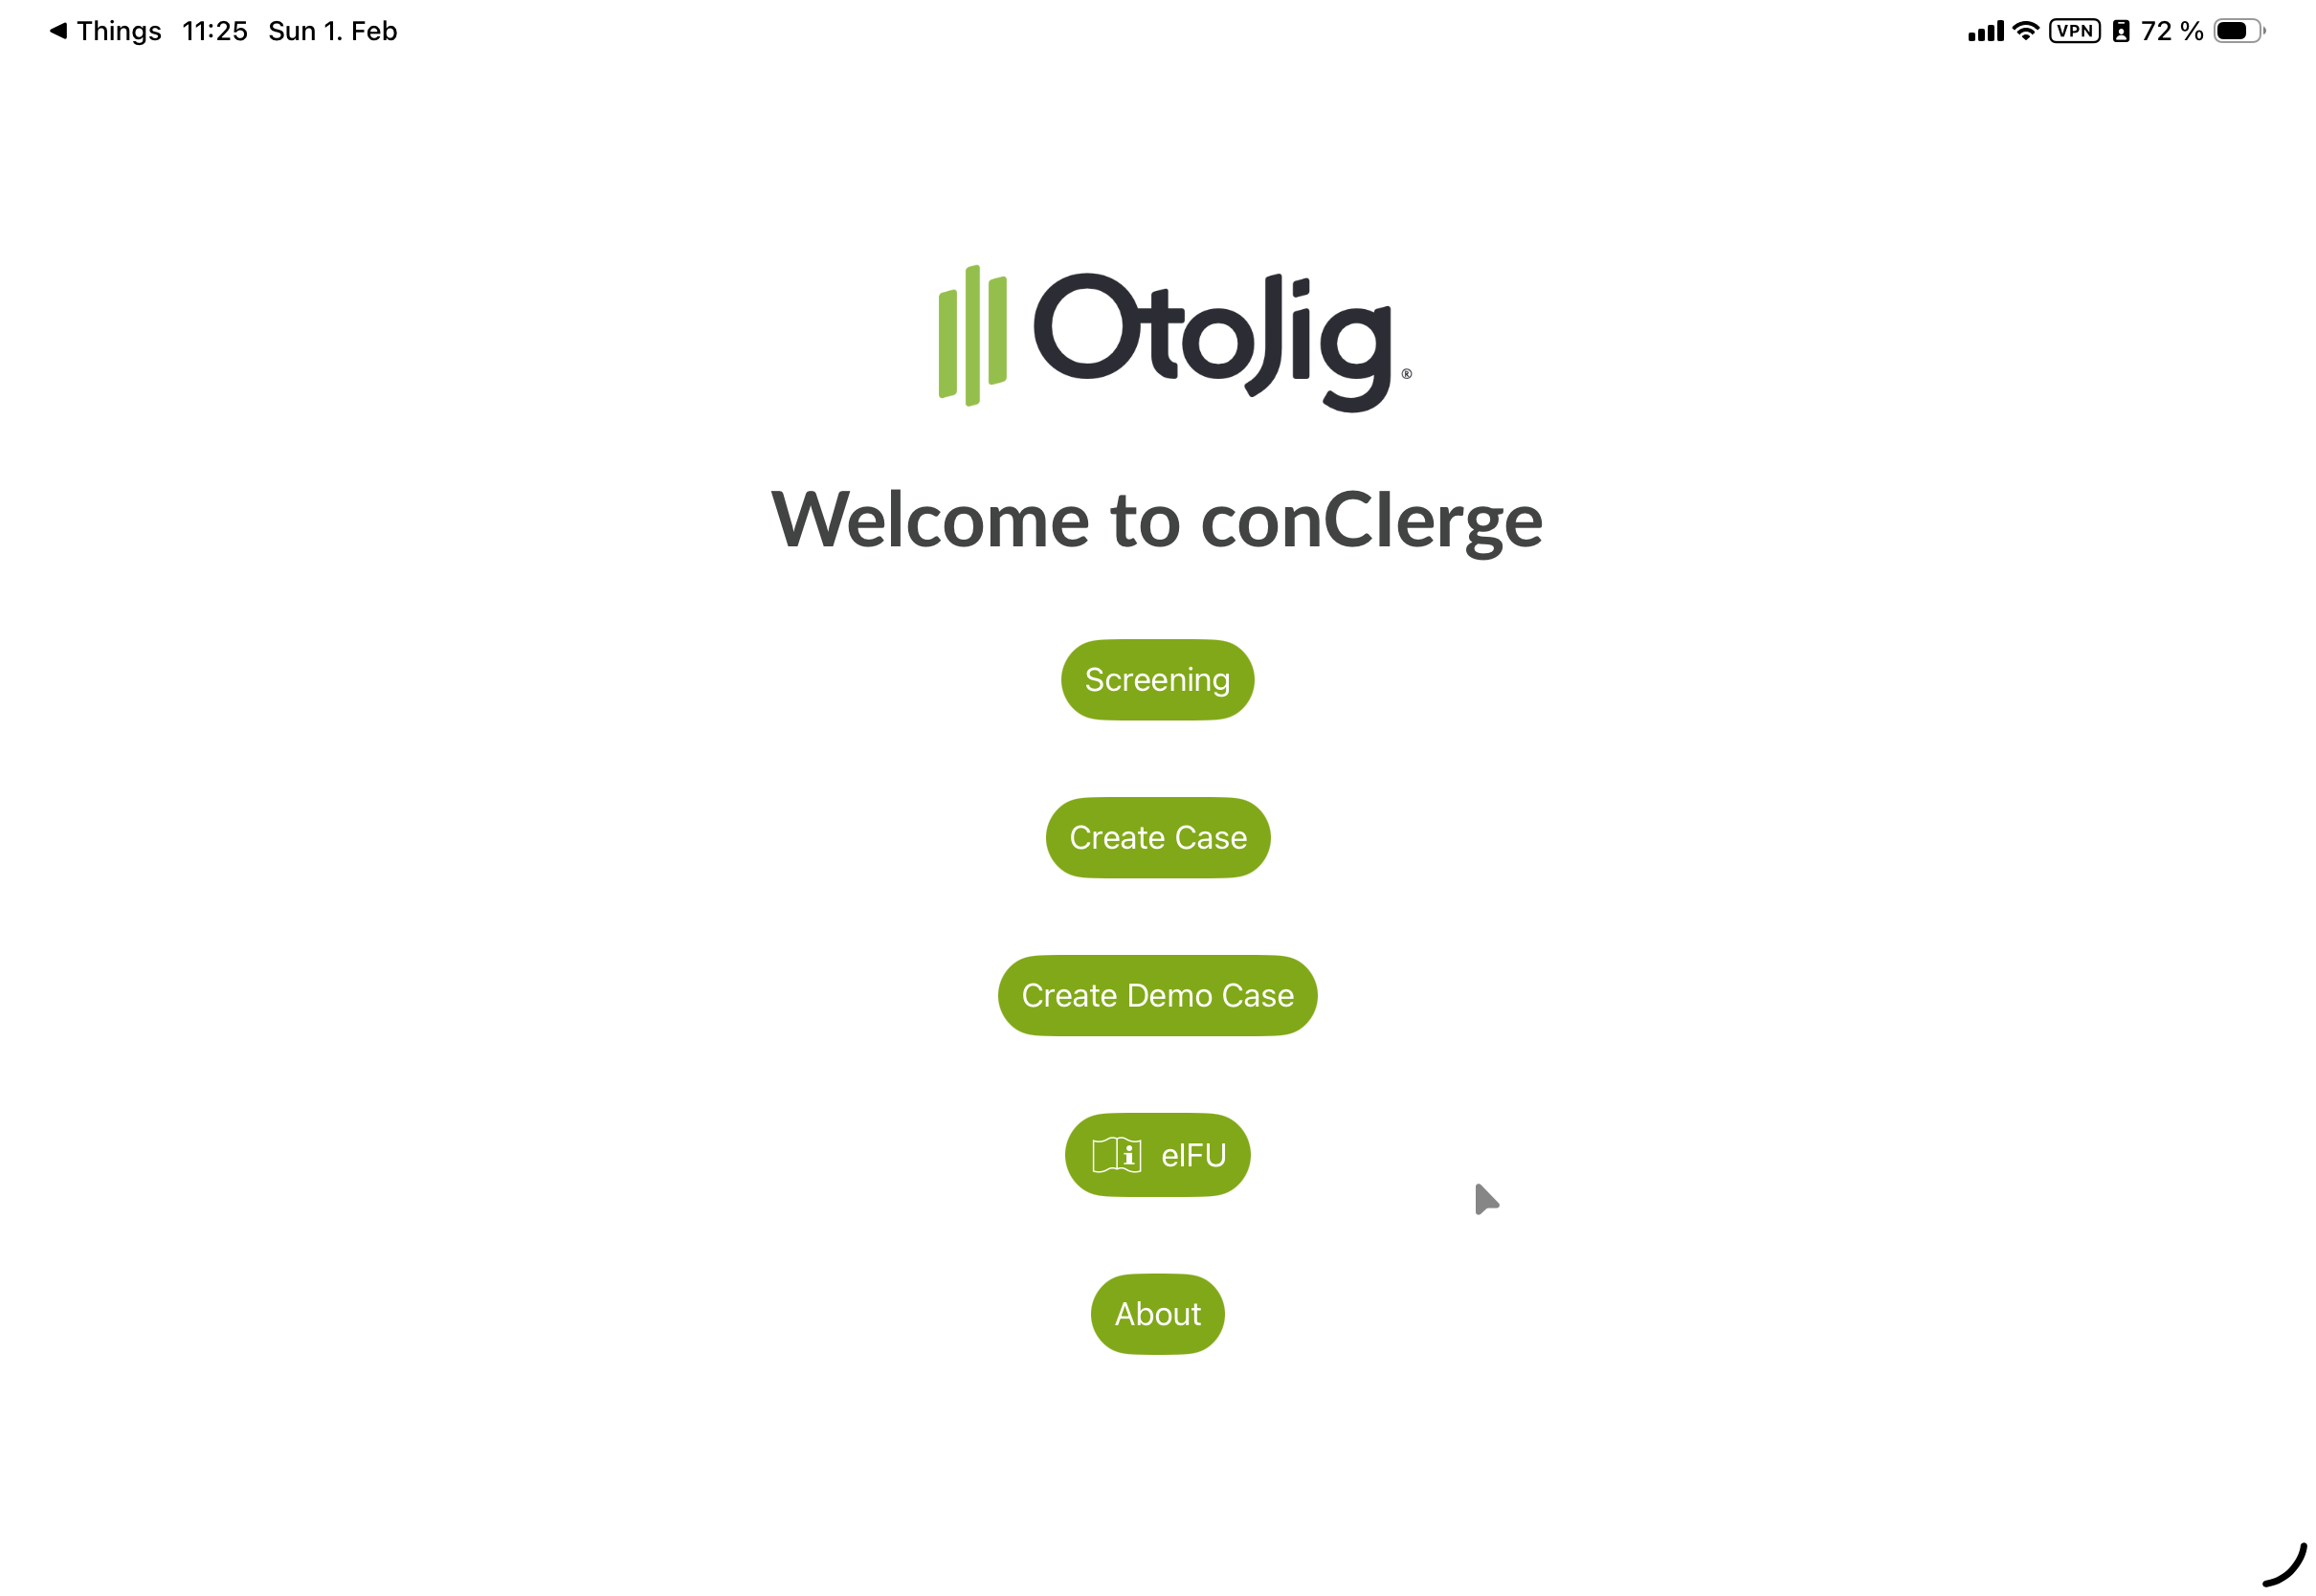
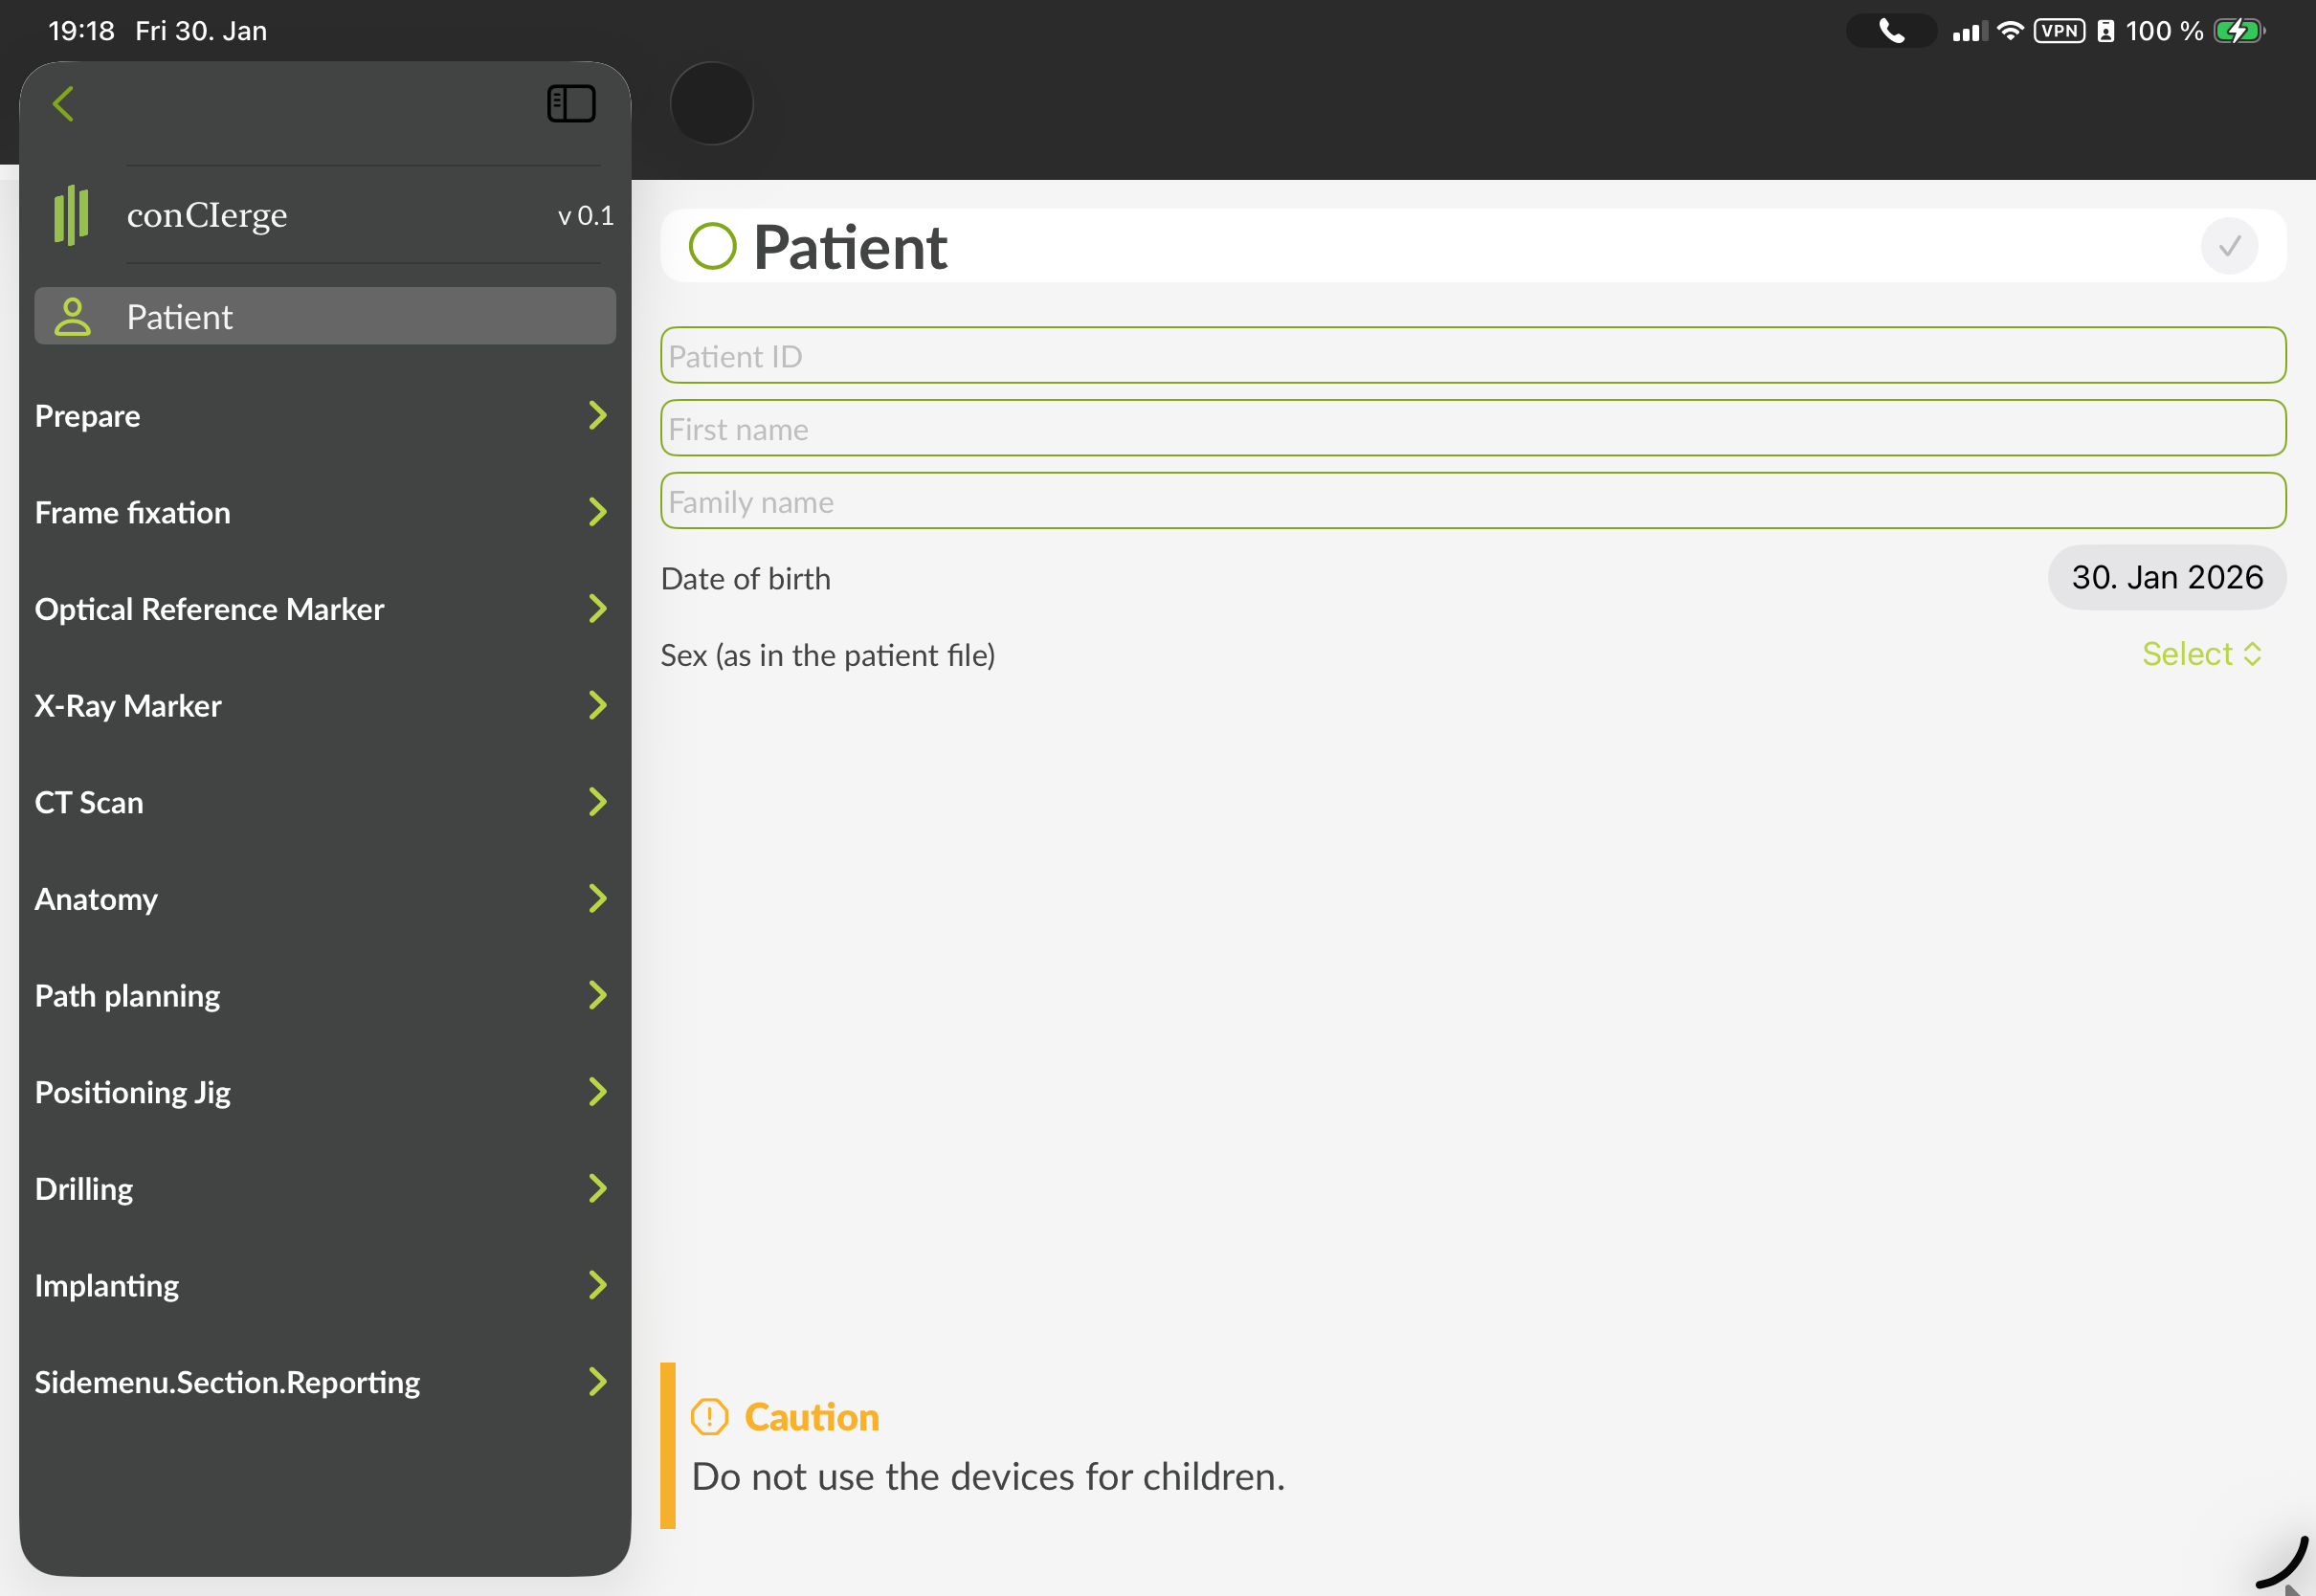
Figure 2: GUI of conCIerge showing the initial screen (left) and the sidebar of the "Create Case" screen to enter the patient data (right). The content is often scrollable. After completion, each step has to be checked either by clicking the circle next to the heading or clicking the (✓) button on the top right corner of the main view. The exact visual representation may appear different.
Interfaces and interactions with the hospital environment
The app can import medical data that originates from a CT or CBCT scanner of the hospital. Recommended is an USB (Type-C) drive, with USB 3.0 "super speed" or faster and at least 256 GB storage capacity, ExFAT formatted.
The app does not use an online connection, all data are stored securely on-device. The software is not intended to be used in an IT network to connect to hospital services.
The app can be used pre- and intraoperatively and uses the iPad camera to scan certain codes and patters during the surgery.
Screening
The screening is basically just a variation of the normal "Create Case" user interface with fewer entries in the sidebar. It supports entering the patient data, choose the surgical side, the target, perform or load the planning, and conclude the anatomical suitability if a pre-operative CT scan of the temporal bone is available. Therefore, the GUI of the "Screening" is a subset of the steps in the normal "Create Case" workflow.
Stand-alone use
If you do not intend to perform a surgery according to to the Instructions for Use — OtoJig System but instead intend to use conCIerge only for visualization & optimal path planning and/or to visualize a virtually (planned) in-plane angle and the off-plane angle towards the cochlea, then you can use the "Screening" feature.
Create a new case
The first item in the sidebar is "Patient". Please enter the patient related information.
Note
It is important to enter the correct patient data to avoid a later mixup. The Patient name, sex and birthday remain visible in the top bar throughout the whole planning and will be provided to compare with the data from an imported DICOM dataset.
Prepare
The software shall be used already in the preparation of the surgery, because it provides a checklist of required and compatible medical devices. For convenience, the applicable warnings and precautions from Instructions for Use — OtoJig System are displayed within these step-by-step instructions as appropriate in each step.
Make sure to read the warnings and precautions which generally apply to the different OtoJig devices (not only the planning software).
In the step "Side", select the side for the surgery (left/right).
In the step "Target", select the target for the planning (either a target in the temporal bone or specifically an inner ear access 🌀).
In the step "Checklist", please go through the checklist to identify the required compatible devices for the selected target.
In the step "Otomat", there are information about preparing the Otomat manufacturing machine for (later) production of an individualized Positioning Jig.
In the step "Nerve monitoring", please confirm to be using facial nerve monitoring for the (planned) surgery
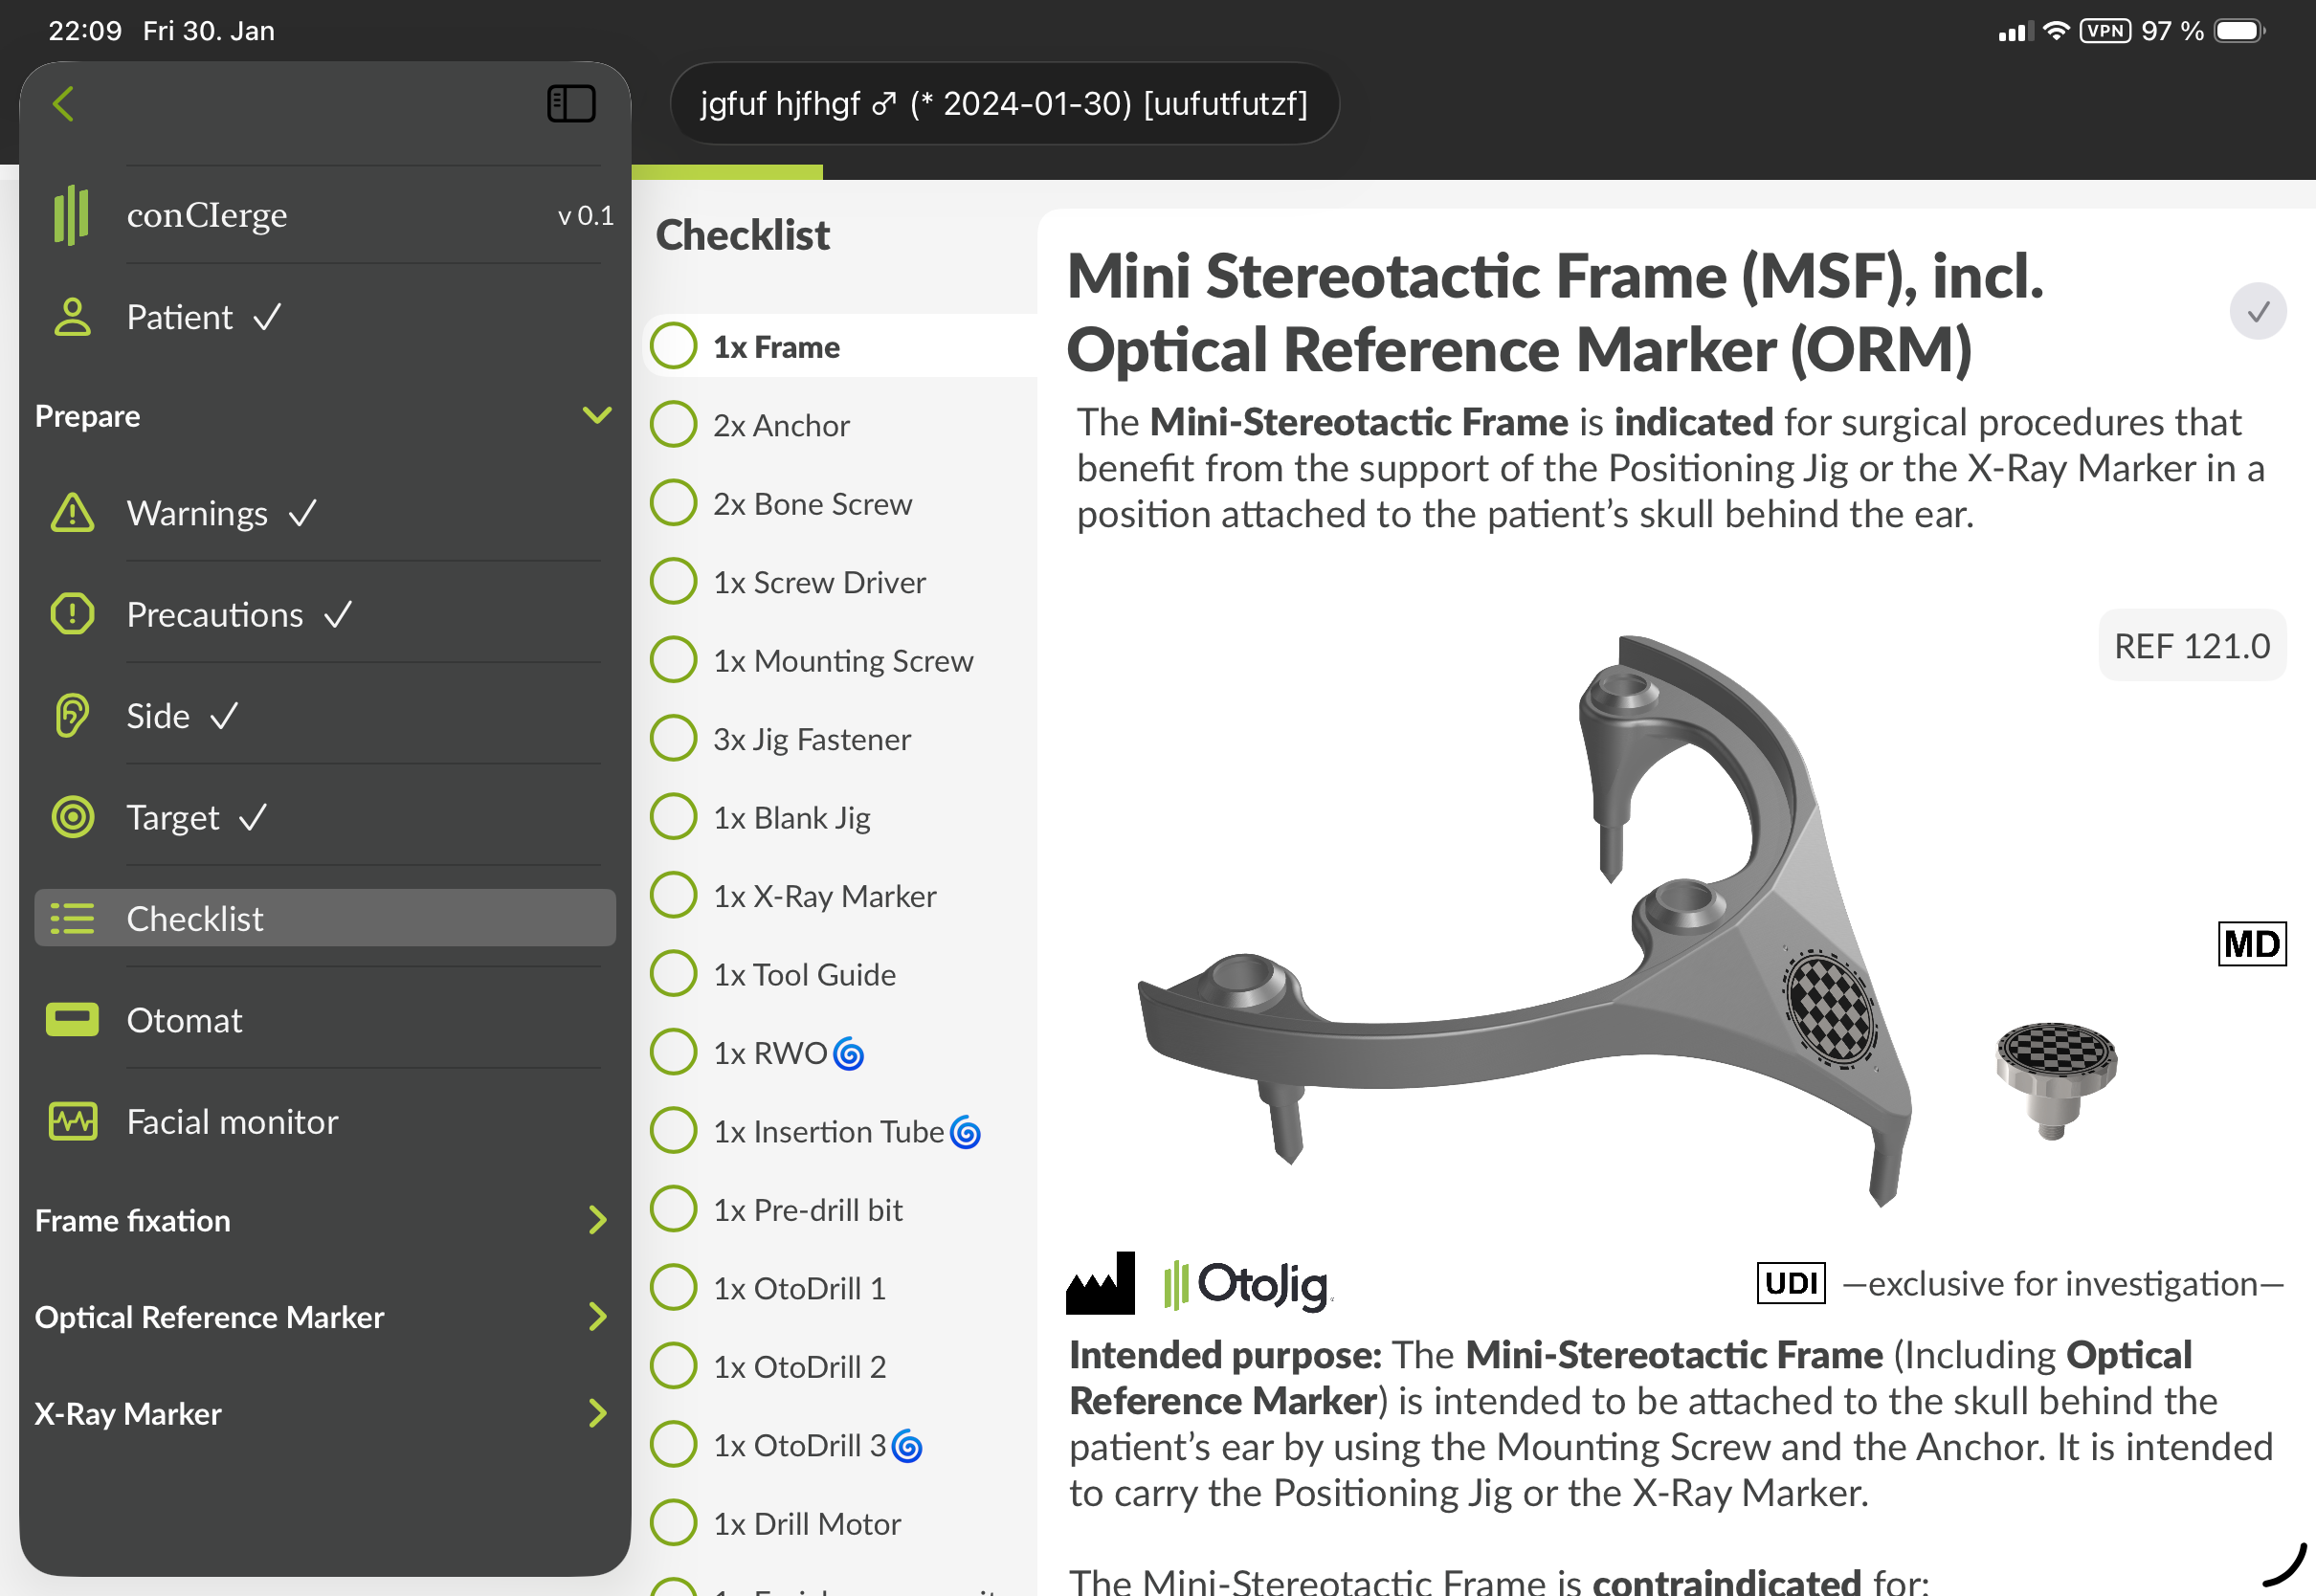
Figure 3: GUI of the step "Checklist" in the "Before surgery" section, showing information to identify each device, the indication and contraindications etc. The exact visual representation may appear different.
Frame fixation
In the section "Frame fixation", there are several steps describing how to fixate the Mini-Stereotactic Frame to the skull.
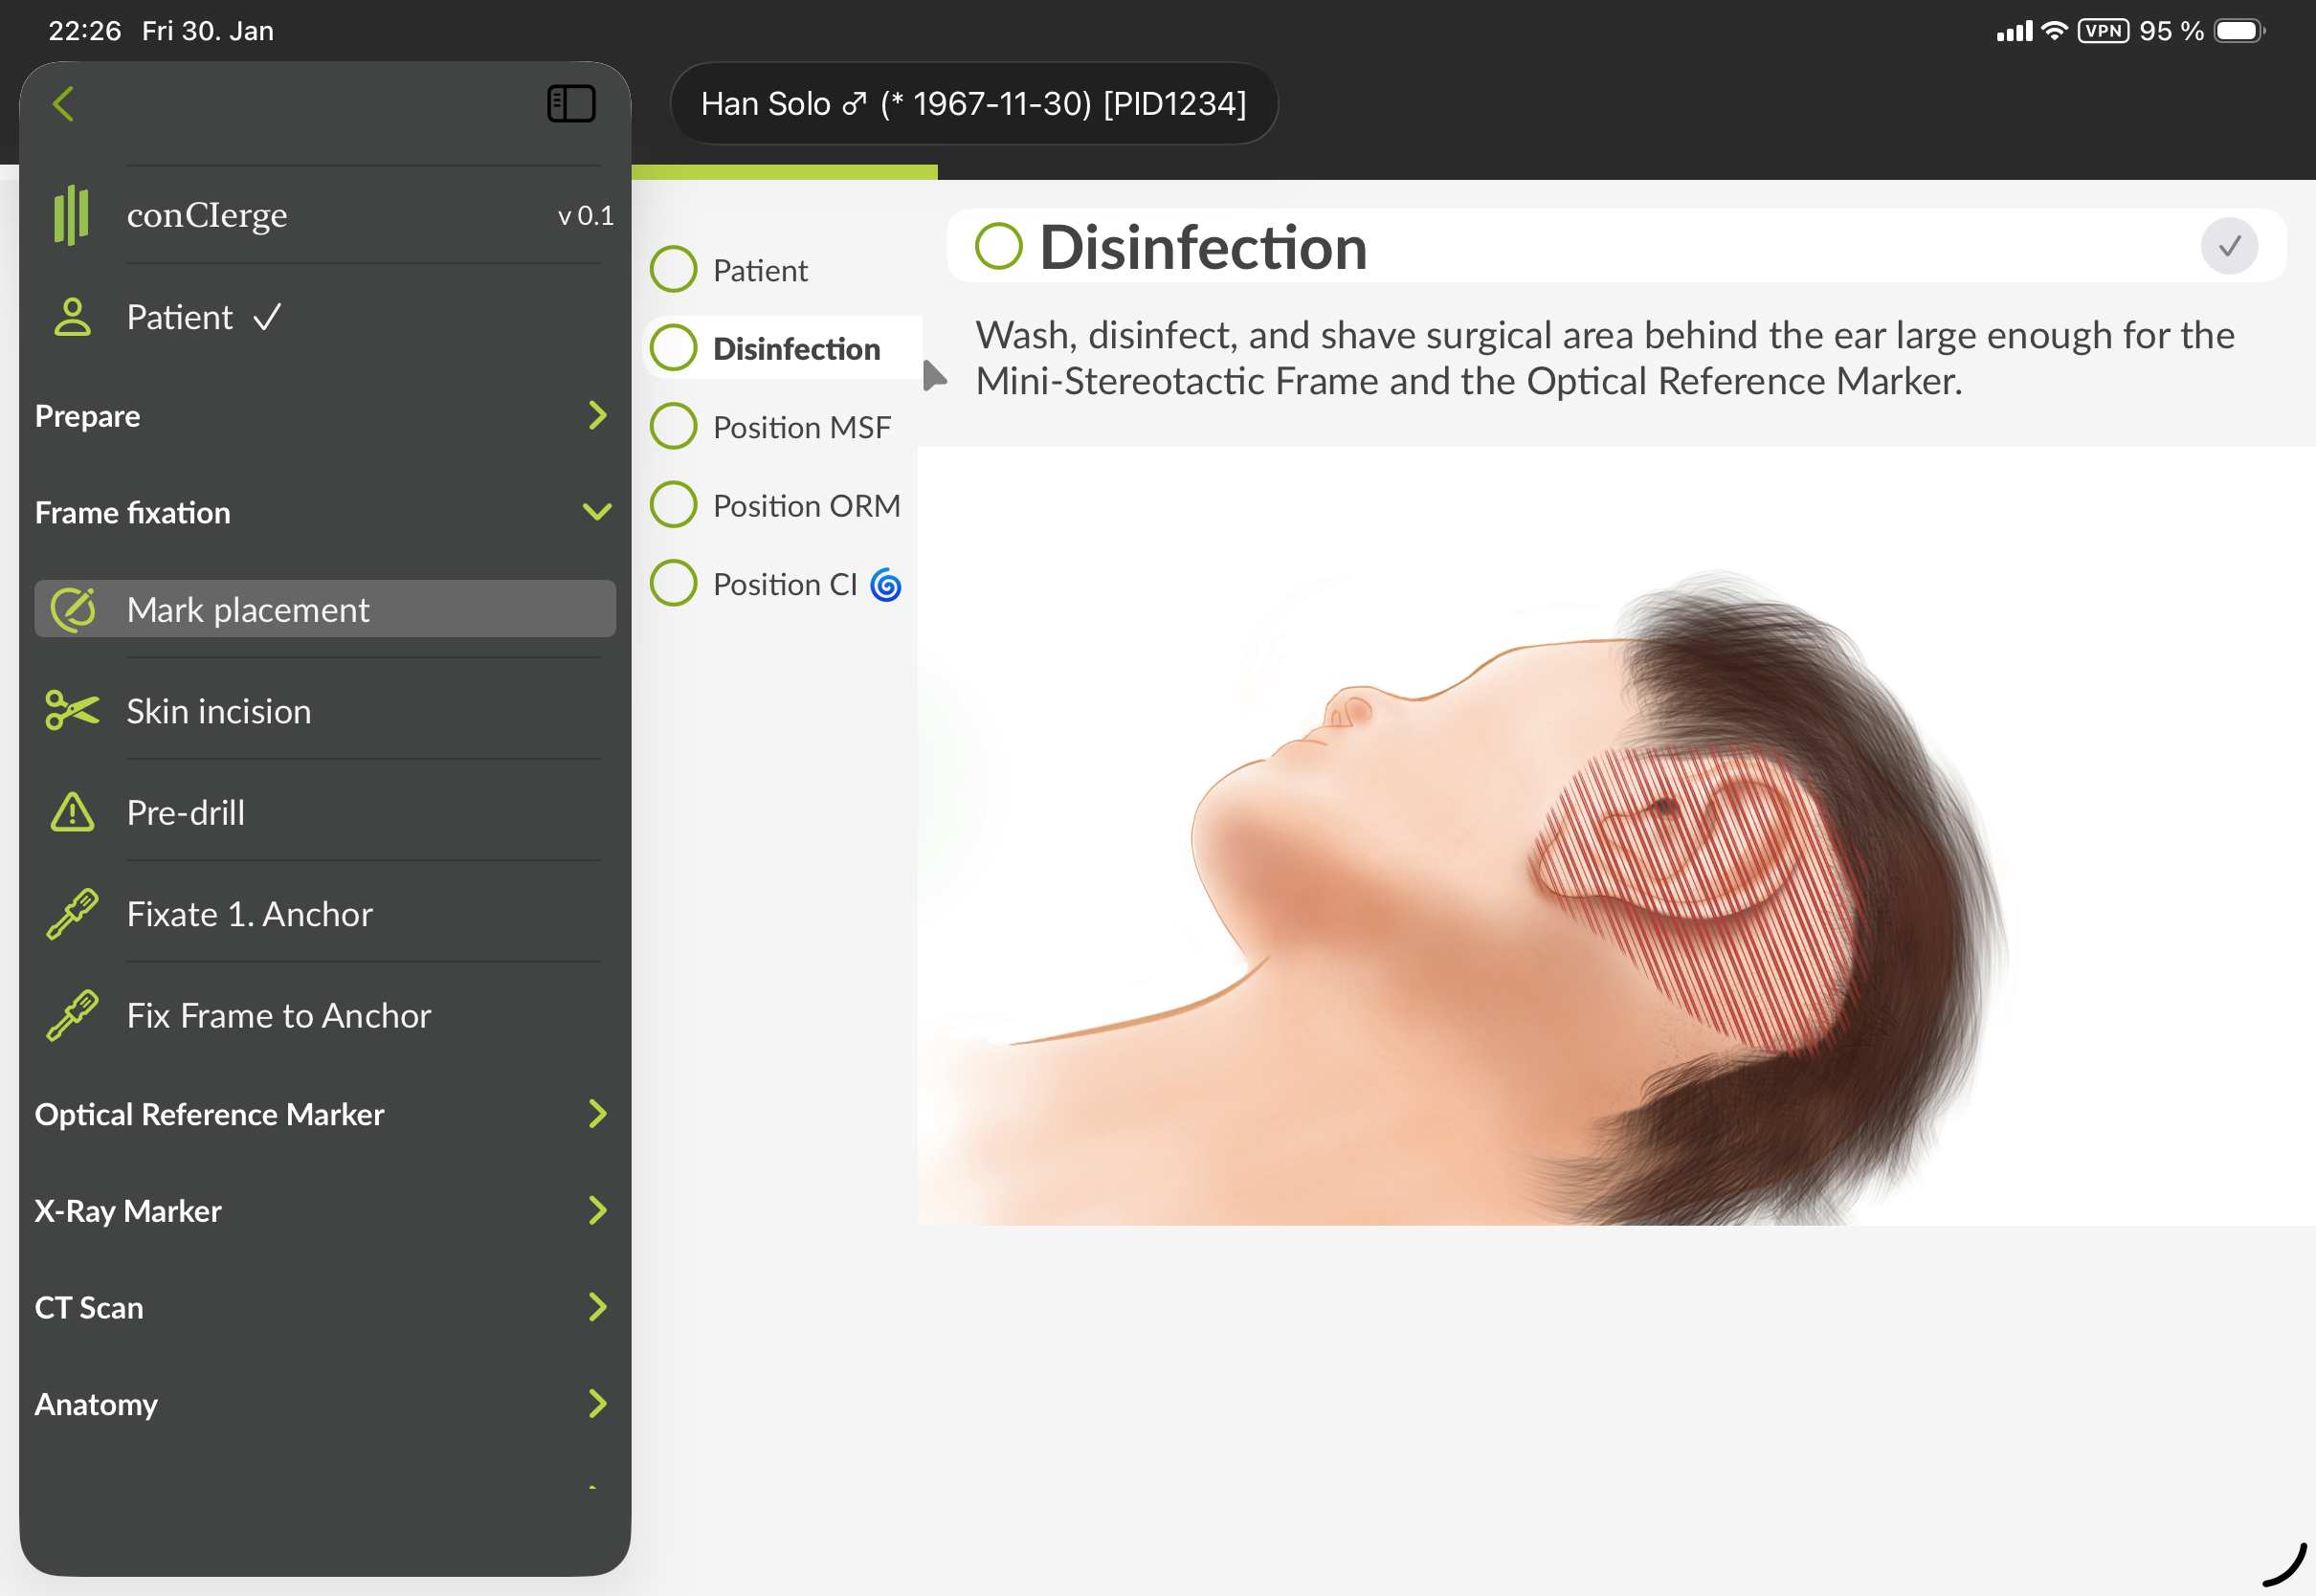
Figure 4: GUI of conCIerge showing the sidebar menu in the section for "Frame fixation". The exact visual representation may appear different.
Optical Reference Marker
In the section "Optical Reference Marker", there are several steps describing how to fixate the Optical Reference Marker to the skull.
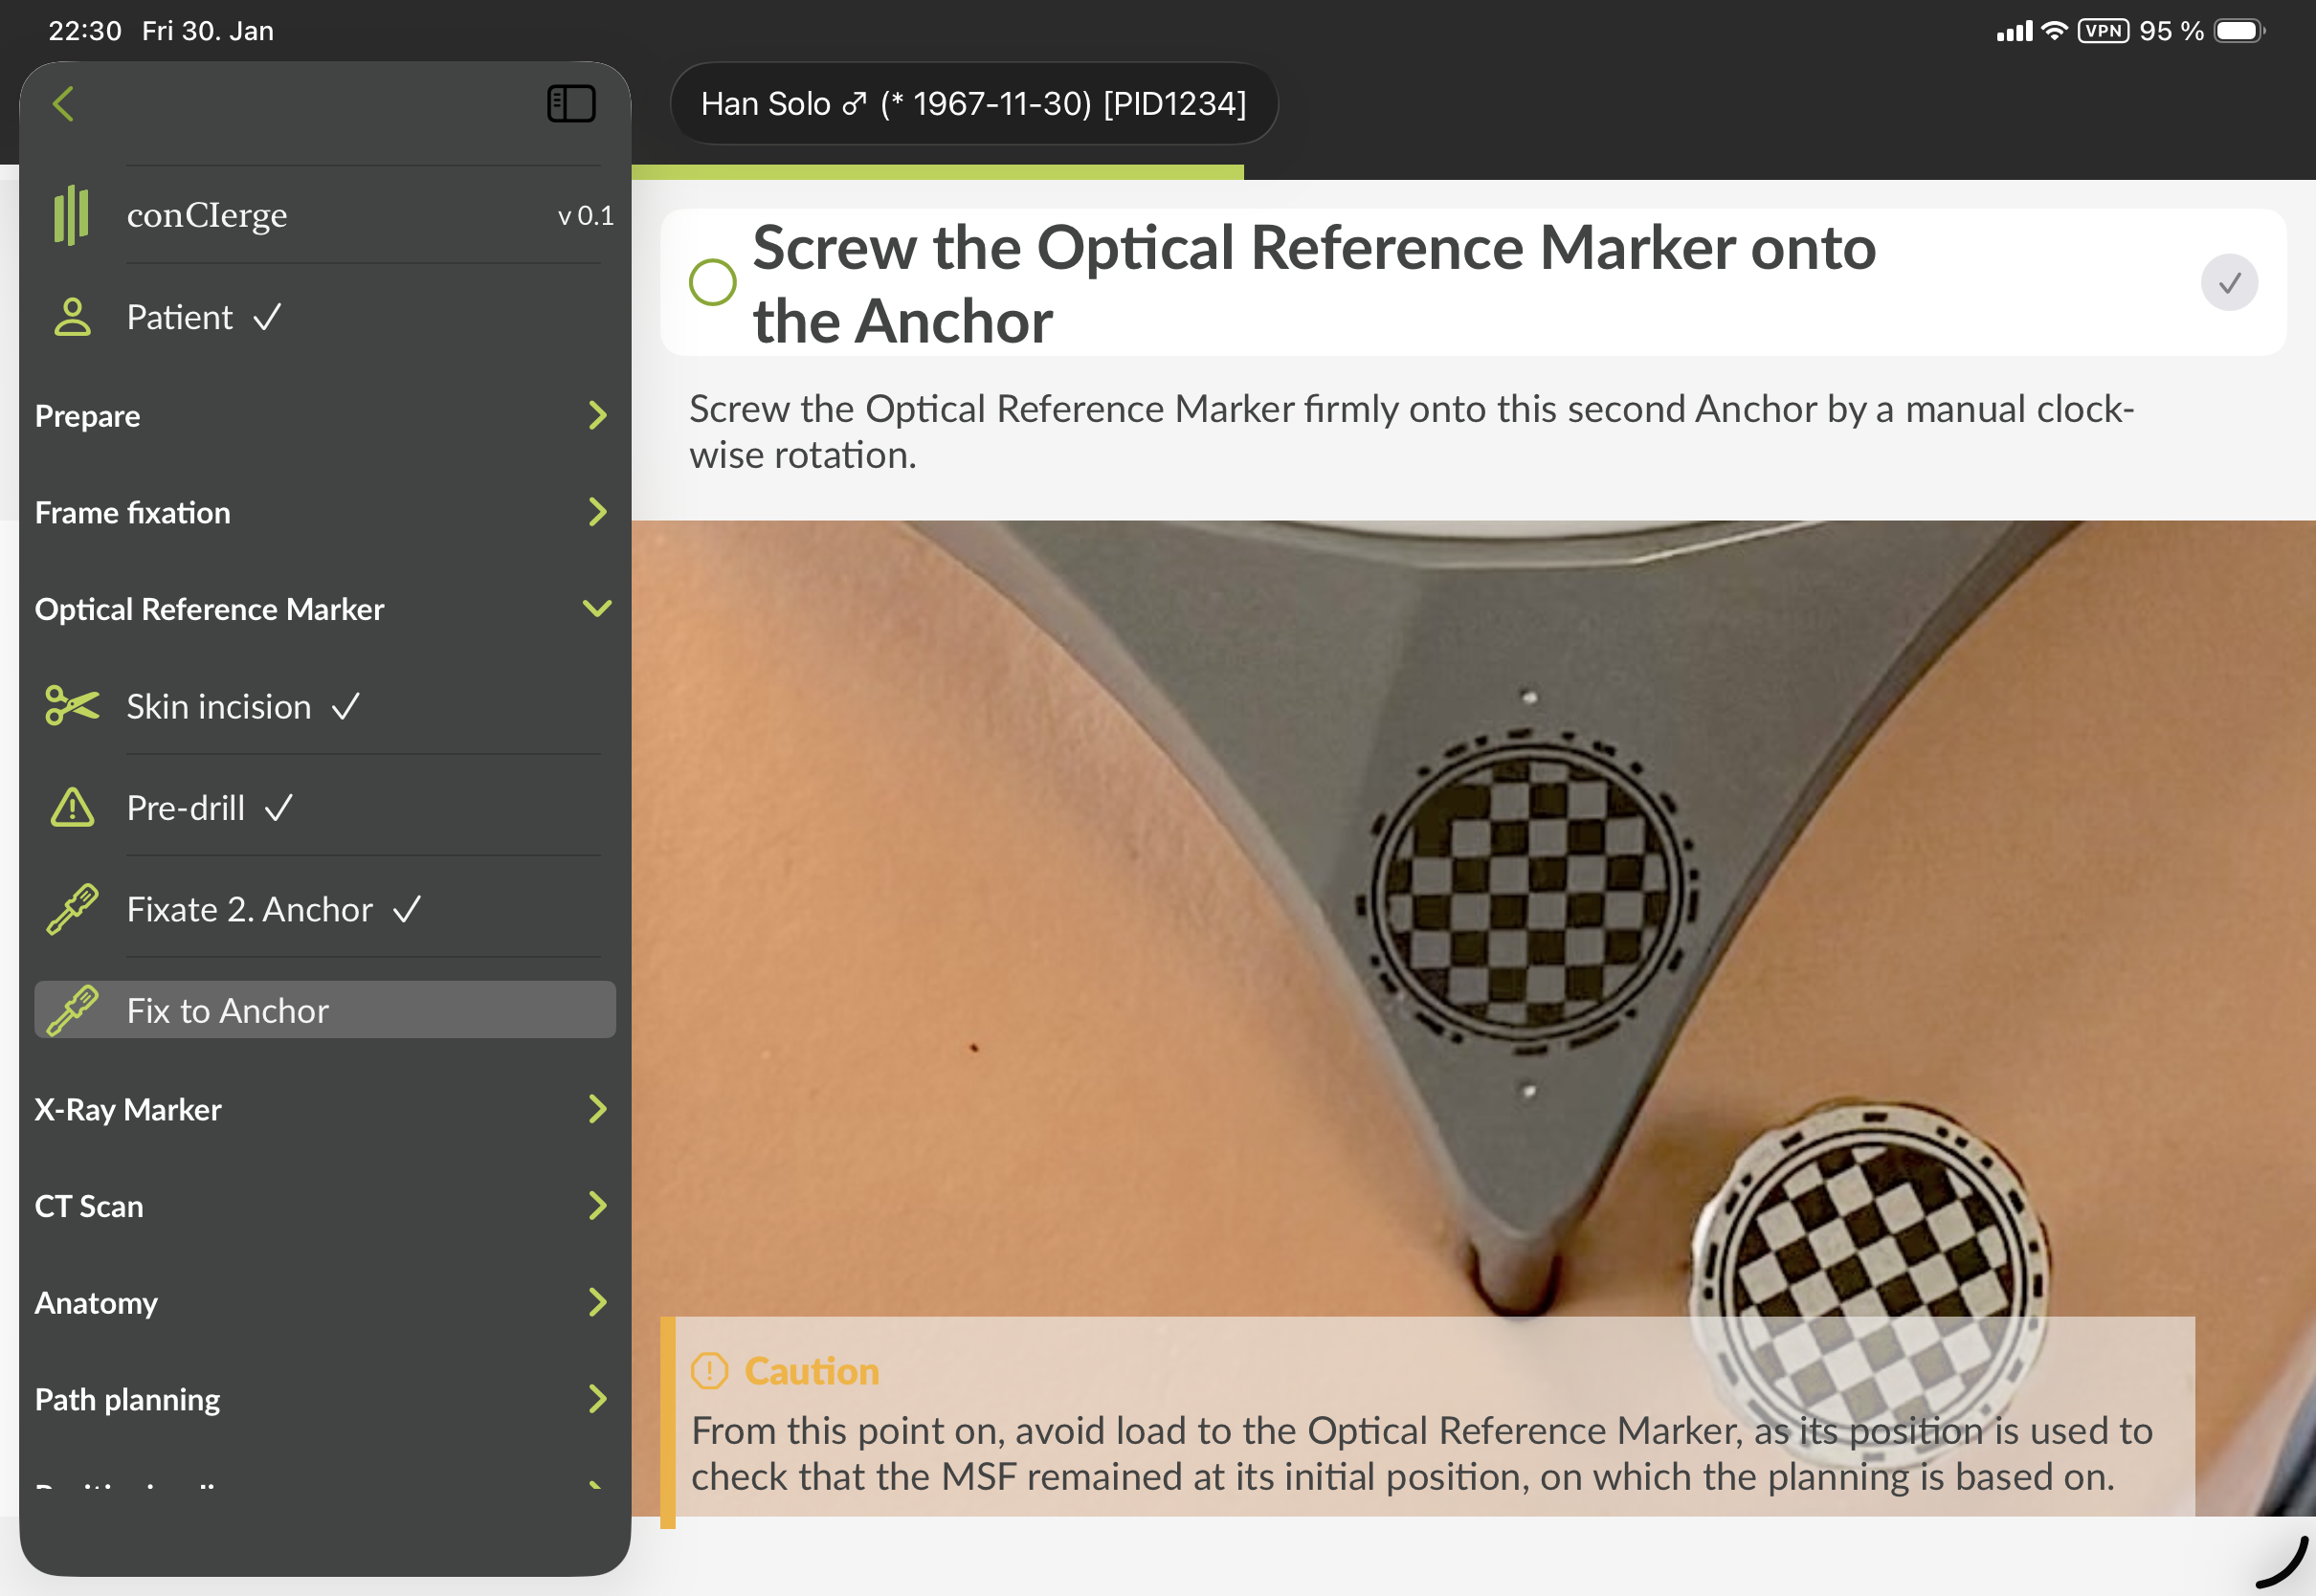
Figure 5: GUI of conCIerge showing the sidebar menu in the section for "Optical Reference Marker". The exact visual representation may appear different.
X-Ray Marker
Once the Mini-Stereotactic Frame and the Optical Reference Marker are fixated, the X-Ray Marker is going to be attached and a reference photo is taken.
In the step "Attach" there are instructions how to mount the X-Ray Marker and secure it with Jig Fasteners.
In the step "Reference photo" please use conCIerge to take picture(s) of the optical markings (on the Mini-Stereotactic Frame and on the Optical Reference Marker).
Note
Make sure the iPad (back) camera lenses are clean and not damaged. Clean dirty camera lenses.
In the step "Scan UDI", please follow the on-screen instructions to take a picture of the UDI data matrix code of the X-Ray Marker.
CT Scan
In the step "Perform", there are instructions on how to perform a CT or CBCT volume scan that fully includes the temporal bone area and the X-Ray Marker.
For the CT scan, use the highest quality setting (bone protocol, if available) for a multi-planar reconstruction. The reconstructed volume has to be a regular grid with 0.3 × 0.3 × 0.3 mm per voxel, or better. Avoid tilting the gantry (offered by some CT devices). Make sure to avoid movement artifacts.
In the step "Import DICOM", there is the option to import (open) a DICOM dataset. Certain quality checks will be performed on the DICOM dataset.
In the step "Remove X-Ray Marker", there are instructions how to remove the X-Ray Marker after the CT Scan.
Anatomy
Based on the CT scan, the segmentation and planning can be performed with a user interface common to most DICOM viewer software. It supports linked orthogonal multi planar reconstruction of the DICOM volume and displaying 3D models and segmentations in 3D and in 2D as outlines. The cut planes of the MPR are colored to represent the view. Each view can be toggled to full screen. The sliders in each 2D view allow to scroll through the slices. If clicked on the slider, a precision movement can be activated where the up/down wedge symbols go one slice(thickness) up/down. Adjusting brightness and contrast (i.e. the windowing) can be adjusted on the corresponding icon in the toolbar. The outlines of the segmentations can be toggled with the eye-shaped icon. The sidebar can be toggled with the leftmost icon in the toolbar. For certain anatomical structures, there are steps in the "Anatomy" sidebar section, that — when clicked — allow to manipulate that specific anatomic structure.
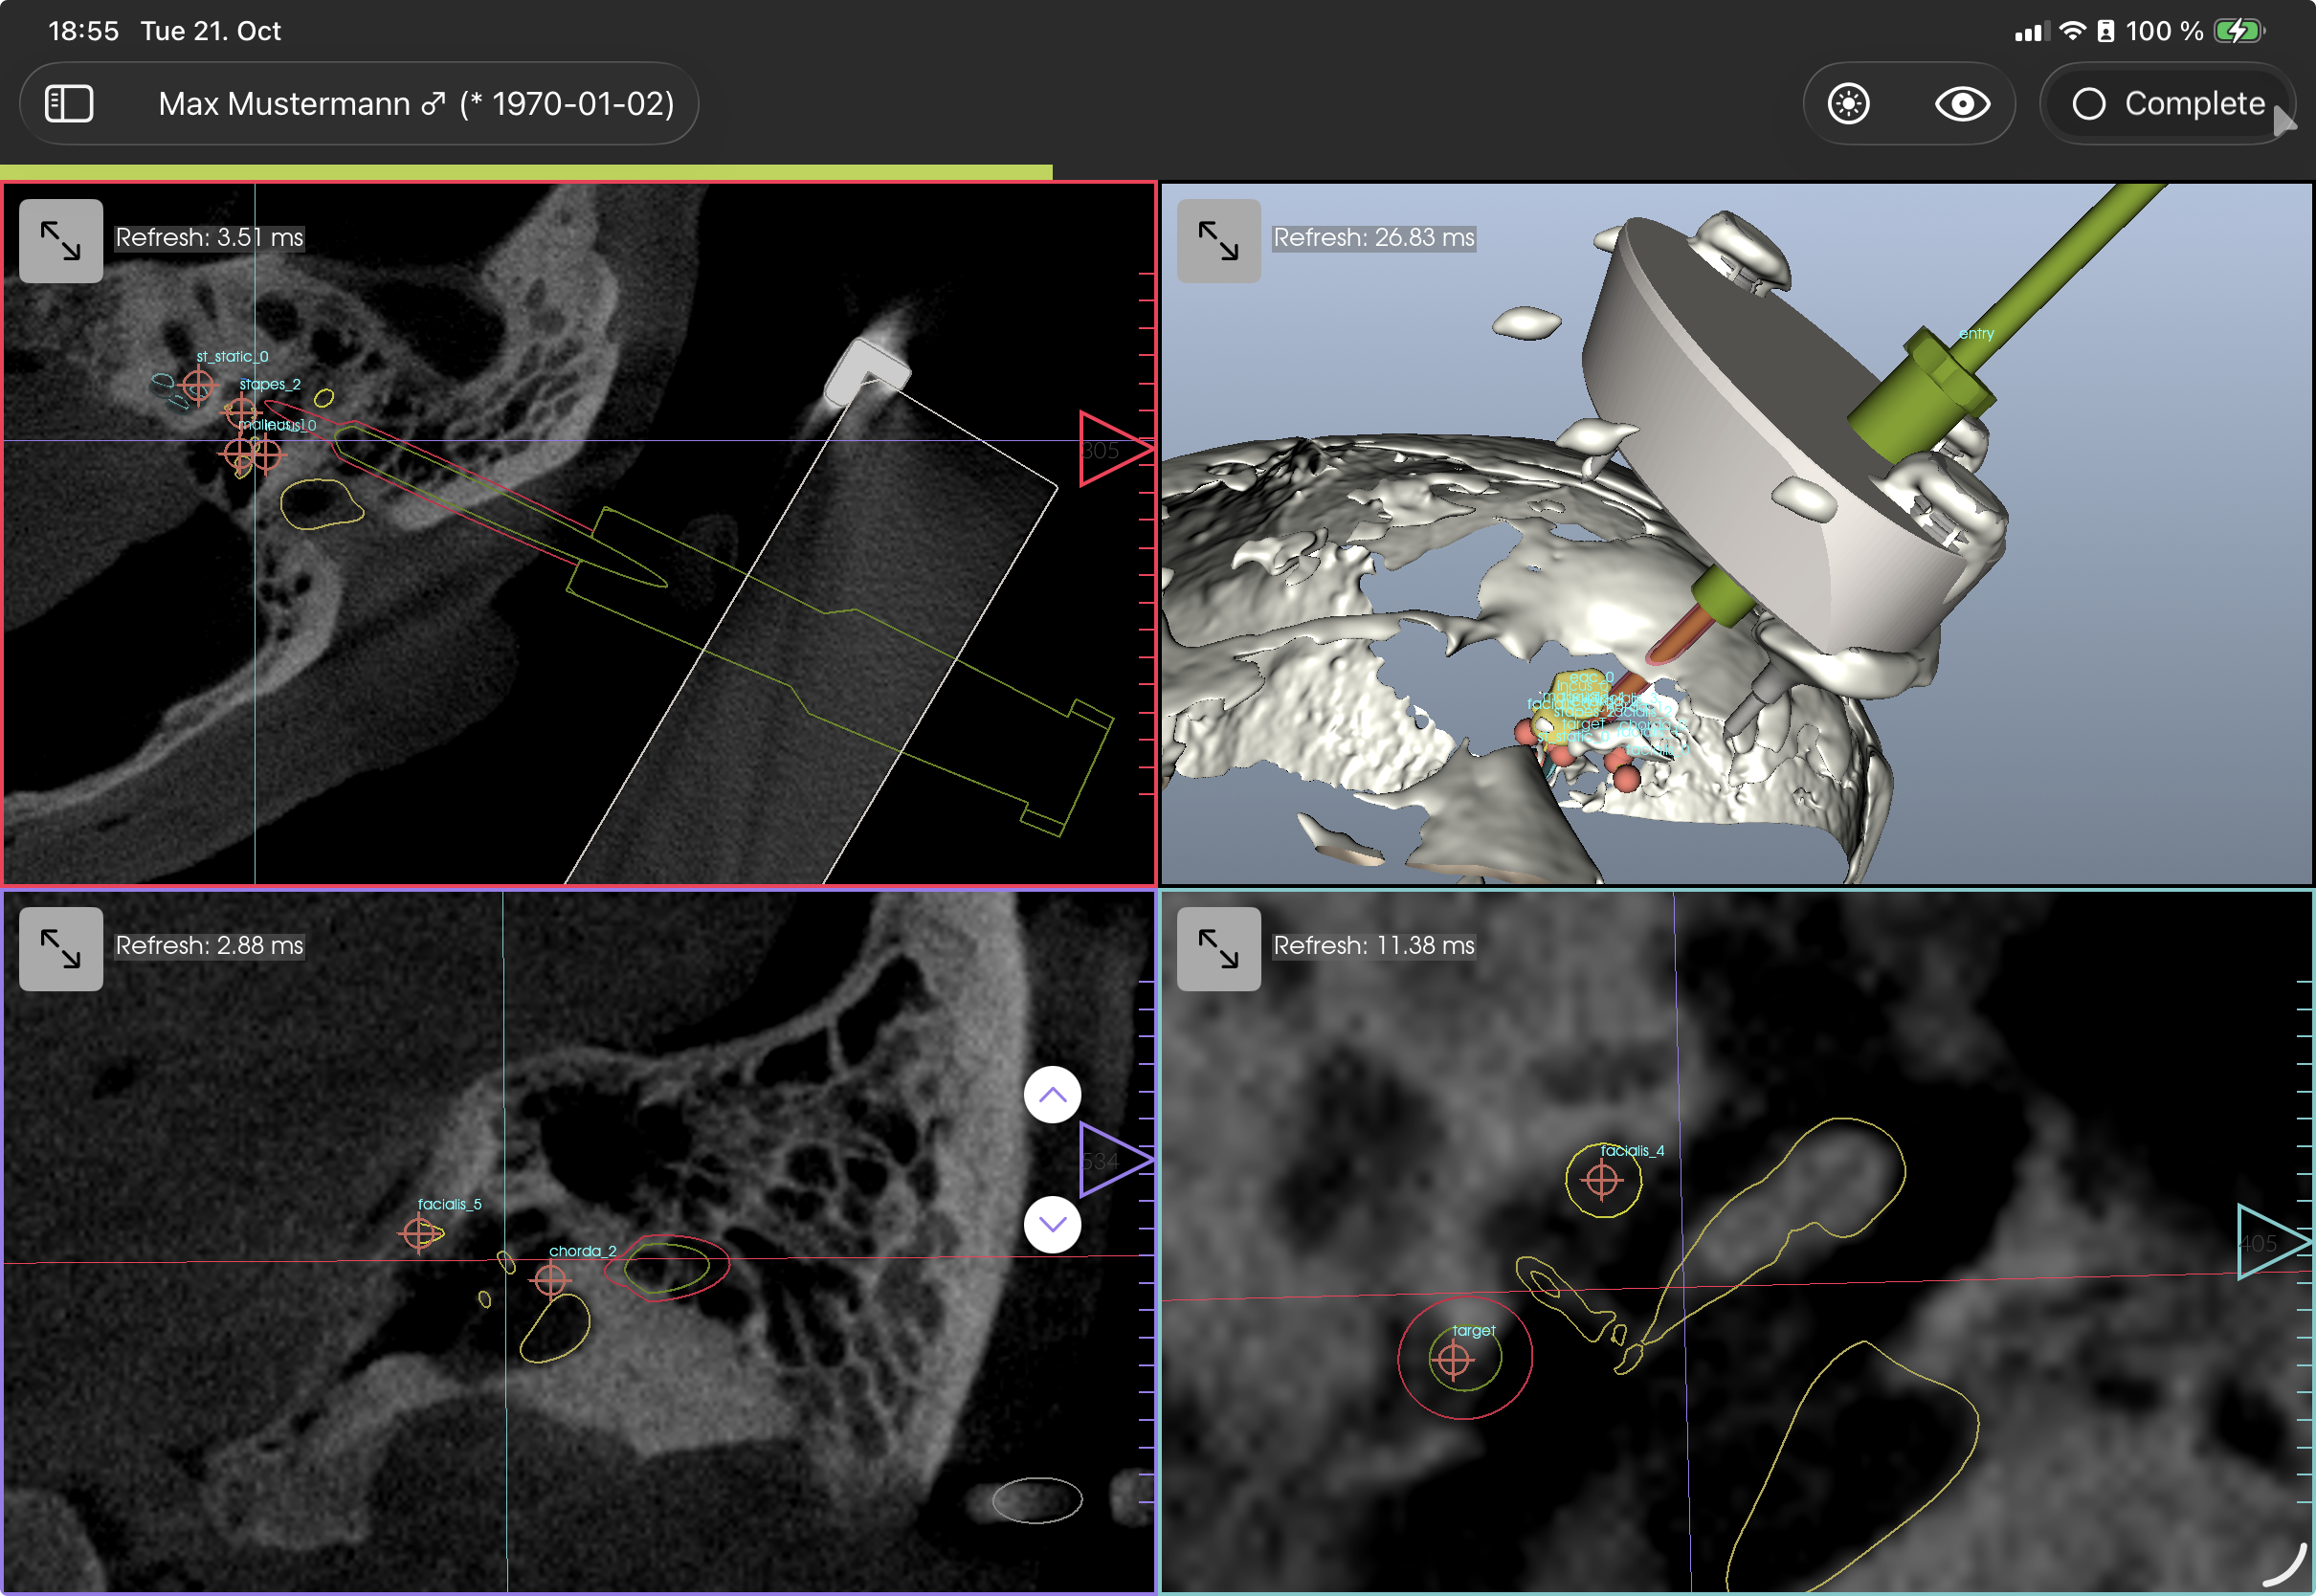
Figure 6: GUI of Anatomy section, showing segmentations and surgical tools. The exact visual representation may appear different.
Path Planning
In this section a path can be planned and the approval of the path (and the segmentations) shall be performed.
In the step "Access path", a path to the designated target can be planned.
In the step "Approval", the correctness of the planning and segmentation has to be confirmed. A distinctive brutalist GUI is used to put attention on this crucial step.
Only trained ENT surgeons are allowed to approve a planning. The training has to be provided or authorized by OtoJig.
The approval view consists of several steps of pre-rendered cut planes based on the segmentations and on the planned path.
Please follow the instructions closely.
The (?) icon provides context sensitive help.
If certain preconditions are not fulfilled (including minimal distances to certain risk structures not kept, volume data resolution insufficient, X-Ray Marker localization insufficient etc.), the user is informed at the first page of the approval views.
The transparently drawn objects are projections and can represent that parts are before or behind the current image cut plane. The outlines are within the plain.
The eye-symbol allows to toggle the outline/projection of the current object.
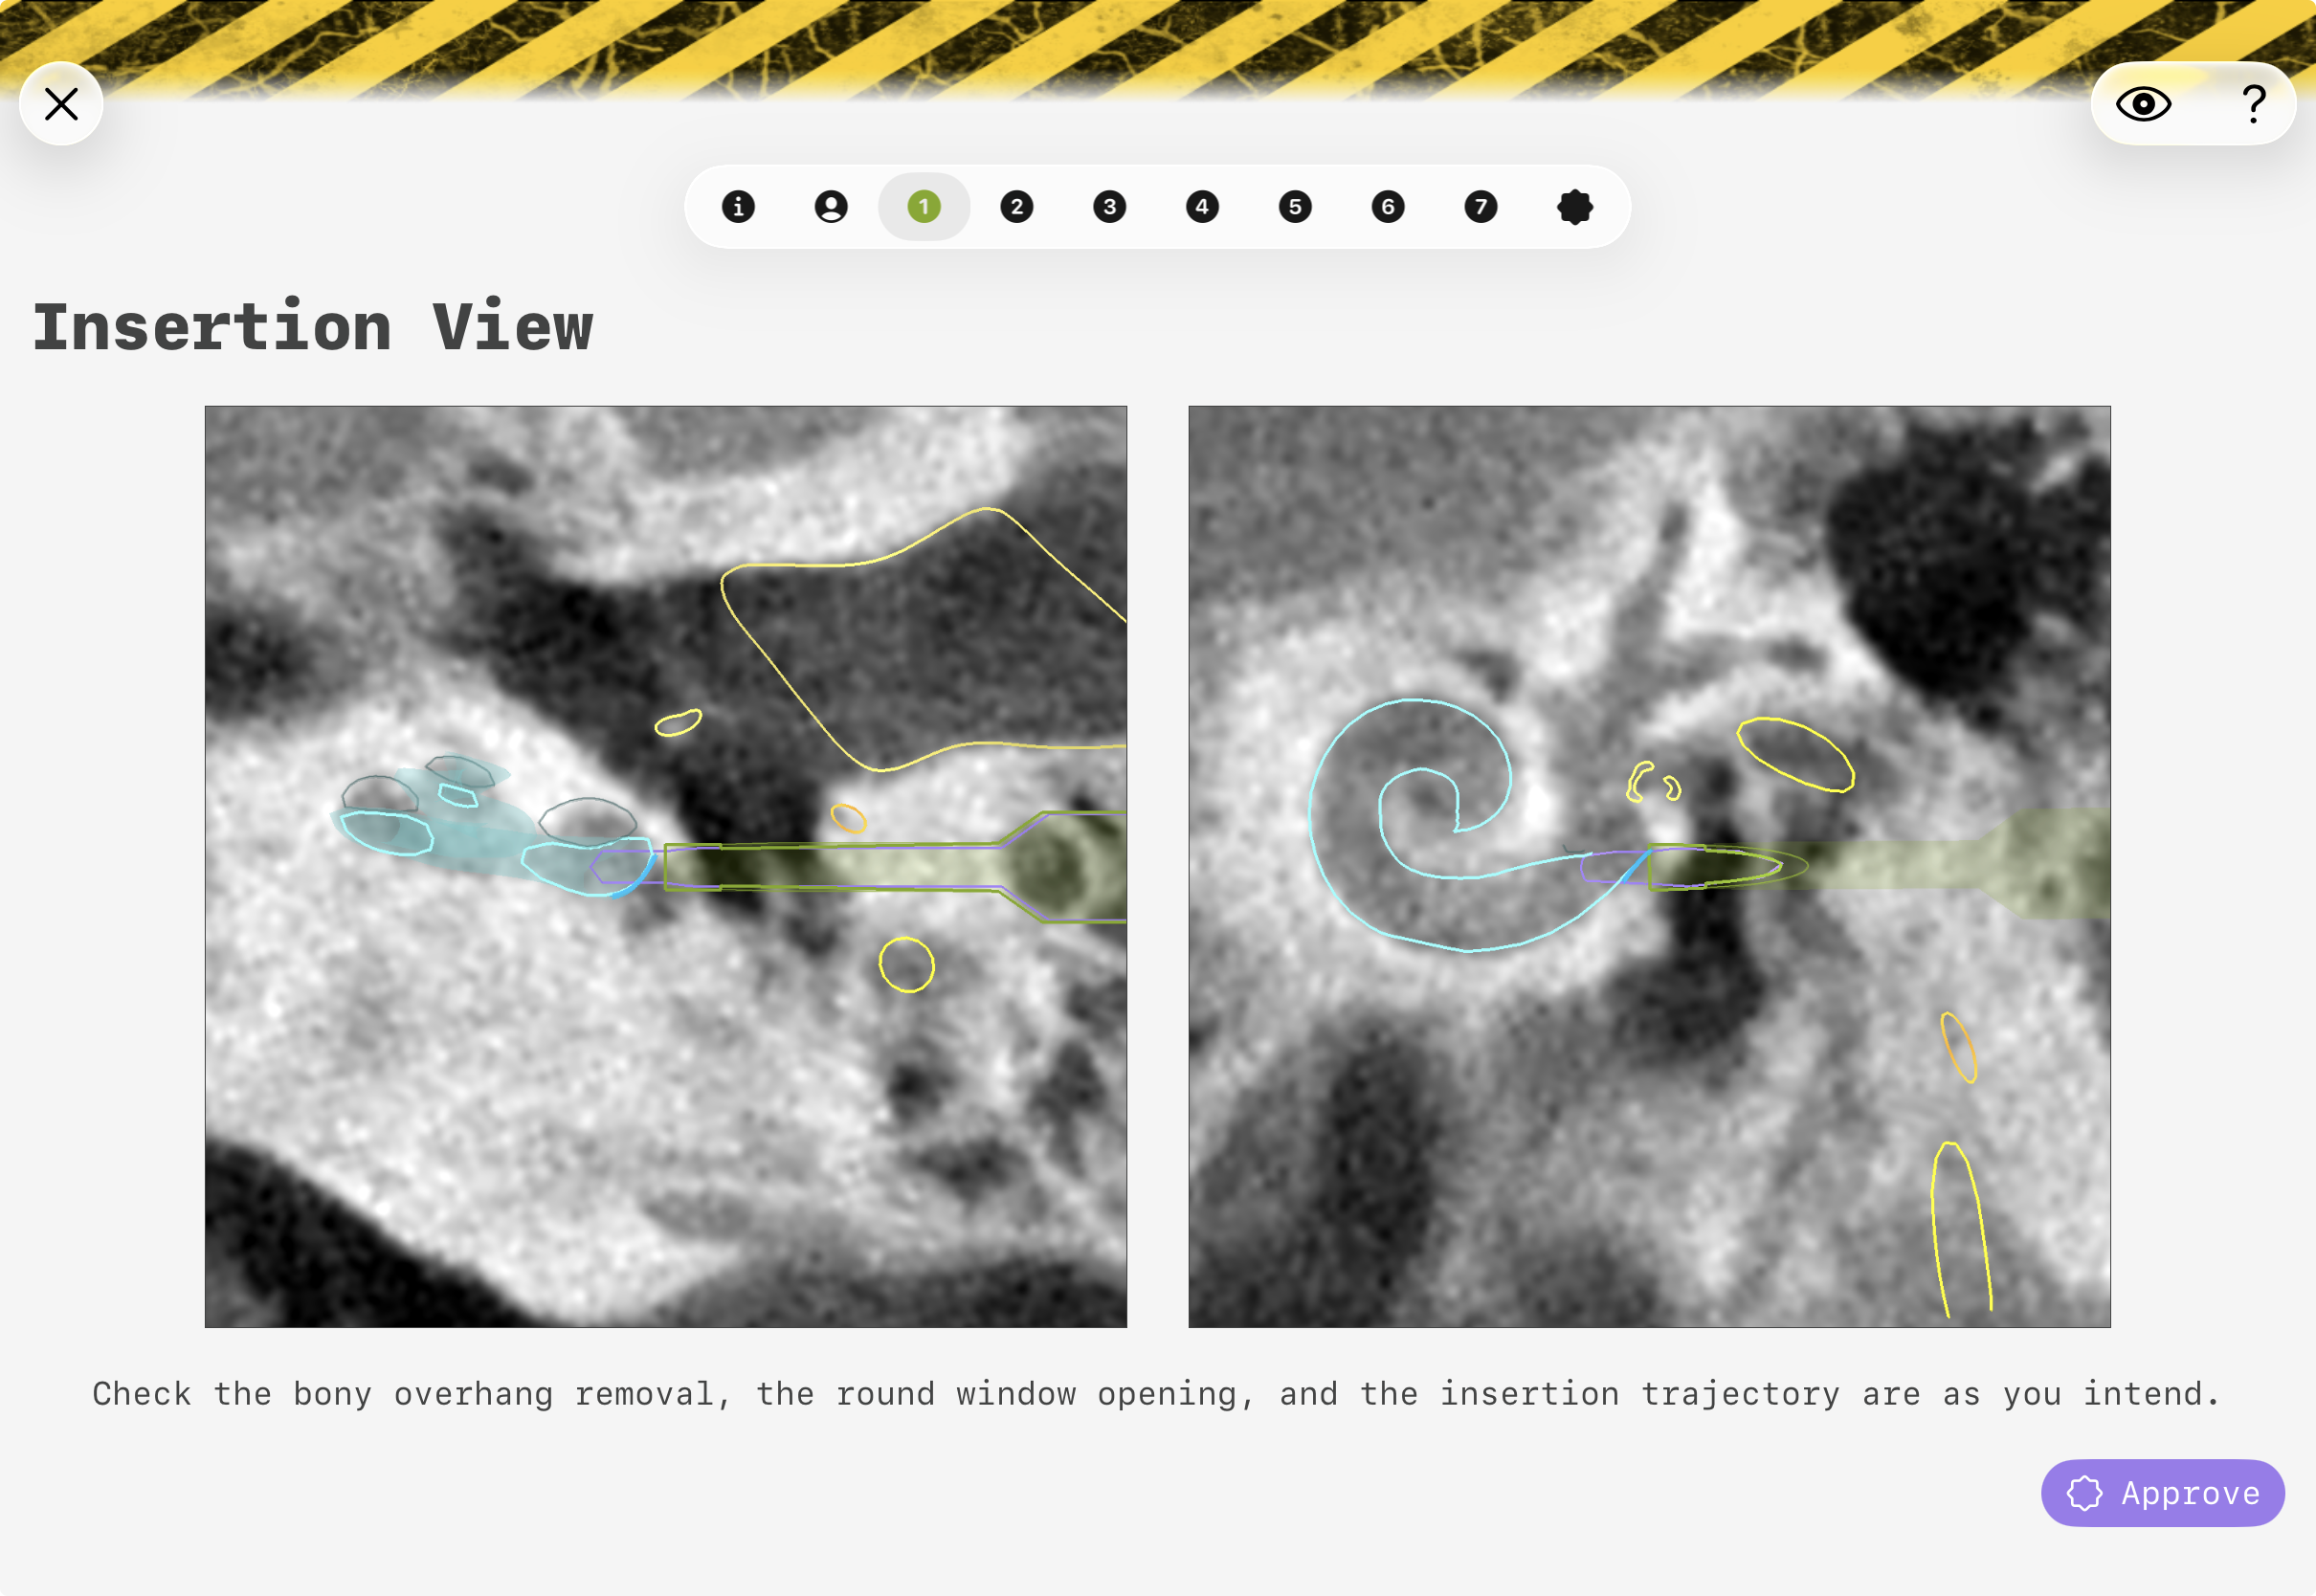
Figure 7: GUI of the approval view(s) of conCIerge. The exact visual representation may appear different.
In the step "Export path", the path can be exported for production of an individualized Positioning Jig.
This is only possible after successful approval (see previous step).
Positioning Jig
In this section the individualized Positioning Jig shall be attached to the Mini-Stereotactic Frame.
In the step "Production" an Otomat machine shall be used to individualize a Blank Jig into a patient specific Jig that matches the planning of the current case.
The Otomat (and the Otomatic app) provide a "production receipt".
The production receipt shall be imported to confirm integrity and authenticity of the produced Jig.
In the step "Skin incision", perform the skin incision that is to be used for the following minimally-invasive drilling.
In the step "Insert Tool Guide", follow the instructions how to insert the Tool Guide into the Jig.
In the step "Mount", follow the instructions how to attach and fixate the individualized Positioning Jig with Jig Fasteners.
In the step "Verification photo", follow the instructions and take a photo of the optical patterns imprinted on the Mini-Stereotactic Frame and Optical Reference Marker.
In the step "Scan JigID", please scan the QR-code of the Jig to assure that this is the Positioning Jig that was individualized for this patient.
Drilling
In this section the minimally invasive drilling shall be conducted.
Make sure to follow the instructions of the recommended drilling strategy as displayed in the app and described in the "Instructions for Use — OtoJig System"!
In the step "OtoDrill 1", please follow the instructions how to perform the first drilling step.
In the step "Verification photo", follow the instructions and take a photo of the optical patterns imprinted on the Mini-Stereotactic Frame and Optical Reference Marker.
In the step "OtoDrill 2", please follow the instructions how to perform the second drilling step.
in the step "OtoDrill 3", if an inner ear access has been chosen as the target, please follow the instructions to remove the bony overhang of the inner ear.
Implanting
In this sections the opening of the inner ear and the covering of the access path with the Insertion Tube shall be conducted.
In the step "Grove", please follow the recommendation on how to create a grove which may be used to fixate e.g. an electrode lead of an cochlear implant at the entrance of the minimally invasive access path.
In the step "Open cochlea", please follow the instruction on how to use the Round Window Opener to open the round window.
In the step "Remove devices", follow the instructions to remove all devices from the patient.
In the step "Insertion", please follow the instructions on how to use the Insertion Tube to cover the access tunnel to the inner ear and insert and fixate a cochlear implant electrode. In the final step, the Insertion Tube shall be removed and the surgery continued just like a conventional CI surgery.
Glossary of symbols
| Symbol | Title | Description | Reference |
|---|---|---|---|
 | Manufacturer | Indicates the medical device manufacturer | ISO 15223-1 |
 | Country of manufacture | To identify the country of manufacture of products | ISO 15223-1 |
 | Consult instructions for use or consult electronic instructions for use | Indicates the need for the user to consult the instructions for use | ISO 15223-1 |
| ⚠️ | Caution | Indicates that caution is necessary when operating the device or control close to where the symbol is placed, or that the current situation needs operator awareness or operator action in order to avoid undesirable consequences | Unicode |
 | Medical device | Indicates the item is a medical device | ISO 15223-1 |
 | Unique device identifier | Indicates a carrier that contains unique device identifier information | ISO 15223-1 |
 | CE marking | ‘CE marking’ means a marking by which a manufacturer indicates that a device is in conformity with the applicable requirements set out in Regulation (EU) 2017/745 and other applicable Union harmonization legislation providing for its affixing | Regulation (EU) 2017/745 |
| ℞only | Prescription use only | Caution: Federal law restricts this device to sale by or on the order of a physician | 21 CFR 801.109 (FDA) |
 | Health Industry Bar Code | The HIBC emblem is a sign for optical marking linear and 2-dimensional bar codes for indicating that the code contains the standard HIBC structure. | HIBC suggestion |
Contact & legal
Reporting of serious incidents
Any serious incident that has occurred in relation to a device should be reported to the manufacturer and the competent authority of the Member State in which the user and/or patient is established. Serious incident means any incident that directly or indirectly led, might have led or might lead to any of the following:
the death of a patient, user, or other person,
the temporary or permanent serious deterioration of a patient’s, user’s or other person’s state of health, or
a serious public health threat.
Use the following contact for reporting of serious incidents: reporting@otojig.com or call +49 511 53859999
Contact
Address:
OtoJig GmbHFeodor-Lynen-Straße 3530625 HannoverGermany
Email: hello@otojig.com
The pictures provided in this material are for illustration purposes only and may not represent the actual design of the app. The trademarks used herein are trademarks of OtoJig GmbH.