Instructions for Use — OtoJig System
℞only
The latest versions of all instructions for use are available at:
https://otojig.com/IFU/.
Version of this document: v0.4, issued 2026-01-06, OtoJig GmbH. All rights reserved.
Description and Identification of Devices
The OtoJig procedure involves a number of medical devices which, when inter-connected or combined, are intended to achieve the following medical purpose:
The OtoJig system is intended to create a minimally invasive surgical tunnel in the temporal bone and to provide a covered access to the inner ear.
Healthcare Professionals can verify the suitability of the OtoJig devices by consulting this instructions for use. The selection of corresponding software and accessories is limited to the following lists of OtoJig devices and compatible 3rd-party devices.
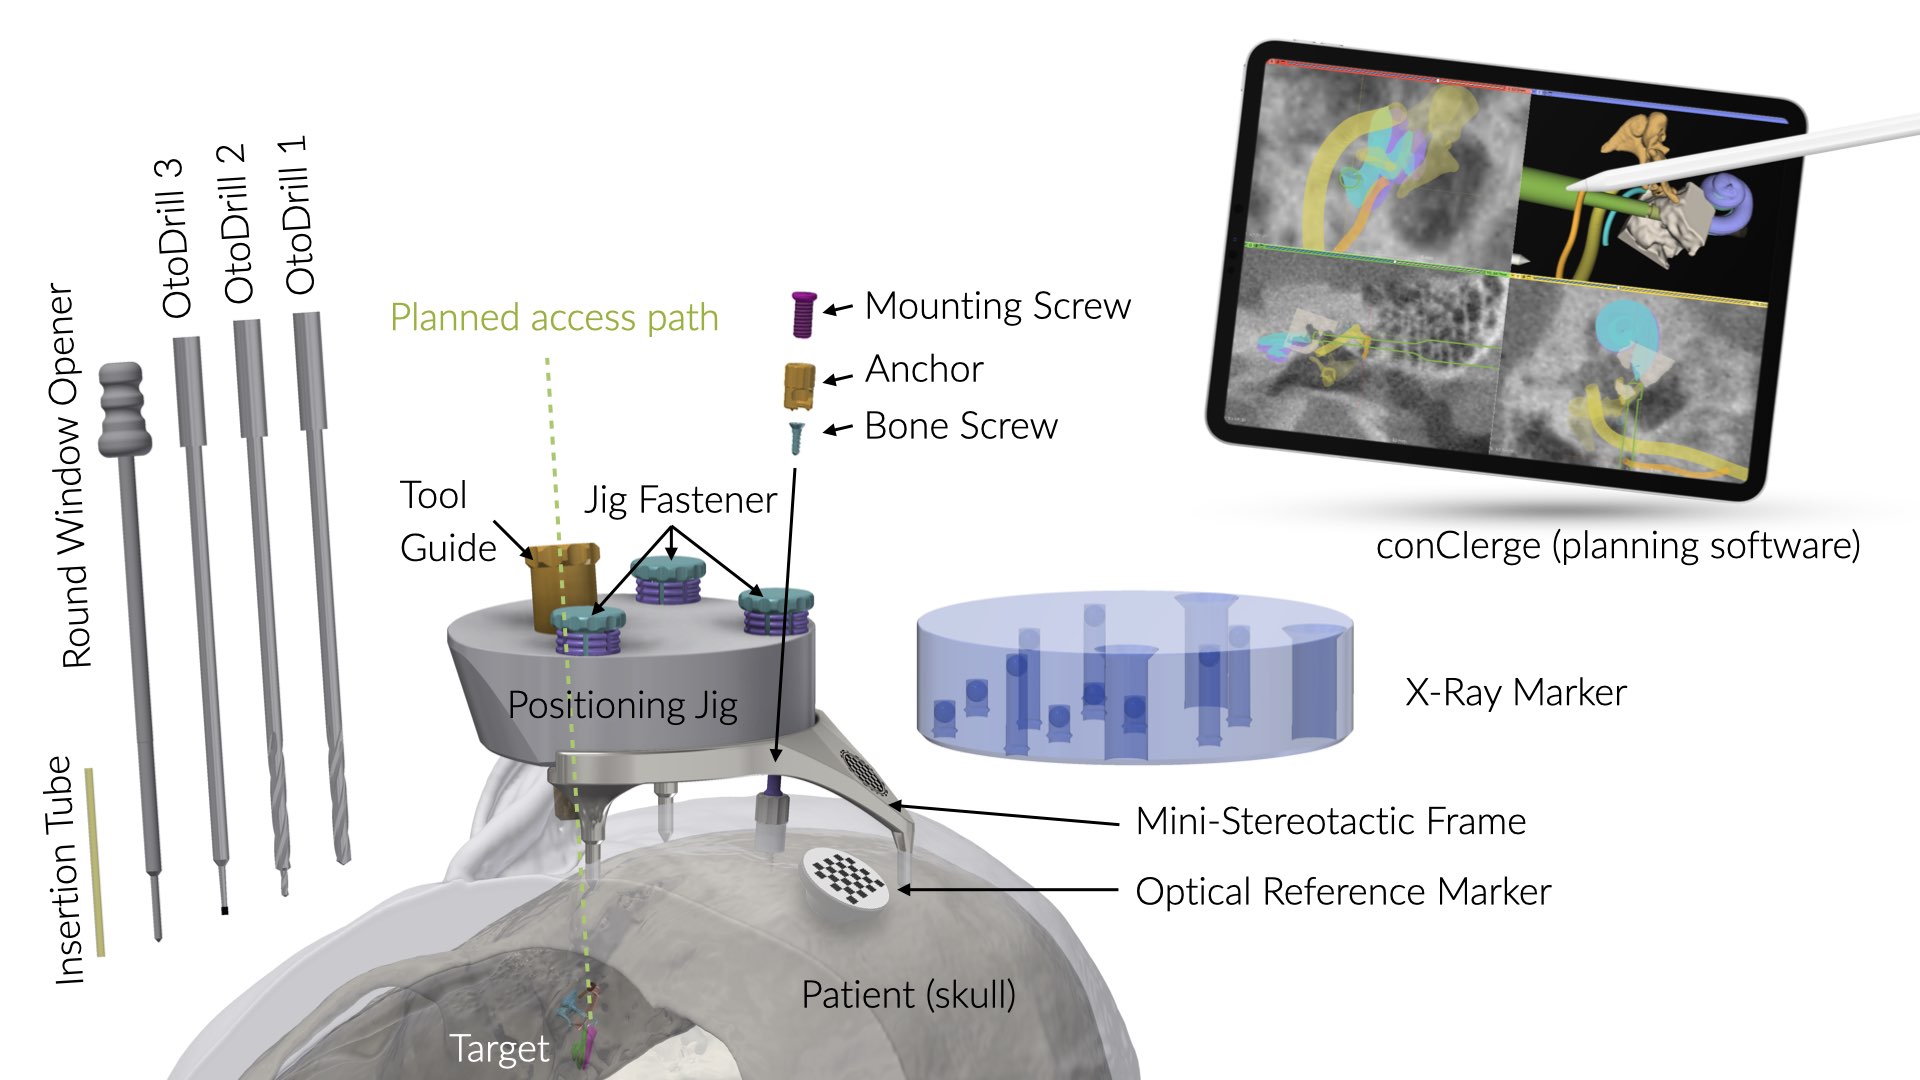
OtoJig System
The OtoJig System includes the following OtoJig and third-party devices listed below. The mutual compatibility of the devices has been verified in accordance with the manufacturer's instructions, and all required activities have been performed in accordance with those instructions.
OtoJig Devices
| Device name | Manufacturer | Article Number |
|---|---|---|
| Mini-Stereotactic Frame (MSF) | OtoJig GmbH | REF 121.0 |
| Optical Reference Marker (part of the MSF) | OtoJig GmbH | REF 121.0 |
| Anchor | OtoJig GmbH | REF 101.0 |
| Mounting Screw | OtoJig GmbH | REF 110.0 |
| Jig Fastener (Shell and Pin) | OtoJig GmbH | REF 150.0 |
| Tool Guide | OtoJig GmbH | REF 161.1 |
| Positioning Jig | OtoJig GmbH | REF 131.0 |
| Round Window Opener | OtoJig GmbH | REF 170.0 |
| Insertion Tube | OtoJig GmbH | REF 180.0 |
| X-Ray Marker | OtoJig GmbH | REF 141.0 |
| conCIerge (planning software) | OtoJig GmbH | v1.* |
Warning
Only combine devices as specified in this IFU. Any other combination of devices is not permitted and can result in injury to the patient or user.
Third-Party Devices
| Manufacturer | Name | Device | Article Number(s) |
|---|---|---|---|
| KLS Martin SE & Co. KG | Bone Screw | maxDrive®, screw, ⌀ 2.0 mm, length 6 mm | 25-872-06-09 (pack of 5)25-872-06-61 (piece)25-872-06-71 (piece, sterile)25-872-06-75 (pack of 5, sterile) |
| KLS Martin SE & Co. KG | Emergency Bone Screw | maxDrive®, screw, ⌀ 2.3 mm, length 6 mm | 25-873-06-09 (pack of 5)25-873-06-71 (piece, sterile)25-873-06-75 (pack of 5, sterile) |
| KLS Martin SE & Co. KG | Screw driver blade | Screw driver blade MaxDrive 2.0/2.3 mm, L | 25-486-97-07 |
| Gebr. Brasseler GmbH & Co. KG | OtoDrill 11 | Twist drill round shank ⌀ 3.00 mmS27243.501 | REF 191.1ID 10029330 |
| Gebr. Brasseler GmbH & Co. KG | OtoDrill 21 | Twist drill round shank ⌀ 1.30 mmS27244.501 | REF 192.1ID 10029331 |
| Gebr. Brasseler GmbH & Co. KG | OtoDrill 31 | Bur, cylindrical round shank ⌀ 1.23 mmND0404.013 | REF 193.1ID 10029332 |
| Gebr. Brasseler GmbH & Co. KG | Pre-drill Bit | Twist drill round shank ⌀ 1.5 mmS27245.035 | REF 194.0ID 10029329 |
Warning
Only use the above listed bone screws in combination with the Anchor (REF 101.0).
Materials, Supplied Condition, and Reusability
The table below lists the materials and substances from which the OtoJig devices are made, the supplied condition, and the reusability. All (hardware) devices are to be used in sterile condition.
| Device | Material | Direct contact with tissue | Duration of body contact | Supplied condition | Reusability |
|---|---|---|---|---|---|
| Mini-Stereotactic Frame (MSF) | Titanium alloy Ti6Al4V ISO 5832-3 | Yes | Short term | non-sterile | reusable (50x) |
| Optical Reference Marker (part of the MSF) | Titanium alloy Ti6Al4V ISO 5832-3 | Yes | Short term | non-sterile | reusable (50x) |
| Anchor | Titanium alloy Ti6Al4V ISO 5832-3 | Yes | Short term | non-sterile | single use |
| Mounting Screw | Titanium alloy Ti6Al4V ISO 5832-3 | No | Short term | non-sterile | single use |
| Jig Fastener (Shell and Pin) | Titanium alloy Ti6Al4V ISO 5832-3 | No | Short term | non-sterile | single use |
| Tool Guide | Chromium stainless steel: 1.4112 (EN 10027-2) | No | Short term | non-sterile | single use |
| Positioning Jig | Polypropylene PP (ISO 1043-1) | No | Short term | non-sterile | single use |
| Round Window Opener | Chromium stainless steel 1.4112 (EN 10027-2) | Yes | Transient | non-sterile | single use |
| Insertion Tube | Polyimide | Yes | Transient | sterile (radiation sterilization) | single use |
| X-Ray Marker | Polyetheretherketone PEEK (ISO 1043-1) | No | Transient | non-sterile | reusable (50x) |
| ConCIerge (planning software) | Software | N/A | N/A | N/A | N/A |
Intended Purpose
ConCIerge is intended to plan minimally invasive access tunnels in the temporal bone.
The Mini-Stereotactic Frame (Including Optical Reference Marker) is intended to be attached to the skull behind the patient’s ear by using the Mounting Screw and the Anchor. It is intended to carry the Positioning Jig or the X-Ray Marker.
The Anchor is intended to serve as a fixation point attached to the skull behind the ear.
The Mounting Screw is an accessory for the medical device Mini-Stereotactic Frame. The Mounting Screw is intended to keep the Mini-Stereotactic Frame in position on the skull behind the patient’s ear.
The Jig Fastener is an accessory for the medical devices Positioning Jig and X-Ray Marker. The Jig Fastener is intended to fasten either the Positioning Jig or the X-Ray Marker onto defined mounting sockets.
The Tool Guide is intended to restrict movements of Round Window Opener or drill bits along a pre-planned access tunnel.
The Positioning Jig is intended to position a Tool Guide according to a pre-planned access tunnel relative to the position of the Mini-Stereotactic Frame.
The Round Window Opener is intended to open the round window membrane of the cochlea.
The Insertion Tube is intended to provide a covered canal in the temporal bone.
The X-Ray Marker, whilst mounted on the Mini-Stereotactic Frame, is intended to be locatable by a planning software in a computed tomography volume image.
Medical Indications, Contraindications & Patient Population
All OtoJig devices are intended for use with adult patients.
Caution
Do not use the devices for children.
ConCIerge is indicated for:
visualization of computed tomography volume images of the human temporal bone,
planning of minimally invasive access tunnels in the temporal bone, and
assisting surgeons in drilling the planned access tunnels.
ConCIerge is contraindicated for:
Visualization of computed tomography volume images and planning of access tunnels is contraindicated for patients where either no computed tomography volume image could be acquired due to medical reasons or where the computed tomography volume image is of insufficient quality, including movement of the patient during acquisition, or other reasons which make it impossible for the surgeons to clearly identify the boundaries of the anatomical structures.
Planning of access tunnels is contraindicated for patients where the planned access tunnel may intersect the segmentations of the facial nerve canal or the wall of the outer ear canal.
The assistance in drilling of a pre-planned access tunnel is contraindicated for patients with cholesteatoma in the surgical area of the planned access tunnel.
The Mini-Stereotactic Frame is indicated for surgical procedures that benefit from the support of the Positioning Jig or the X-Ray Marker in a position attached to the patient’s skull behind the ear.
The Mini-Stereotactic Frame is contraindicated for:
patients with bone disease in area of surgery,
patients with infection in the surgical area,
patients with suspected sensitivity or allergies to titanium alloy, and
insufficient or inadequate hard tissue.
The Anchor is indicated for surgical procedures that benefit from a fixation point attached to the skull behind the ear.
The Anchor is contraindicated for:
patients with bone disease in area of surgery,
patients with infection in the surgical area,
patients with suspected sensitivity or allergies against titanium alloy, and
insufficient or inadequate hard tissue.
The Mounting Screw is an accessory for the Mini-Stereotactic Frame.
The Mounting Screw is contraindicated if the Mini-Stereotactic Frame is contraindicated.
The Jig Fastener is an accessory for the Positioning Jig and the X-Ray Marker.
The Jig Fastener is contraindicated if the Positioning Jig and the X-Ray Marker are contraindicated.
The Tool Guide is indicated for surgical procedures that benefit from restricting movement of the Round Window Opener or drill bits along a pre-planned access tunnel.
The Tool Guide is contraindicated for patients with suspected sensitivity or allergies against chromium stainless steels.
The Positioning Jig is indicated for surgical procedures which benefit from the positioning of a Tool Guide according to a pre-planned access tunnel in relative position to a Mini-Stereotactic Frame.
The Positioning Jig is contraindicated for patients with suspected sensitivity or allergies against Polypropylene (PP).
The Round Window Opener is indicated for surgical procedures that require opening of the round window membrane of the cochlea.
The Round Window Opener is contraindicated for patients with
bone disease in area of surgery,
infection in the surgical area, and
suspected sensitivity or allergies against chromium stainless steels.
The Insertion Tube is indicated to form a covered canal in the temporal bone.
The Insertion Tube is contraindicated for patients with
bone disease in area of surgery,
infection in the surgical area, and
suspected sensitivity or allergies against polyimide.
The X-Ray Marker is indicated for surgical procedures that benefit from a marker which is locatable in a computed tomography volume image.
The X-Ray Marker is contraindicated for patients:
with suspected sensitivity or allergies against polyether ether ketone (PEEK), and
where either no computed tomography volume image could be acquired due to medical reasons or where the computed tomography volume image is of insufficient quality, including movement of the patient during acquisition, or other reasons which make it impossible to clearly identify the embedded radio-dense metal balls.
Intended User and User Training
Intended user
ConCIerge:
All trained medical professionals (physicians, nurses, technicians) and medical device advisors/experts can operate conCIerge.
Approving segmentations and planned access tunnels have to be performed by a trained ENT surgeon.
Anchor, Mounting Screw, Mini-Stereotactic Frame, Positioning Jig, X-Ray-Marker, Jig Fastener, Tool Guide, Round Window Opener, Insertion Tube:
Intended to be used by trained ENT surgeons.
Training
Training is provided by OtoJig. It includes personal handling of representative devices on a temporal bone model under the supervision of a qualified trainer.
Warnings and Precautions
General safety information
Warning
For safety reasons, please read these Instructions for Use carefully before using the devices. For the device conCIerge, please consult the separate eIFU of conCIerge.
For non-sterile delivered single-use devices: processing must be performed according to the following processing instructions.
For sterile delivered single-use devices: do not use devices beyond the use-by date indicated on the sterile packaging.
For reusable devices: cleaning, disinfection and sterilization must be performed prior to first use and after each use according to the reprocessing instructions. Do not reuse more than 50 times as indicated.
For single-use devices: Reuse and/or reprocessing is prohibited. Reusing and/or reprocessing a single-use device can result in biocontamination, degraded performance, or loss of functionality.
Before use, the packaging of all sterilized devices must be inspected visually in an unaided way to determine if damages in the sterile barrier system integrity are evident. Do not use if the sterile packaging is damaged.
Caution
Do not use the devices for children.
Devices with direct tissue contact are contraindicated if there are suspected sensitivities or allergies to the used materials. See Contraindications.
Before processing of non-sterile delivered devices, the packaging of all non-sterile delivered devices must be inspected visually in an unaided way to determine damages of the packaging. Do not use devices if the packaging is damaged.
All devices must be inspected visually in an unaided way for damage, wear, corrosion, and legibility of the labeling. Damaged, worn, or corroded devices as well as devices with illegible labeling must not be used. Do not use devices more often than the specified reusable cycles.
For single-use devices: discard them after the procedure, even if they have not been used.
The devices and their components must not be modified and must be used only as intended by this instructions for use.
Handle the devices carefully, do not apply excessive force as this may cause mechanical damage to the devices or tissue in direct contact with the devices.
Mini-Stereotactic Frame (incl. Optical Reference Marker)
Warning
Cut hazard: Its sharp spikes can potentially pierce gloves and skin.
Caution
Handle with care. Dispose the device if it might have been bent or deformed (e.g. dropped to the floor).
X-Ray Marker
Caution
Handle with care. Dispose the device if it might have been subjected to a strong impact (e.g. dropped to the floor).
Positioning Jig
Warning
Patient individualized Positioning Jigs are intended to be solely used for the patient for which they have been produced.
Round Window Opener
Warning
The Round Window Opener has a sharp tip, handle with care.
The Round Window Opener must be guided in the Tool Guide.
Caution
In the case of local anesthesia: pay attention to possible movements of the patient's head when using the Round Window Opener. Movements of the patient's head near the tip of the Round Window Opener can lead to injuries.
Insertion Tube
Caution
Devices larger than the lumen of the Insertion Tube cannot be used.
Do not apply large forces on the Insertion Tube as this may damage the device or tissue. Stop inserting the Insertion Tube when resistance is felt or the tube has reached the desired depth.
Residual Risks and Undesirable Side-Effects
The medical devices are used in the context of or as part of other surgically invasive procedures such as cochlear implantation, middle ear surgery, or similar surgeries. The risks associated with the OtoJig procedure inherit the primary risks of those (conventional) surgeries, which contain: excessive bleeding, blood clots, death, delayed wound healing, infections, wound dehiscence, breathing difficulties due to infection, inflammation, diffuse swelling, tissue necrosis, necrosis, hematoma, leakage of cerebrospinal fluid, damage to the facial nerve, pain, scarring at the wound site, exanthema, skin lesions, skin irritation, difficulty swallowing, and complications associated with anesthesia. In addition, meningitis is a rare postoperative complication with cochlear implantation, but can be potentially serious. As with all skin incisions, the potentially additional incisions or puncturing of the skin can often lead to local wound healing disorders, infection, inflammation, or itching. The occurrence probability of these risks is influenced by multiple factors, such as surgical technique, skin incisions and the duration of the surgery.
The device-specific residual risks are:
| Risk | Device(s) |
|---|---|
| There is an improbable risk that the planned surgery needs to be aborted or switched to conventional surgical techniques, if there are reasons to believe that the procedure cannot be safely completed, in particular if any of the safety measures trigger an alert, including facial nerve monitoring, intraoperative checklists and other risk controls implemented in software. | conCIerge |
| There is a frequent risk that either no (safe) access tunnel can be planned for a given patient due to anatomic constraints or that no Positioning Jig can be produced for a given planned access tunnel. This results in a non-availability of the minimally-invasive treatment that lead to abort of the surgery or switch to conventional surgical techniques. | conCIerge |
| There is an occasional risk that the OtoJig system cannot be mounted because of anatomical constraints. In this case, the surgery needs to be aborted or switched to conventional surgical techniques. | Anchor, Mounting Screw, Mini-Stereotactic Frame, Positioning Jig, Jig Fastener, Tool Guide |
| There is an occasional risk of nerve damages related to device deficiencies that can lead to deviations of the drill hole from the planned path. | Anchor, Mounting Screw, Mini-Stereotactic Frame, Positioning Jig, Jig Fastener, Tool Guide |
| There is an occasional risk of nerve damages associated with nonconforming devices (production errors). | Positioning Jig |
| There is an occasional risk of nerve damages associated with drilling inaccuracies resulting from incorrect assembly of the Jig Fasteners. | Positioning Jig, X-Ray Marker |
| There is an occasional risk of temporary or permanent injuries by thermal damage and/or by direct mechanical damage2 resulting from: - software defects, - cyber-security incidents (including forging, hacking, data manipulation etc.), - planning and approval of an incorrect or unfavorable access tunnel, - compatible drill bits (OtoDrills) deviating from the planned path due to excessive user-applied forces, - inadequate hard tissue (e.g. inhomogeneous bone densities). | conCIerge |
| There is an occasional risk of damaging the meninges or a blood vessel, which could result in bleeding or infections, during pre-drilling. | conCIerge |
| There is a frequent risk that device deficiencies (e.g. production errors, device damages) lead to deviations in the axis of the Round Window Opener or prevent fitting of the Round Window Opener into the Tool Guide. A new device may be required. | Round Window Opener |
| There is a frequent risk that device deficiencies (e.g. production errors, device damages) lead to loss of device functionality. A new device may be required. | Insertion Tube |
| There is an occasional risk that device deficiencies (e.g. production errors) lead to loss of device functionality. A new device may be required. | Anchor, Mounting Screw, Mini-Stereotactic Frame, Positioning Jig, Jig Fastener, Tool Guide, X-Ray Marker |
| There is a frequent risk of cuts/pricks (sharp tips) when handling the devices. | Round Window Opener Mini-Stereotactic Frame |
| There is an occasional infection risk when handling the used devices for disposal. | All OtoJig hardware devices |
| There is the risk when using the Insertion Tube out of the given geometrical limits (inner diameter, outer diameter, length). These risks cannot be predicted in advance. | Insertion Tube |
| There is an occasional risk of tissue damages/cuts when applying high forces to the inserted Insertion Tube. | Insertion Tube |
| There is an occasional risk of damaging/contamination the Insertion Tube during aseptic presentation. A new device may be required. | Insertion Tube |
| There is a very frequent risk of injuries such as cuts/pricks associated with the fixation of the Anchor: If the initial pre-drilled hole is found to be unsuitable, it may be necessary to drill a second one. | Anchor |
| There is a very frequent risk of injuries such as cuts/pricks associated with the fixation of the Mini-Stereotactic Frame: If the Mini-Stereotactic Frame is not properly positioned behind the ear, a second pre-drilled hole might need to be drilled to reposition the device. | Mini-Stereotactic Frame |
| There is an occasional risk of injuries such as cuts/pricks associated with raised edges (burrs). | Anchor, Mounting Screw, Mini-Stereotactic Frame, Positioning Jig, Jig Fastener, Tool Guide, X-Ray Marker |
| There is an occasional risk that the OtoJig system cannot be assembled because of usability issues. In this case, the surgery needs to be aborted or switched to conventional surgical techniques. | Anchor, Mounting Screw, Mini-Stereotactic Frame, Positioning Jig, Jig Fastener, Tool Guide |
| There is an occasional risk of fingers/skin becoming trapped when using the device. | Jig Fastener |
| There is an occasional risk of OtoDrills getting stuck in the Tool Guide. New devices may be required. | Tool Guide |
| There is an occasional risk of delays during surgery: Depending on the level of experience of the user or on the occurrence of software anomalies, the intraoperative planning may take longer than usual and thereby cause negative effects from a prolonged anesthesia duration. | conCIerge |
| There is an improbable risk of non-availability of treatment due to: iPad device failures or the device running out of battery, or software anomalies, or if the X-Ray Marker cannot be localized in the imported CT volume image. | conCIerge |
| There are improbable risks related to privacy disclosures resulting from to unauthorized access to user, patient, and/or (medical) planning data or manipulation of the software or data. | conCIerge |
| There is a very rare risk of allergic reactions against the materials used (chrome-containing stainless steel, titanium, polyimide, polypropylene, and polyetheretherketone). | All OtoJig hardware devices |
Residual risks are described according to the following probabilities per use:
Very frequent: ≥ 1 of 10 (10 %)
Frequent: ≥ 1 of 100 (1 %) to < 1 of 10 (10 %)
Occasional: ≥ 1 of 1,000 (0.1 %) to < 1 of 100 (1 %)
Rare: ≥ 1 of 10,000 (0.01 %) to < 1 of 1,000 (0.1 %)
Improbable: < 1 of 10,000 (0.01 %)
Note
Off-label use, misuse, combination with non-compatible devices, modification of devices or contraindications may lead to additional risks. Depending on the type of misuse, there may be additional risks that cannot be predicted in advance.
Expected Clinical Benefits
The use of the OtoJig procedure offers several advantages, including reduced surgical drilling time and less healthy bone volume removal compared to traditional mastoidectomy procedures:
Minimally invasive: The OtoJig procedure allows for a state of the art minimally invasive access to the middle and inner ear.
Round window approach: The Round Window Opener allows inner ear access through the round window membrane.
Shorter drilling time: The OtoJig procedure allows for a reduced drilling time compared to conventional mastoidectomy and posterior tympanotomy.
Visualization & optimal path planning: ConCIerge helps surgeons to find and plan their preferred access path and to get a better understanding of the patient's individual anatomy in comparison to standard of care DICOM viewers.
Insertion trajectory: ConCIerge allows to visualize and control the (planned) in-plane angle and the off-plane angle towards the cochlea.
Insertion of CI: MED-EL FLEX SL electrodes can be advanced through the Insertion Tube into the inner ear through the access created by the OtoJig procedure.
General Processing Instructions
Devices: Anchor, Mounting Screw, Jig Fastener, Tool Guide and Round Window Opener
Processing instructions according to ISO 17664-1.
Warning
It is the responsibility of the user to use the validated processing recommended in these instructions for use and to use suitable equipment qualified and validated according to ISO 15883 series and other national recommendations.
The instructions provided in these instructions for use have been validated by the manufacturer of the non sterile single-use medical devices as being capable of preparing a medical device for use. It remains the responsibility of the processor to ensure that the processing, as actually performed, using equipment, materials, and personnel in the processing facility, achieves the desired result. This requires verification and/or validation and routine monitoring of the process.
1 Processing
1.1 Automated Cleaning, Disinfection and Drying
Perform automated cleaning, disinfection and drying:
Prewash with cold water for at least 4 minutes – drain
Wash with a detergent (Neodisher® MediClean forte (1%)) at +55 °C for at least 5 minutes – drain
Rinse with cold water3 for at least 1 minute – drain
Disinfect with hot water3 at +93 °C for at least 5 minutes – drain
Dry with hot air at +100 °C for at least 20 minutes
Validation was performed with a washer/disinfector Belimed WD 290 IQ.
1.2 Inspection
Visually inspect the device for damages, remaining contaminations, and moisture. If there are contaminations or moisture, repeat cleaning/disinfection process and inspection.
Caution
Discard the device if damaged.
1.3 Packaging
Place the device in a carrier (e.g. a surgical instrument tray). Do not stack devices.
Double wrap in accordance with ISO 11607-1.
1.4 Sterilization
Use a fractionated vacuum sterilization method in accordance with ISO 17665 and national recommendations. This method has been validated to achieve the desired sterility assurance level (SAL) of 10-6.
Phase 1 – Conditioning
A vacuum is generated up to four times. Steam is then injected to warm the device.
Phase 2 – Sterilization
The validated parameters for the fractionated pre-vacuum method are:
Temperature: +134 °C
Exposure time: at least 5 minutes
Phase 3 – Evacuation
The steam is released.
Phase 4 – Drying
Drying takes place under application of a vacuum.
After sterilization, cool the device uniformly at room temperature.
Sterilization validation was performed with an autoclave Hospithera CISA 6464LS Steam Sterilizer and MED-EL Surgical Instrument Tray (REF 41452) double wrapped in Halyard Sequential Sterilization Wrap H500. Drying was done over a period of at least 30 minutes.
1.5 Storage After Sterilization
Store the wrapped and sterilized device in accordance with the specifications provided by the manufacturer of the sterilization wrapping material.
Device: Positioning Jig
There are two methods for processing the Positioning Jig: disinfection or sterilization. Both are described below:
1 Processing - Sterilization approach
The processing consists of the following steps:
manual cleaning 3,
inspection,
packaging, and
sterilization.
The device is a patient-matched device to be manufactured and processed during surgery at the point of use. Due to time constraints associated with the anesthesia duration, an automated cleaning process cannot be used, as it would extend the anesthesia time to an unacceptable length.
Warning
It is the responsibility of the user to use the validated processing recommended in these instructions for use and to use suitable equipment qualified and validated according to ISO 15883 series and other national recommendations.
The instructions provided in these instructions for use have been validated by the manufacturer of the medical device as being capable of preparing a medical device for use. It remains the responsibility of the processor to ensure that the processing, as actually performed, using equipment, materials, and personnel in the processing facility, achieves the desired result. This requires verification and/or validation and routine monitoring of the process.
1.1 Manual Cleaning and Draining
Perform manual cleaning and drying:
Wash with a cleaning solution (gigasept® pearls (2%)) at ambient temperature for at least 10 minutes. Ensure that all surfaces are covered by the cleaning solution. Drain cleaning solution from the device.
Rinse with cold water 4 for at least 1 minute – drain
1.2 Inspection
Visually inspect the device for damages and remaining contamination. If there is remaining contamination, repeat cleaning process and inspection.
Caution
Discard the device if damaged.
1.3 Packaging
Place the device in a carrier (e.g. a surgical instrument tray). Do not stack devices.
Double wrap in accordance with ISO 11607-1.
Label the packaging with a patient identifier to prevent mix-ups.
1.4 Sterilization
Use a fractionated vacuum sterilization method in accordance with ISO 17665 and national recommendations. This method has been validated to achieve the desired sterility assurance level (SAL) of 10
Phase 1 – Conditioning
A vacuum is generated up to four times. Steam is then injected to warm the device.
Phase 2 – Sterilization
The validated parameters for the fractionated pre-vacuum method are:
Temperature: +134 °C
Exposure time: at least 5 minutes
Phase 3 – Evacuation
The steam is released.
Phase 4 – Drying
Drying takes place under application of a vacuum.
After sterilization, cool the device uniformly at room temperature.
Sterilization validation was performed with an autoclave Hospithera CISA 6464LS Steam Sterilizer and MED-EL Surgical Instrument Tray (REF 41452) double wrapped in Halyard Sequential Sterilization Wrap H500.
2 Processing - disinfection approach
The processing consists of the following steps:
manual cleaning,
disinfection,
inspection, and
packaging.
The device is a patient-matched device to be manufactured and processed during surgery at the point of use. Due to time constraints associated with the anesthesia duration, an automated cleaning process cannot be used, as it would extend the anesthesia time to an unacceptable length.
Warning
It is the responsibility of the user to use the validated processing recommended in these instructions for use and to use suitable equipment.
The instructions provided in these instructions for use have been validated by the manufacturer of the medical device as being capable of preparing a medical device for use. It remains the responsibility of the processor to ensure that the processing, as actually performed, using equipment, materials, and personnel in the processing facility, achieves the desired result. This requires verification and/or validation and routine monitoring of the process.
2.1 Manual Cleaning and Disinfection
Perform manual cleaning, disinfection, and drying:
Prepare a cleaning/disinfection solution of Gigasept® Pearls (2%) in accordance with the manufacturer's instructions.
Place the device in the cleaning/disinfection solution at ambient temperature for at least 15 minutes. Ensure that all surfaces are covered by the cleaning/disinfection solution. OtoJig recommends the use of the OtoJig disinfection bath with the included insert.
Use sterile instruments/gloves to remove the device from the cleaning/disinfection solution. Drain the cleaning/disinfection solution from the device.
Rinse with sterile water for at least 1 minute – drain.
2.2 Inspection
Visually inspect the device for damage and remaining contamination. If there is any remaining contamination, repeat steps 2.1 and 2.2.
Caution: Discard the device if damaged.
2.3 Packaging
Place the device in a self-adhesive sterile bag.
Seal the sterile bag with the adhesive sealer. Make sure that no air leaves the bag if it is pressed. Replace leaking bags.
Label the carrier with a patient identifier to prevent mix-ups.
Devices: Mini-Stereotactic Frame and X-Ray Marker
1 Reprocessing
Reprocessing instructions according to ISO 17664-1.
Warning
It is the responsibility of the user to use the validated reprocessing recommended in these instructions for use and to use suitable equipment qualified and validated according to ISO 15883 series and other national recommendations.
The instructions provided in these instructions for use have been validated by the manufacturer of the medical device as being capable of preparing a medical device for use. It remains the responsibility of the processor to ensure that the reprocessing, as actually performed, using equipment, materials, and personnel in the reprocessing facility, achieves the desired result. This requires verification and/or validation and routine monitoring of the process.
1.1 Initial Treatment at the Point of Use
Prepare a bath with demineralized water.
Immediately after use, immerse the device in the bath to prevent drying.
The device must be reprocessed as soon as reasonably practical following use and not later than 24 hours after use.
Store and transport the device to the reprocessing site in a moist environment. Use a closed container in order to avoid contamination of the environment.
1.2 Preparation Before Automated Cleaning
Every component must be disconnected prior to cleaning, disinfection and sterilization.
Manual Pre-Cleaning
Prepare a bath with demineralized water.
Carefully and gently brush the device in the bath of demineralized water for at least 30 seconds until all visible soil is removed.
Pay attention to crevices, lumens, mated surfaces, connectors and other hard-to-clean areas.
Do not use metal brushes or scouring pads during manual pre-cleaning. These materials damage the surface and finish of the device. Use soft-bristled nylon brushes.
Keep the device below the surface of the cleaning solution during manual scrubbing to prevent the generation of aerosols and splashing which may spread contaminants.
1.3 Automated Cleaning, Disinfection and Drying
Automated cleaning must be performed immediately after manual pre-cleaning.
Prewash with cold water for at least 4 minutes – drain
Wash with a detergent (Neodisher® MediClean forte (1%)) at +55 °C for at least 5 minutes – drain
Rinse with cold water 3 for at least 1 minute – drain
Disinfect with hot water 3 at +93 °C for at least 5 minutes – drain
Dry with hot air at +100 °C for at least 20 minutes
Validation was performed with a washer/disinfector Belimed WD 290 IQ.
1.4 Inspection
Caution: Discard the device if damaged, worn, corroded or if the labeling is illegible.
Visually inspect the device for remaining soil in a well-lit area; no visible soil or moisture must be left on the device. If there is remaining debris, repeat the cleaning process and re-examine.
1.5 Packaging
Place the device in a suitable carrier. Do not stack devices.
Double wrap in accordance with ISO 11607-1.
1.6 Sterilization
Use a fractionated vacuum sterilization method in accordance with ISO 17665 and national recommendations. This method has been validated to achieve the desired sterility assurance level (SAL) of 10
Phase 1 – Conditioning
A vacuum is generated up to four times. Steam is then injected to warm the device.
Phase 2 – Sterilization
The validated parameters for the fractionated pre-vacuum method are:
Temperature: +134 °C
Exposure time: at least 5 minutes
Phase 3 – Evacuation
The steam is released.
Phase 4 – Drying
Drying takes place under renewed application of a vacuum over a period of at least 30 minutes.
After sterilization, cool the device uniformly at room temperature.
Sterilization validation was performed with an autoclave Hospithera CISA 6464LS Steam Sterilizer and MED-EL Surgical Instrument Tray (MED-EL REF 41452) double wrapped in Halyard Sequential Sterilization Wrap H500.
1.7 Storage After Sterilization
Store the wrapped and sterilized device in accordance with the specifications provided by the manufacturer of the sterilization wrapping material.
Storage and transportation
Store all devices in a dry and clean environment, protected from direct sunlight, pests and extremes of temperature and humidity.
Store sterilized devices according to the (re-)processing instructions.
Store sterile delivered devices as indicated on the label of the sterile barrier system / packaging.
Use products in the order in which they are received (“first-in, first-out principle“), taking note of any expiration date on the label.
Only use the original packaging for transport as damage may occur otherwise. If the original packaging materials are no longer available, please contact OtoJig.
Lifetime of the Devices
The single-use (excl. Positioning Jig) devices are intended for short term use; their lifetime is limited to the duration of the procedure. The shelf life is limited to five years.
Positioning Jig: The lifetime is limited to the duration of the procedure. The shelf life is limited to 24 hours.
The reusable devices are intended for short term use; their lifetime is limited to 50 reprocessing cycles. The shelf life is limited to five years.
Disposal of the Devices
Dispose of in accordance with federal, state, and local regulations.
Dispose the devices Round Window Opener and Mini-Stereotactic Frame in a suitable container for sharp devices.
Please return used Positioning Jigs after cleaning. OtoJig may provide a discount for the next order.
OtoJig Surgical Procedure:
This procedure can be used for
creating a minimally invasive surgical tunnel in the temporal bone, and
optionally to provide a covered access to the inner ear, e.g. for cochlear implantation (CI). These optional steps are marked by 🌀.
Note
Activities related to the anesthesia and the application of drugs are not covered by the following steps and are to be performed according to the clinical routine.
Please consult the eIFU of conCIerge in latest version at https://otojig.com/IFU.
Optional screening: Pre-planning in conCIerge
If a pre-operative CT/CBCT volume scan is available for a potential patient, it is recommended to use conCIerge for screening to alleviate the intra-operative risk that no (safe) access tunnel can be planned for a given patient due to anatomic constraints.
From the main screen of the app, choose "Screening".
Import the DICOM data of the scan into conCIerge.
Attempt to plan a virtual access tunnel.
Approve, if applicable, and conclude whether the patient would be suitable for the OtoJig procedure.
Create new case in conCIerge
Create a new case for the patient in the planning app conClerge, identifying the patient by name, birthday, sex, and hospital patient-ID, if applicable.
Select the side for the surgery (left/right)
Select if an inner ear access shall be planned. 🌀
Check availability of devices
The following devices have to be available for creating a minimally invasive surgical tunnel in the temporal bone and to provide a covered access to the inner ear:
1x charged iPad device with the conCIerge app installed (see eIFU of conCIerge)
1x Mini Stereotactic Frame (including 1x Optical Reference Marker)
2x Bone Screw + 2x Emergency Bone Screw
1x Screw Driver incl. blade
2x Anchor
1x Mounting Screw
3x Jig Fastener (Shell and Pin)
1x Blank Jig, i.e. a not yet individualized Positioning Jig
1x X-Ray Marker
1x Tool Guide
1x Round Window Opener 🌀
1x Insertion Tube 🌀
1x Pre-drill bit
1x OtoDrill 1
1x OtoDrill 2
1x OtoDrill 3 🌀
1x Drill motor/hand-piece
Recommendation
A drill motor/hand-piece with a maximum speed of 3,000 rpm for the OtoDrills and the Pre-drill bit, such as the DePuy Synthes UNIUM battery drill (05.001.601) unit with a three jaw chuck (05.001.252 or 01.001.523).
1x Facial nerve monitoring system
Availability of CT/CBCT device
Recommendation
It is recommended to test each CT/CBCT scanning device and/or each intermediate DICOM exporting software application prior to use by scanning an X-Ray Marker (without patient) and importing the DICOM into conCIerge.
1x Surgical pen for skin marking
1x USB (Type-C) drive, recommended USB 3.0 "super speed" or faster and at least 256 GB storage capacity, ExFAT formatted
The following devices have to be available for performing a cochlear implantation:
1x MED-EL FLEX SL cochlear implant electrode 🌀
1x conventional ⌀0.8 mm surgical bur — to create a groove for holding the electrode lead 🌀
Prepare the point of care production machine - Otomat
Prepare the point of care production machine (Otomat) according to the instructions for use of the Otomat.
Facial nerve monitoring
Setup facial nerve monitoring according to its IFU.
Caution
Facial nerve monitoring is mandatory.
Prepare patient
Place the patient using a head rest suitable for intraoperative CBCT scan, if available.
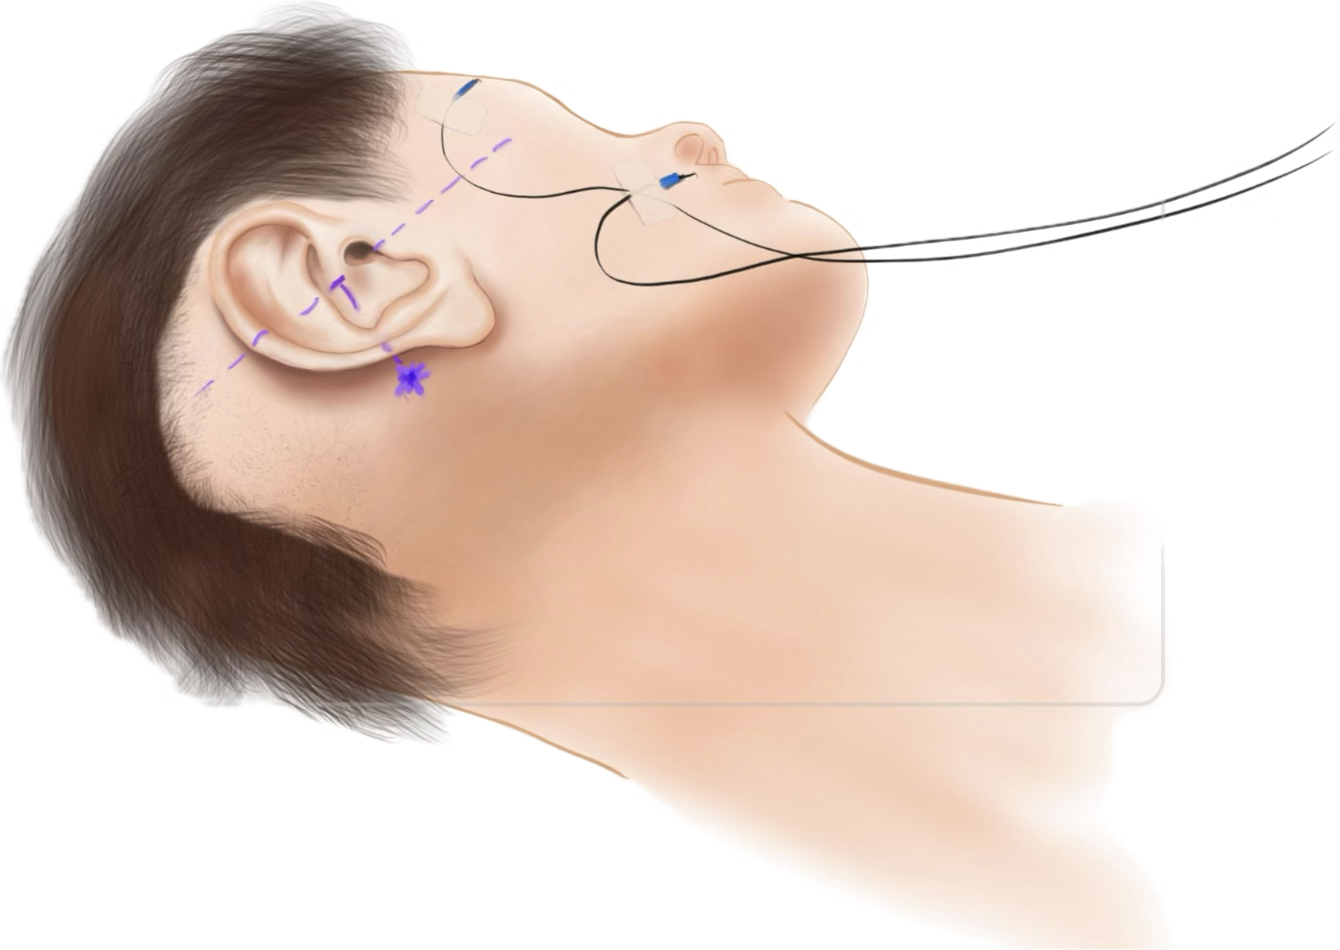
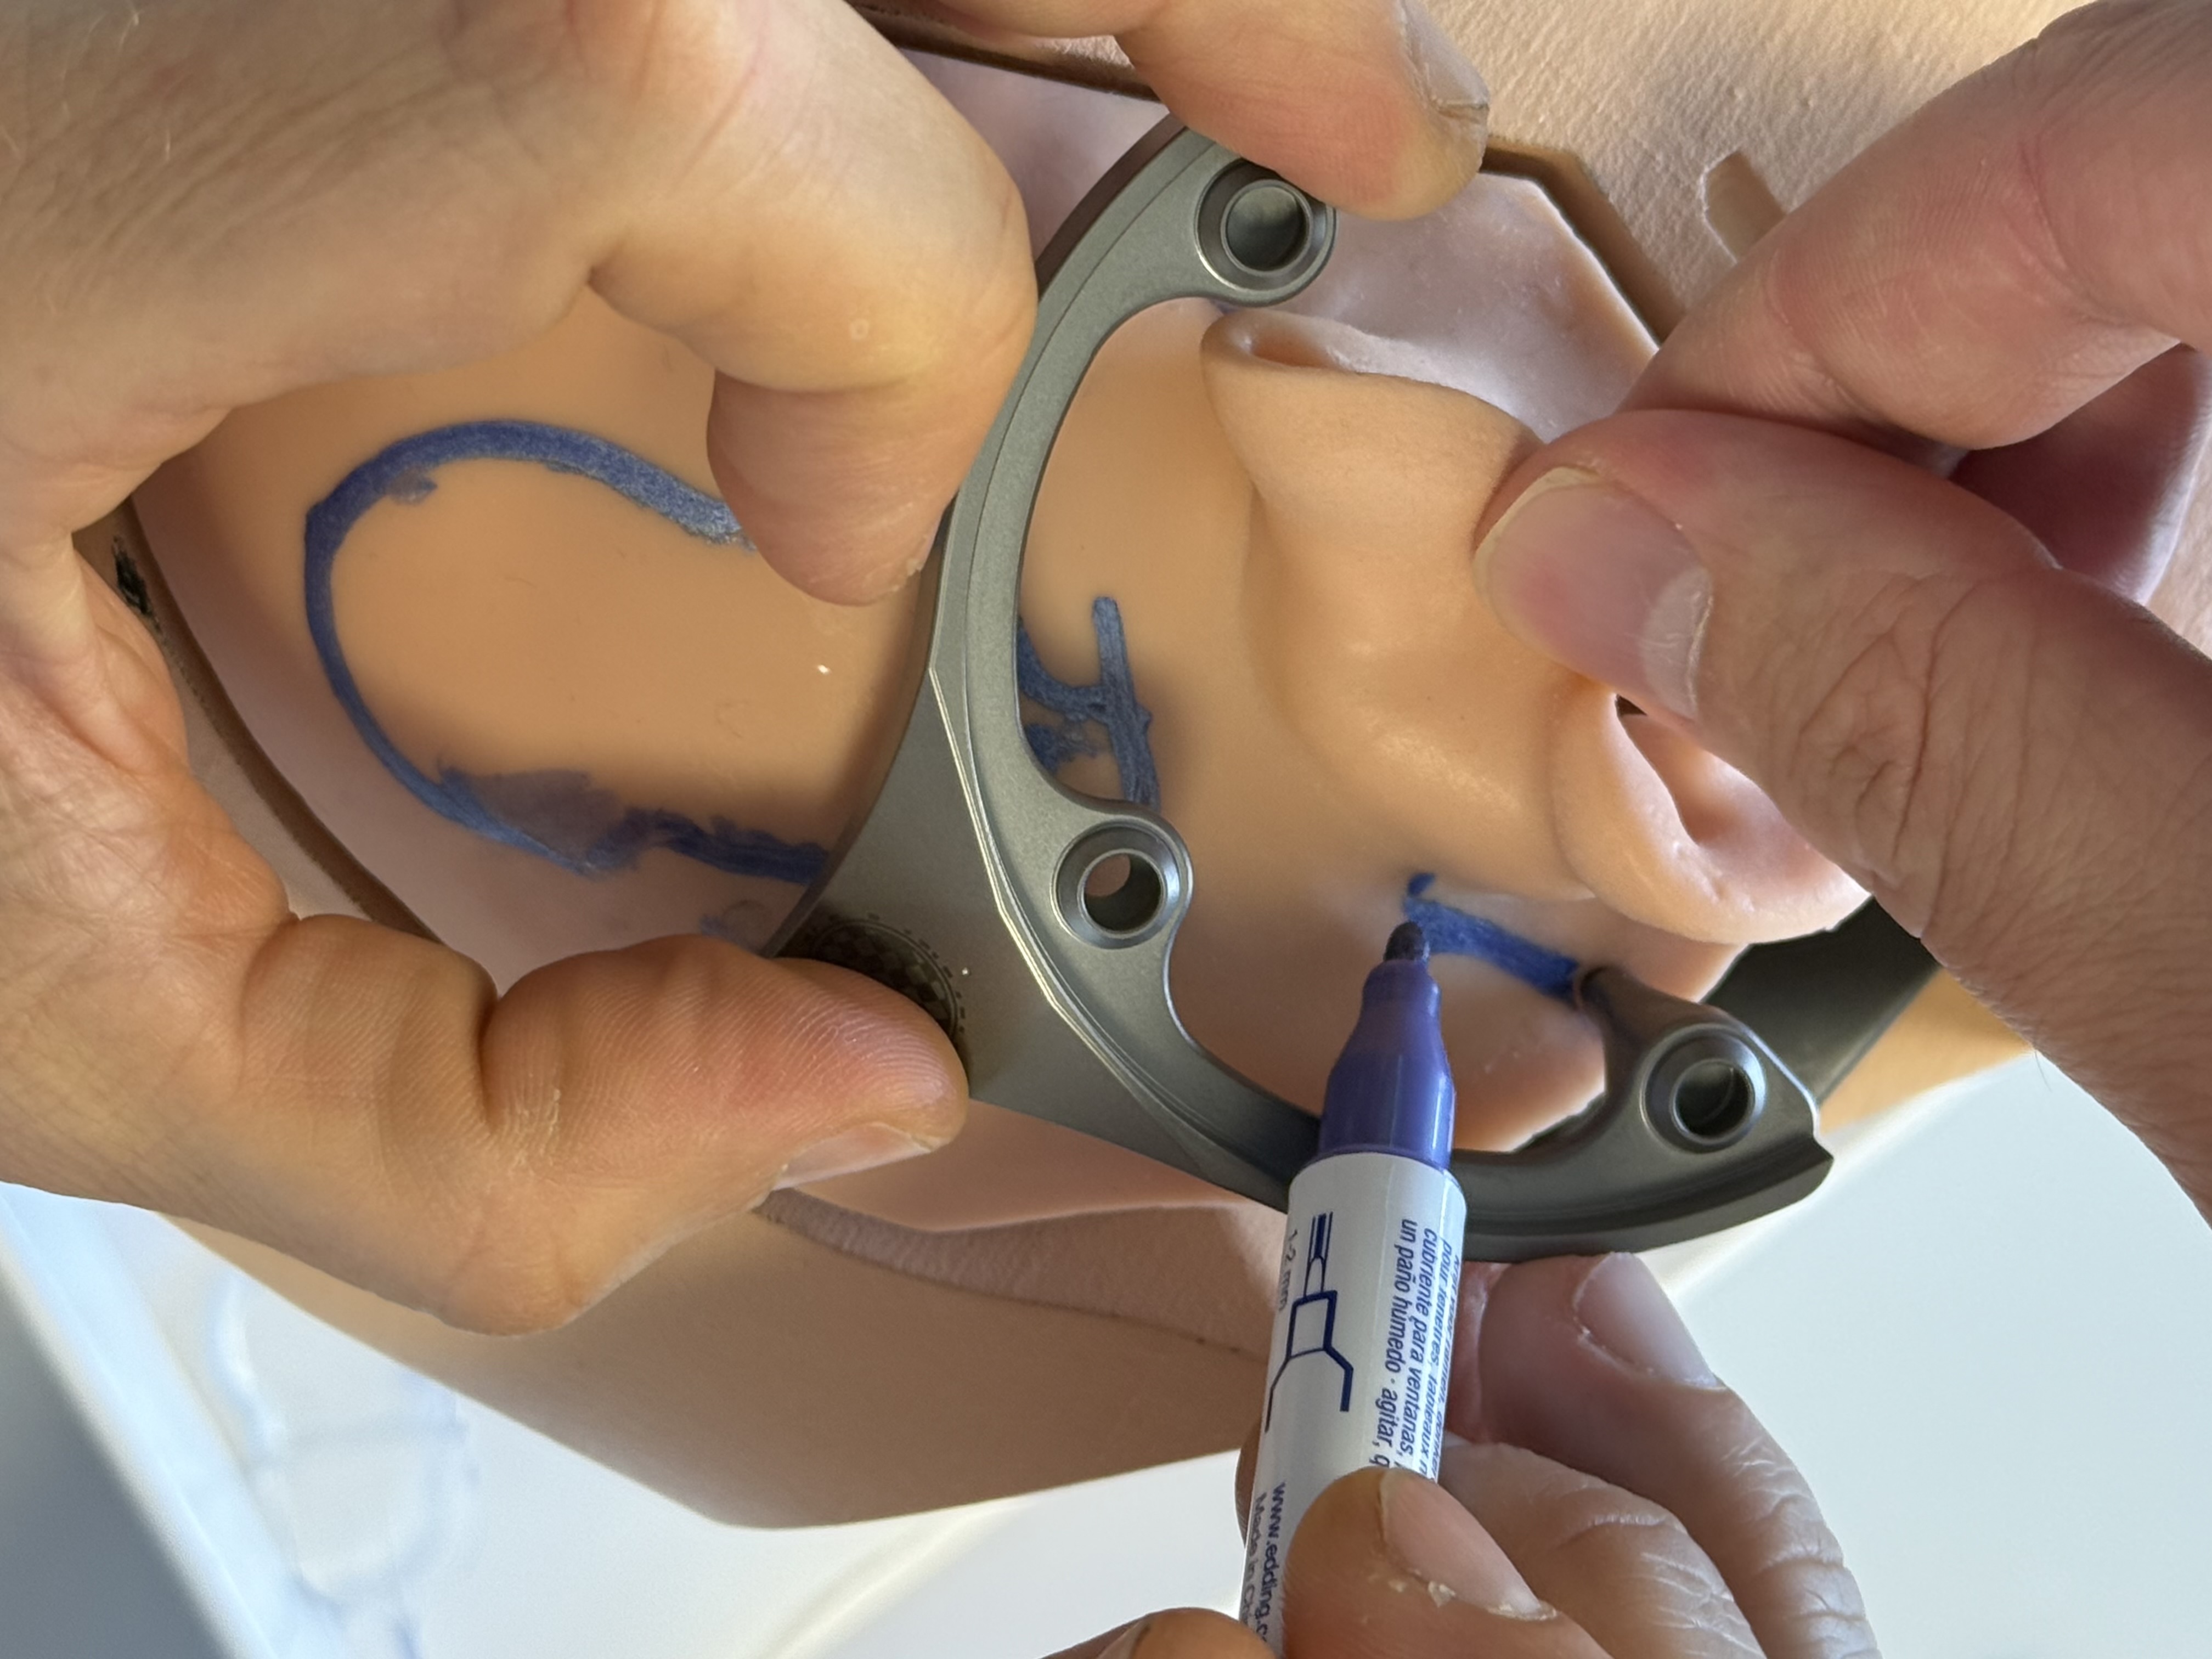
Wash, disinfect, and shave surgical area behind the ear large enough for the MSF and the Optical Reference Marker.
Select and mark the position for the MSF, including the positions for the spikes. In particular, mark the position for first Bone Screw (and Anchor) in an area with sufficient skull thickness (> 4 mm). One spike of the Mini-Stereotactic Frame shall be located on the mastoid process, close to the mastoid tip. The middle spike shall be posterior to the ear. The (virtual) connection line between the two outermost spikes is often perpendicular to the orbito-meatal-line.
Recommendation
It is essential to ensure that the Mini-Stereotactic Frame is positioned correctly on the mastoid tip. A skin incision that provides a suitable view for assessing the contact of the Mini-Stereotactic Frame spikes is recommended.
Select and mark a position for the Optical Reference Marker, by marking the position to place the second Bone Screw in an area with sufficient skull thickness (> 4 mm). The distance between the optical marking (pattern) on the MSF and the Optical Reference Marker should not be further apart than ~5 cm.
Optionally, mark a position for the CI implant. 🌀
Recommendation
To facilitate a smooth procedure, it is recommended to place the MSF so that the implant bed can be created in the bone later, if necessary, while the MSF remains in place.
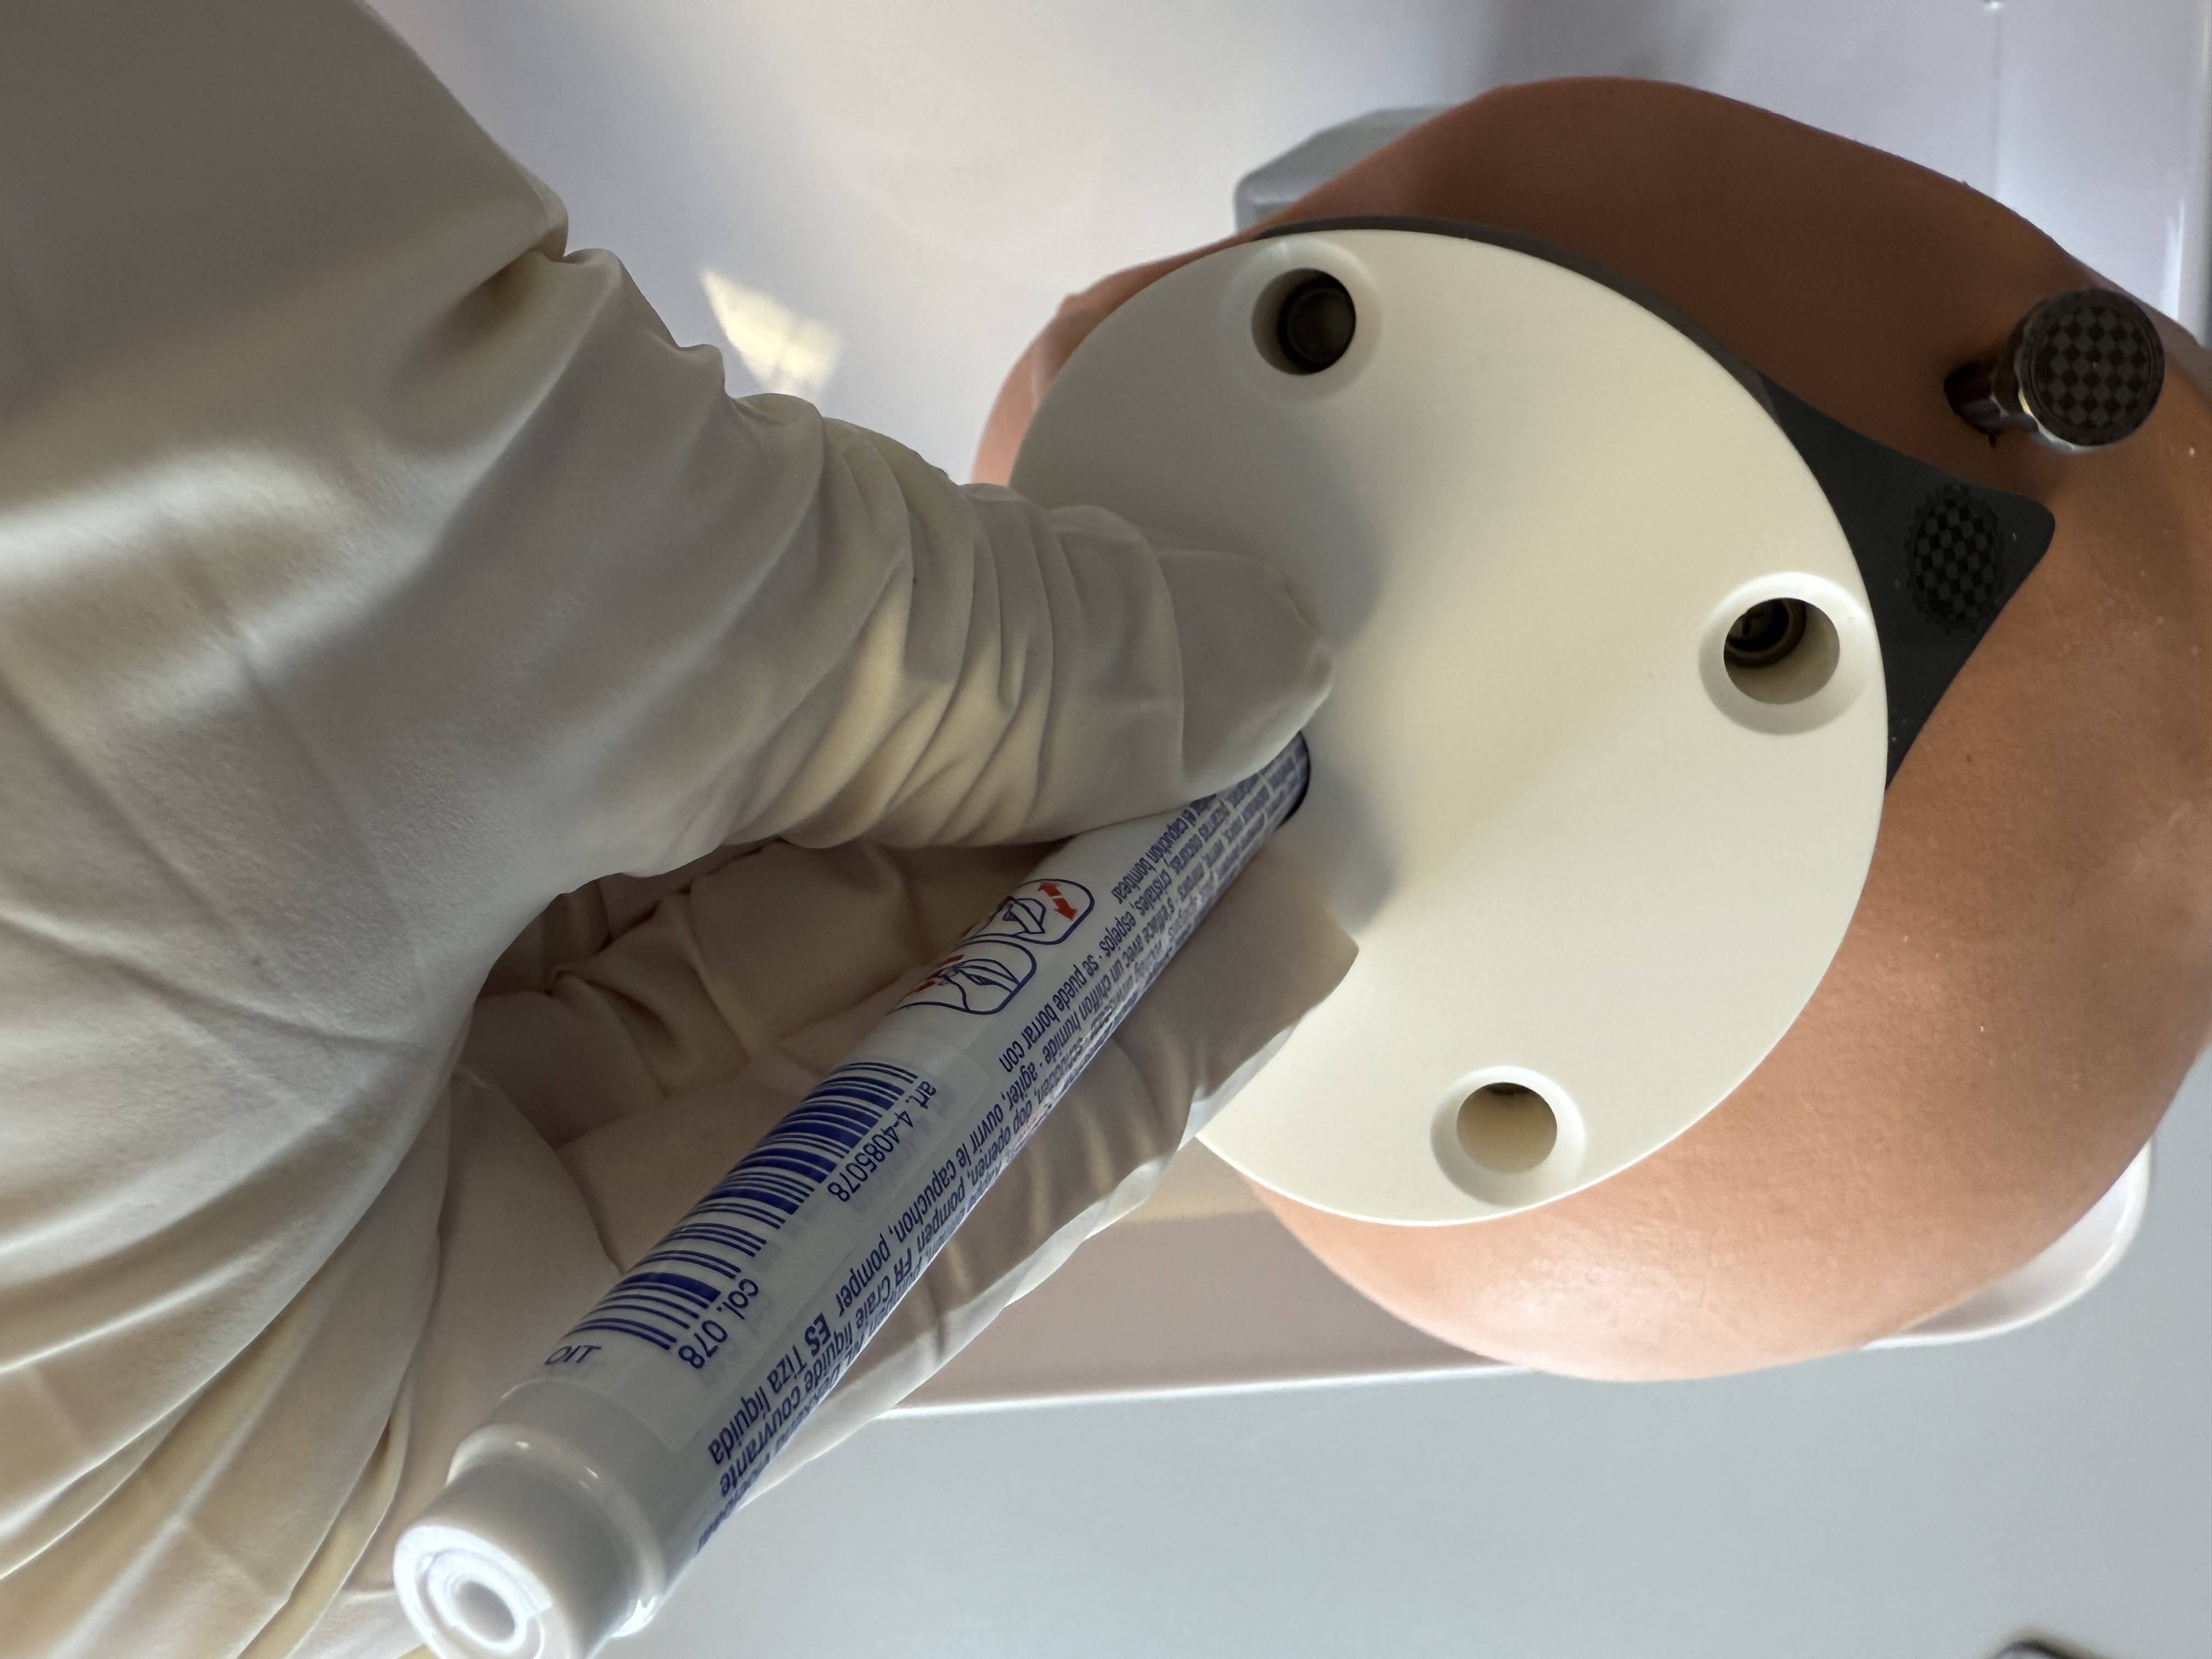
Skin incision and fixation of the first Anchor with a Bone Screw
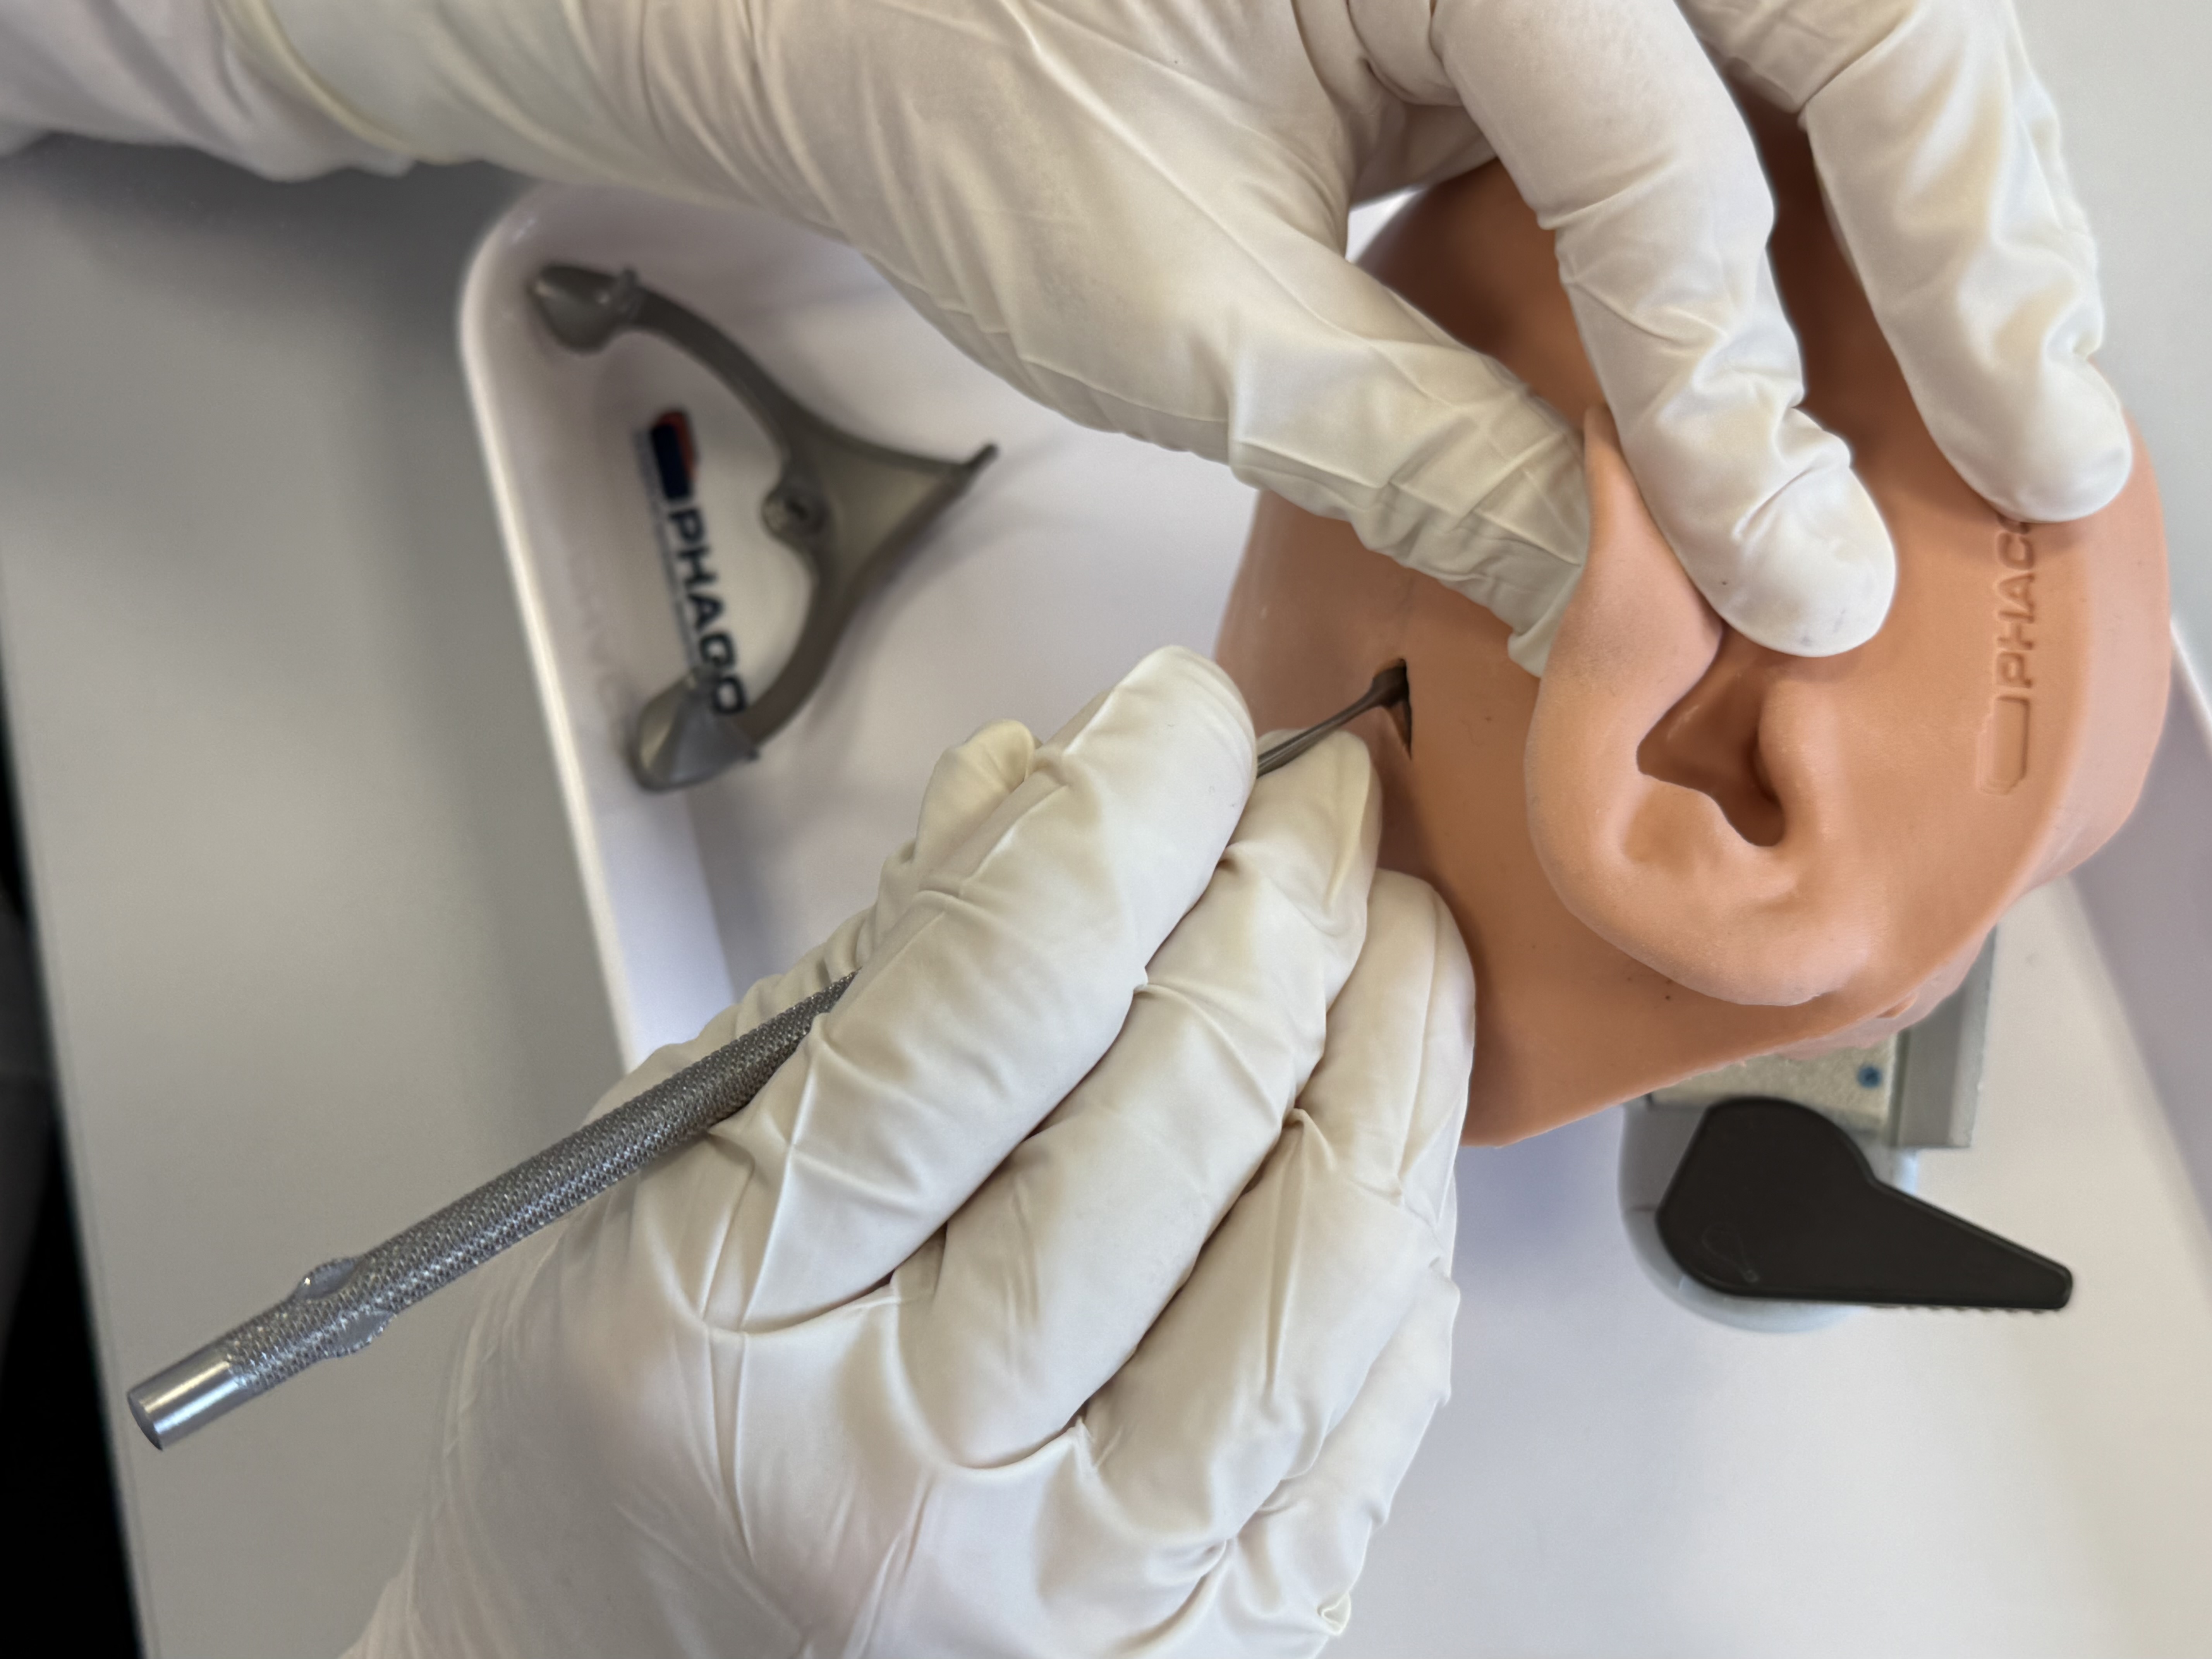

Perform the skin incision and scrape the periosteum at the marked spot for the first Bone Screw, which is intended for the MSF. The larger skin incision should be done at a later step to minimize infection risks during CT/CBCT scanning with the MSF attached.
Pre-drill (with the ⌀1.50 mm Pre-drill bit) the hole for the Bone Screw at the marked position using the MSF temporarily as a guidance. Set the MSF aside for further use.
Caution
Ensure sufficient skull thickness (> 4 mm) for the pre-drilling. If in doubt, drill in small intervals and check the bottom of the hole for bone. If there is sufficient bone, proceed with drilling.
The pre-drill hole must be thoroughly cleaned before the Anchor is fixed to the skull. Take care to ensure that the pre-drill hole is free from any further contaminants.
Fixate the first Anchor to the skull at the pre-drilled hole using the screw driver and a Bone Screw. The Anchor must be firmly attached to the bone without play.
Recommendation
Tighten the screw with a torque of 30 - 35 Ncm is recommended.
If the Bone Screw cannot be fixed sufficiently, an attempt with the Emergency Bone Screw (with a larger diameter of ⌀2.3 mm) can be made.
Alternatively, a new hole can be pre-drilled in the vicinity.
Fixation of the Mini-Stereotactic Frame to the first Anchor
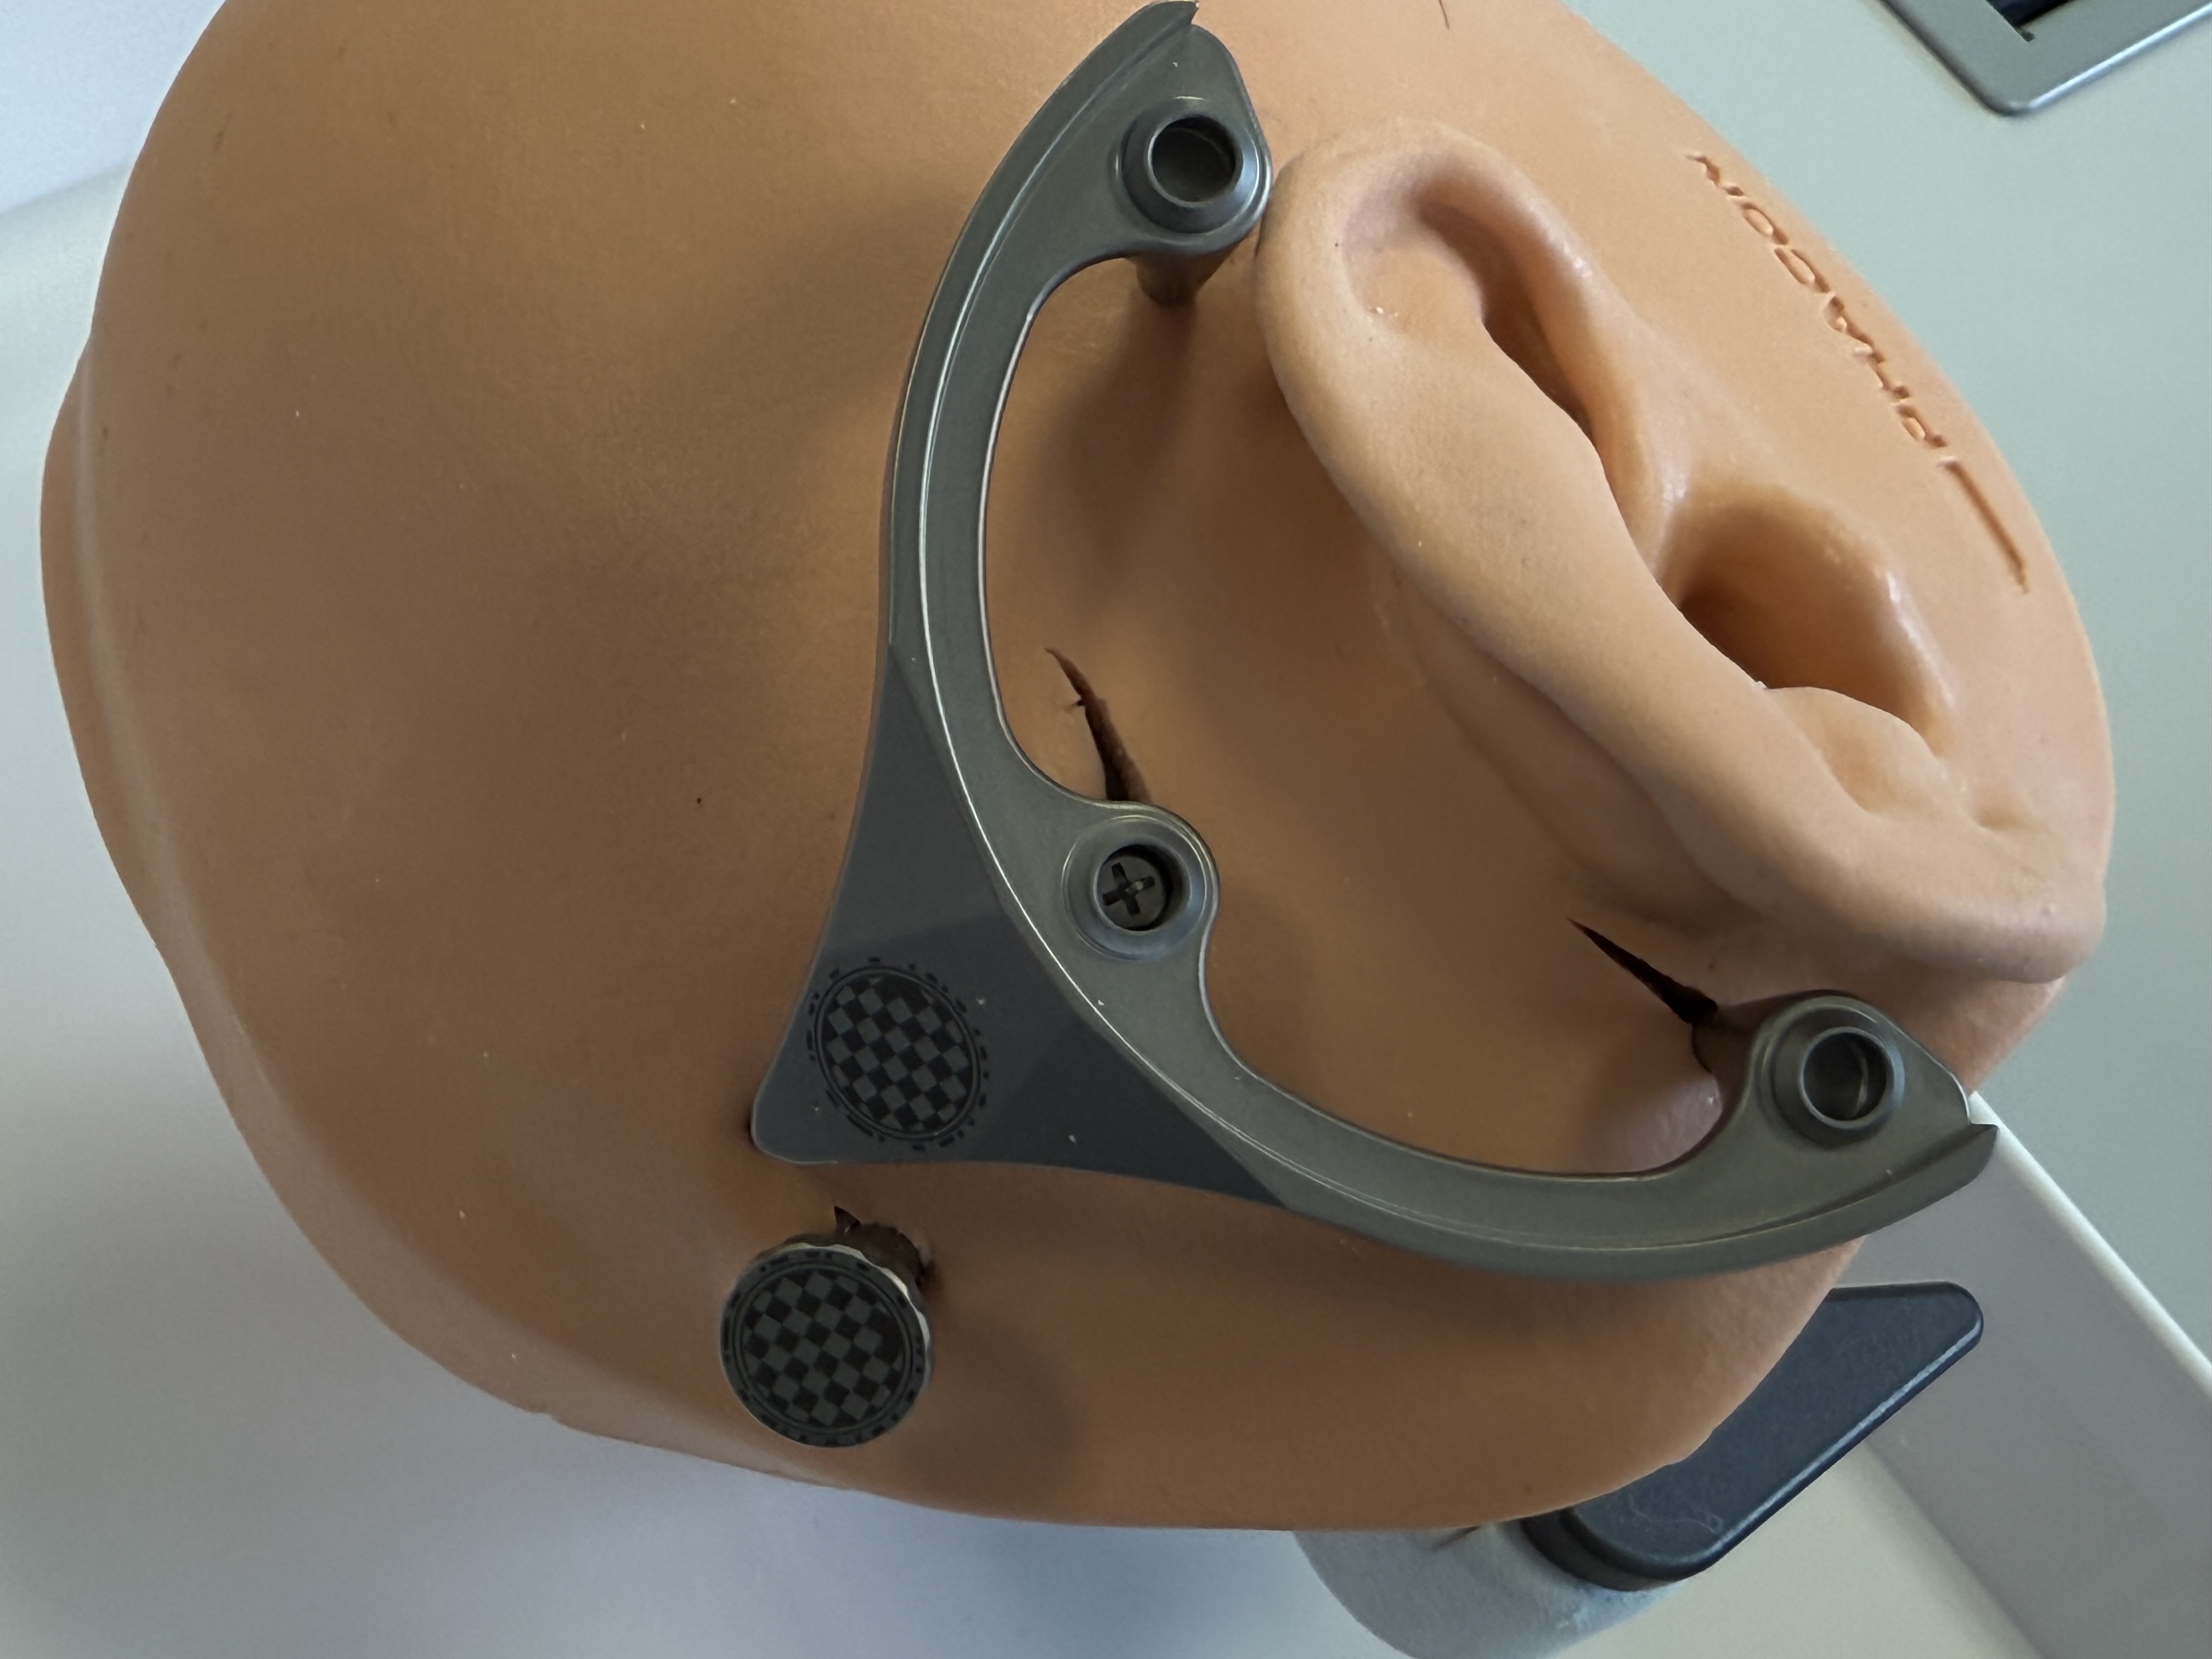
Perform skin incisions and scrape periosteum at the marked positions of the spikes of the MSF.
Fixate the MSF with the Mounting Screw to the first Anchor. Tightening the screw with a torque of 30 Ncm is required.
Warning
Tightening the Mounting Screw with an insufficient torque may lead to loosening of the MSF.
Make sure the spikes are in direct contact to the bone of the skull without a layer of periosteum in between.
After securing the Anchor and the Mini-Stereotactic Frame with the Mounting Screw, visually check that they are not in contact with one another. If there is contact between the Anchor and the Mini-Stereotactic Frame, the Mini-Stereotactic Frame needs to be detached and repositioned.
Recommendation
It is essential to ensure that the Mini-Stereotactic Frame is positioned correctly on the mastoid process. A skin incision that provides a suitable view for assessing the contact of the Mini-Stereotactic Frame spikes is recommended.
Fixation of the second Anchor and Optical Reference Marker
Make or extend the skin incisions for the fixation of the second Anchor, if necessary. Scrape the periosteum at the marked spot for the Bone Screw.
Pre-drill (with the ⌀1.50 mm Pre-drill bit) at the marked position.
Caution
Ensure sufficient skull thickness (> 4 mm) for the pre-drilling. If in doubt, drill in small intervals and check the bottom of the hole for bone. If there is sufficient bone, proceed with drilling.
The pre-drill hole must be thoroughly cleaned before the Anchor is fixed to the skull. Take care to ensure that the pre-drill hole is free from any further contaminants.
Screw a second Anchor to the skull at the pre-drilled hole, using a compatible Bone Screw. The Anchor must be firmly attached to the bone without play.
Recommendation
Tighten the screw with a torque of 30-35 Ncm is recommended.
If the Bone Screw cannot be fixed sufficiently strong, an attempt with the Emergency Bone Screw (with a larger diameter of ⌀2.3 mm) can be made.
Alternatively, a new hole can be pre-drilled in the vicinity.
Screw the Optical Reference Marker firmly onto this second Anchor by a manual clock-wise rotation.
Caution
From this point on, avoid load to the Optical Reference Marker, as its position is used to check that the MSF remained at its initial position, on which the planning is based on.
Mount X-Ray Marker
Caution
The contact surfaces of the X-Ray Marker with the MSF must be clean and free of debris to ensure accurate fit.
Warning
At this point, do not attempt to retighten the screws, reposition the MSF or apply excessive forces. The planning of the access path relies on the fact that the MSF remains at its position relative to the patient.
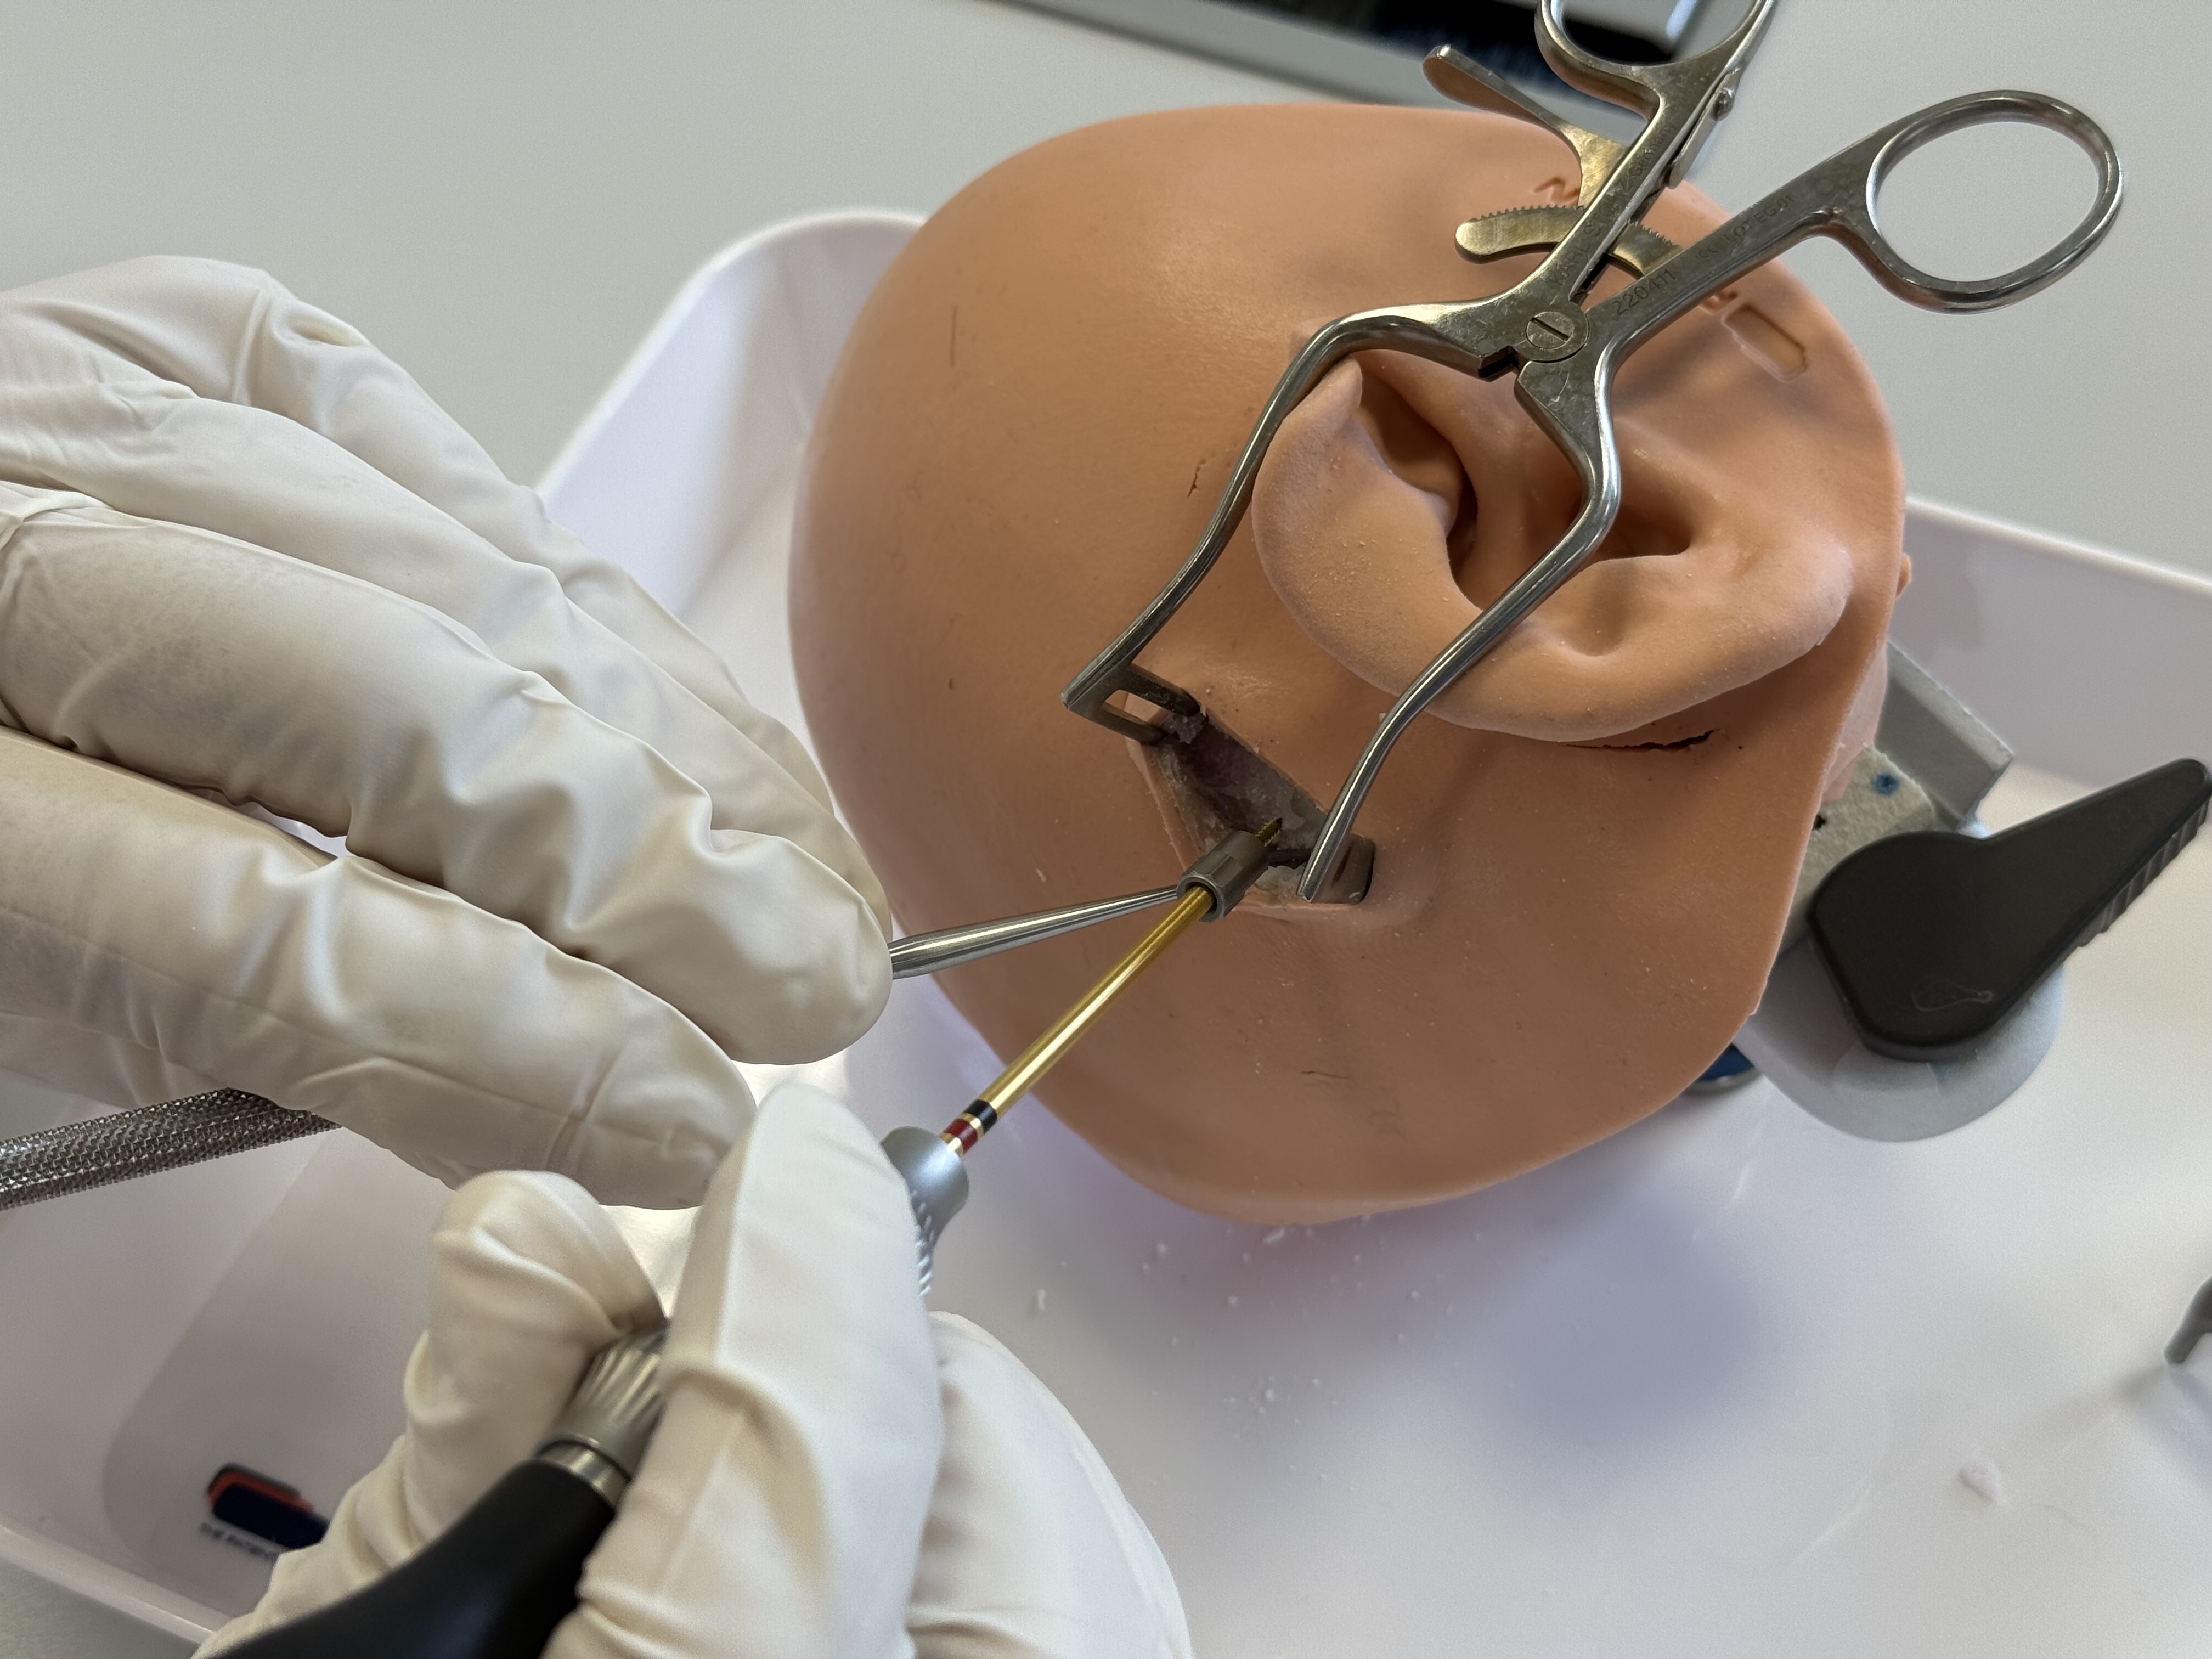
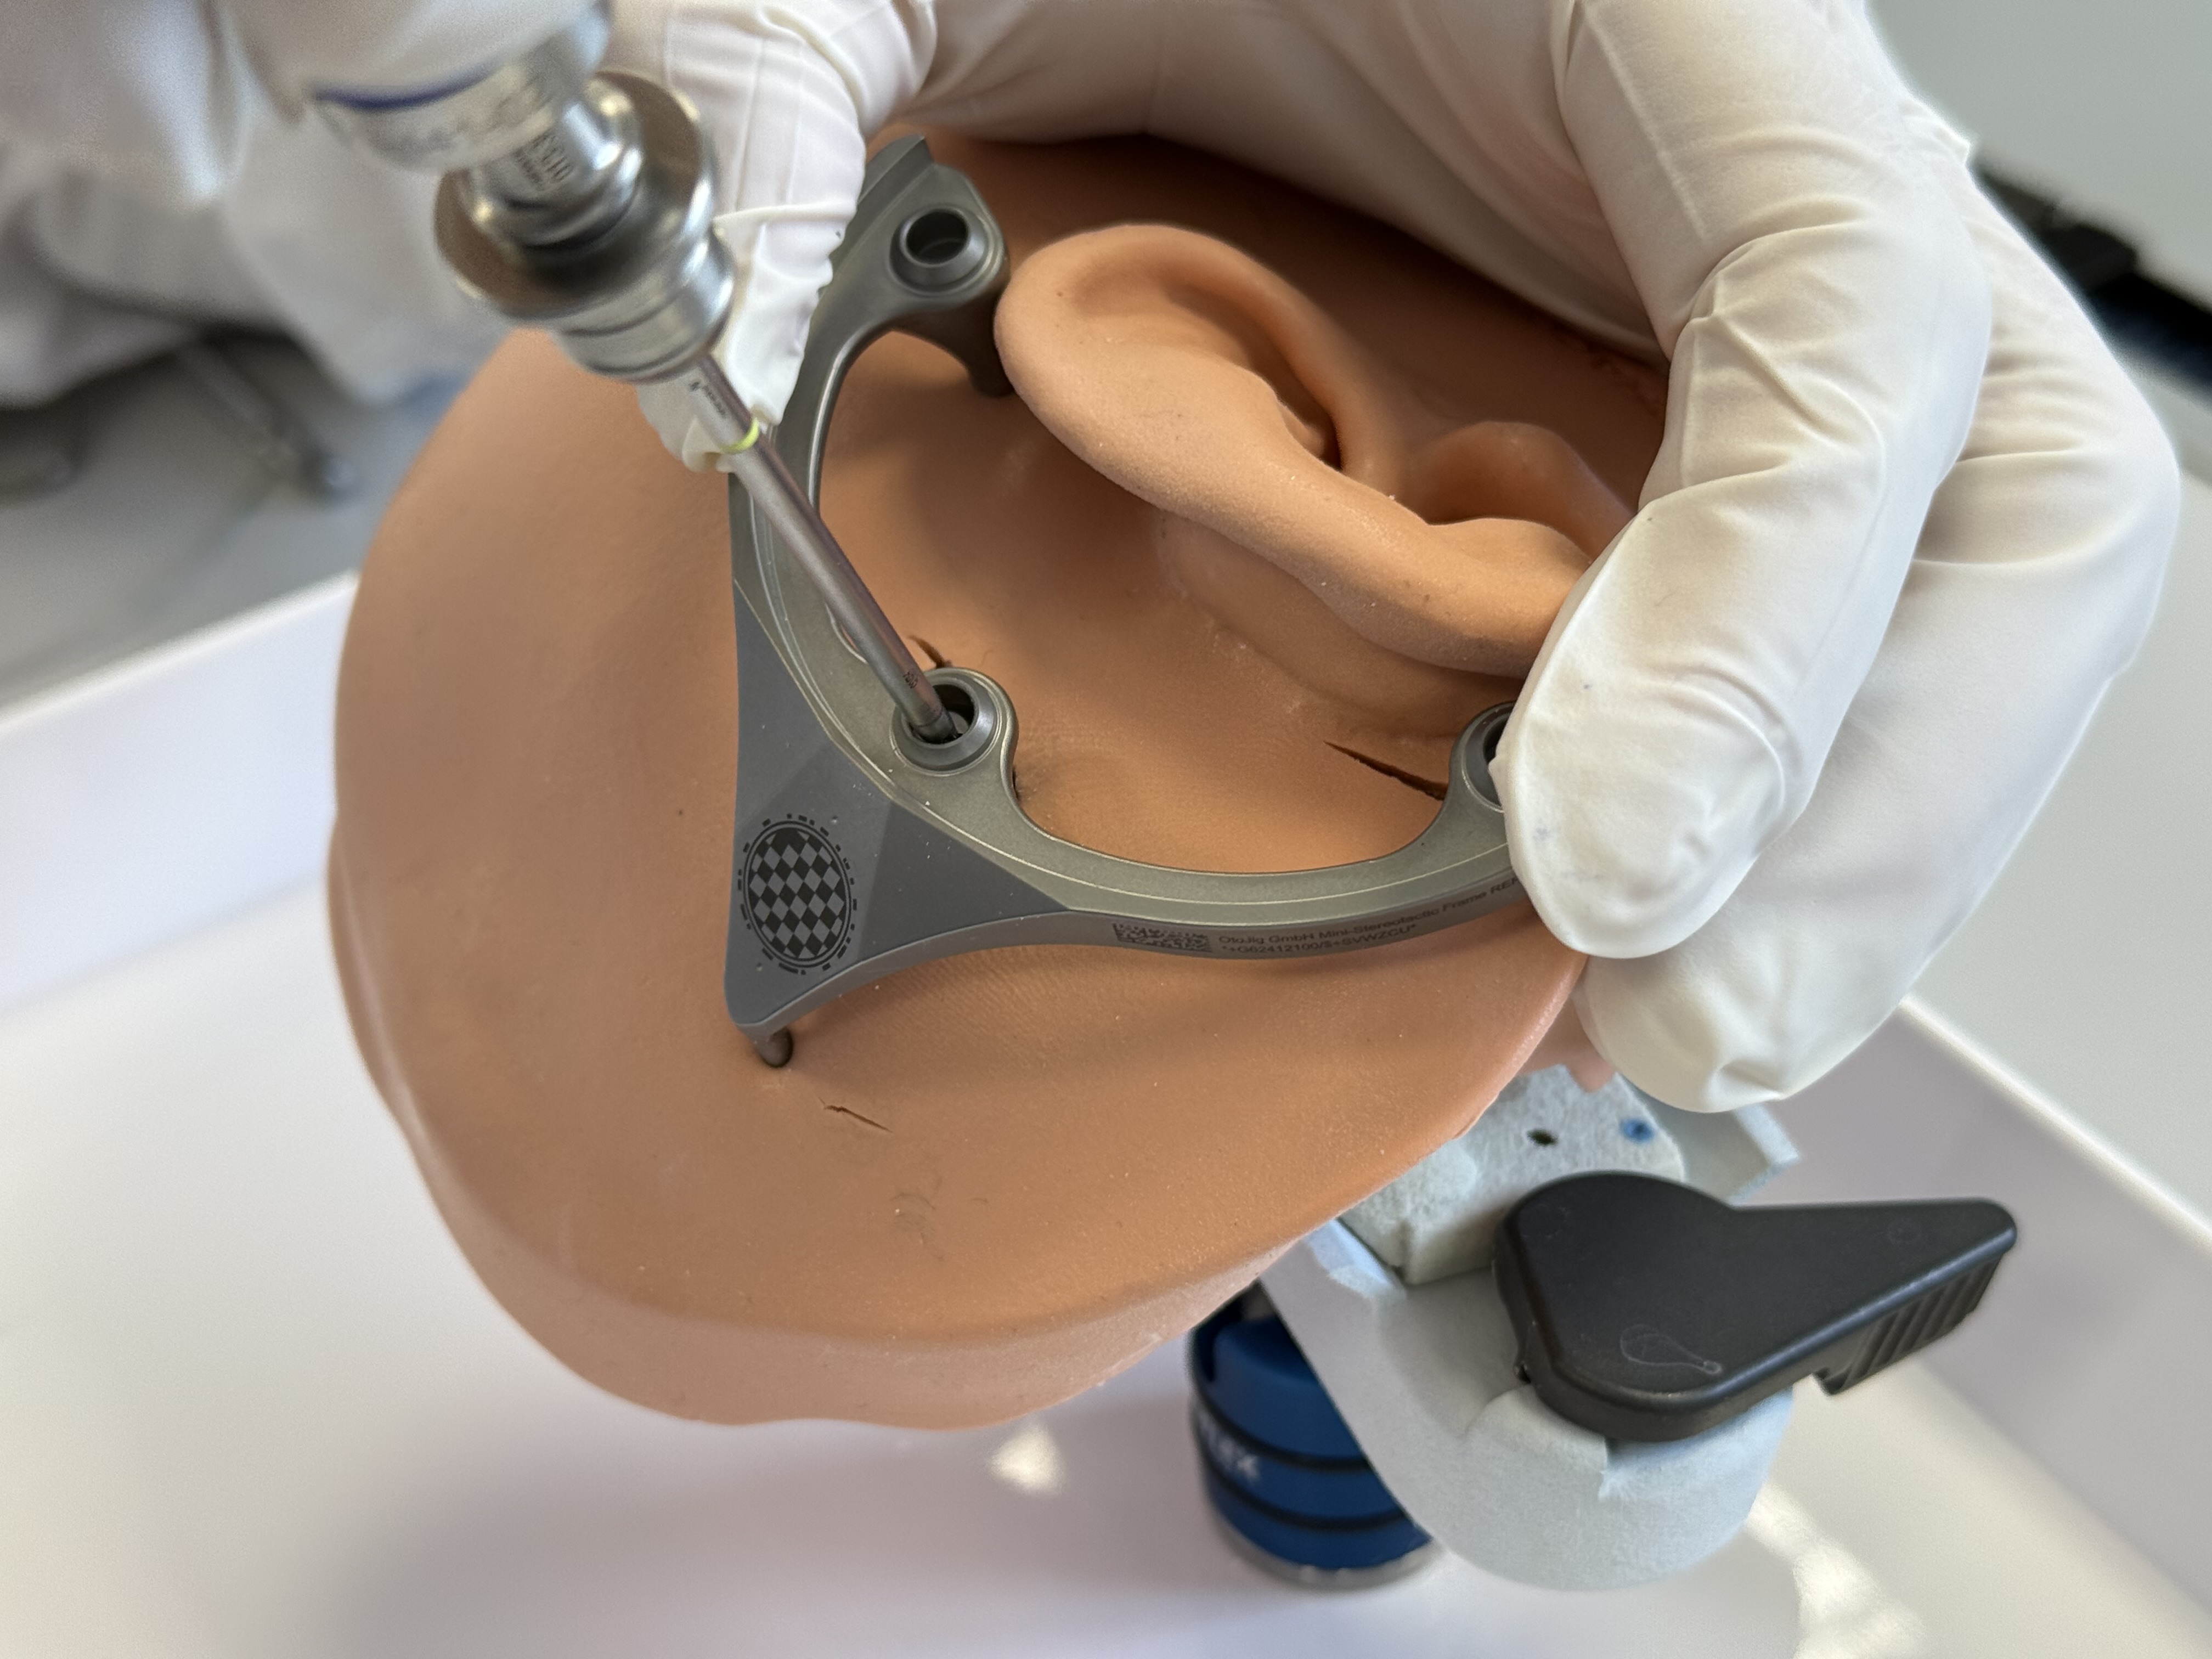
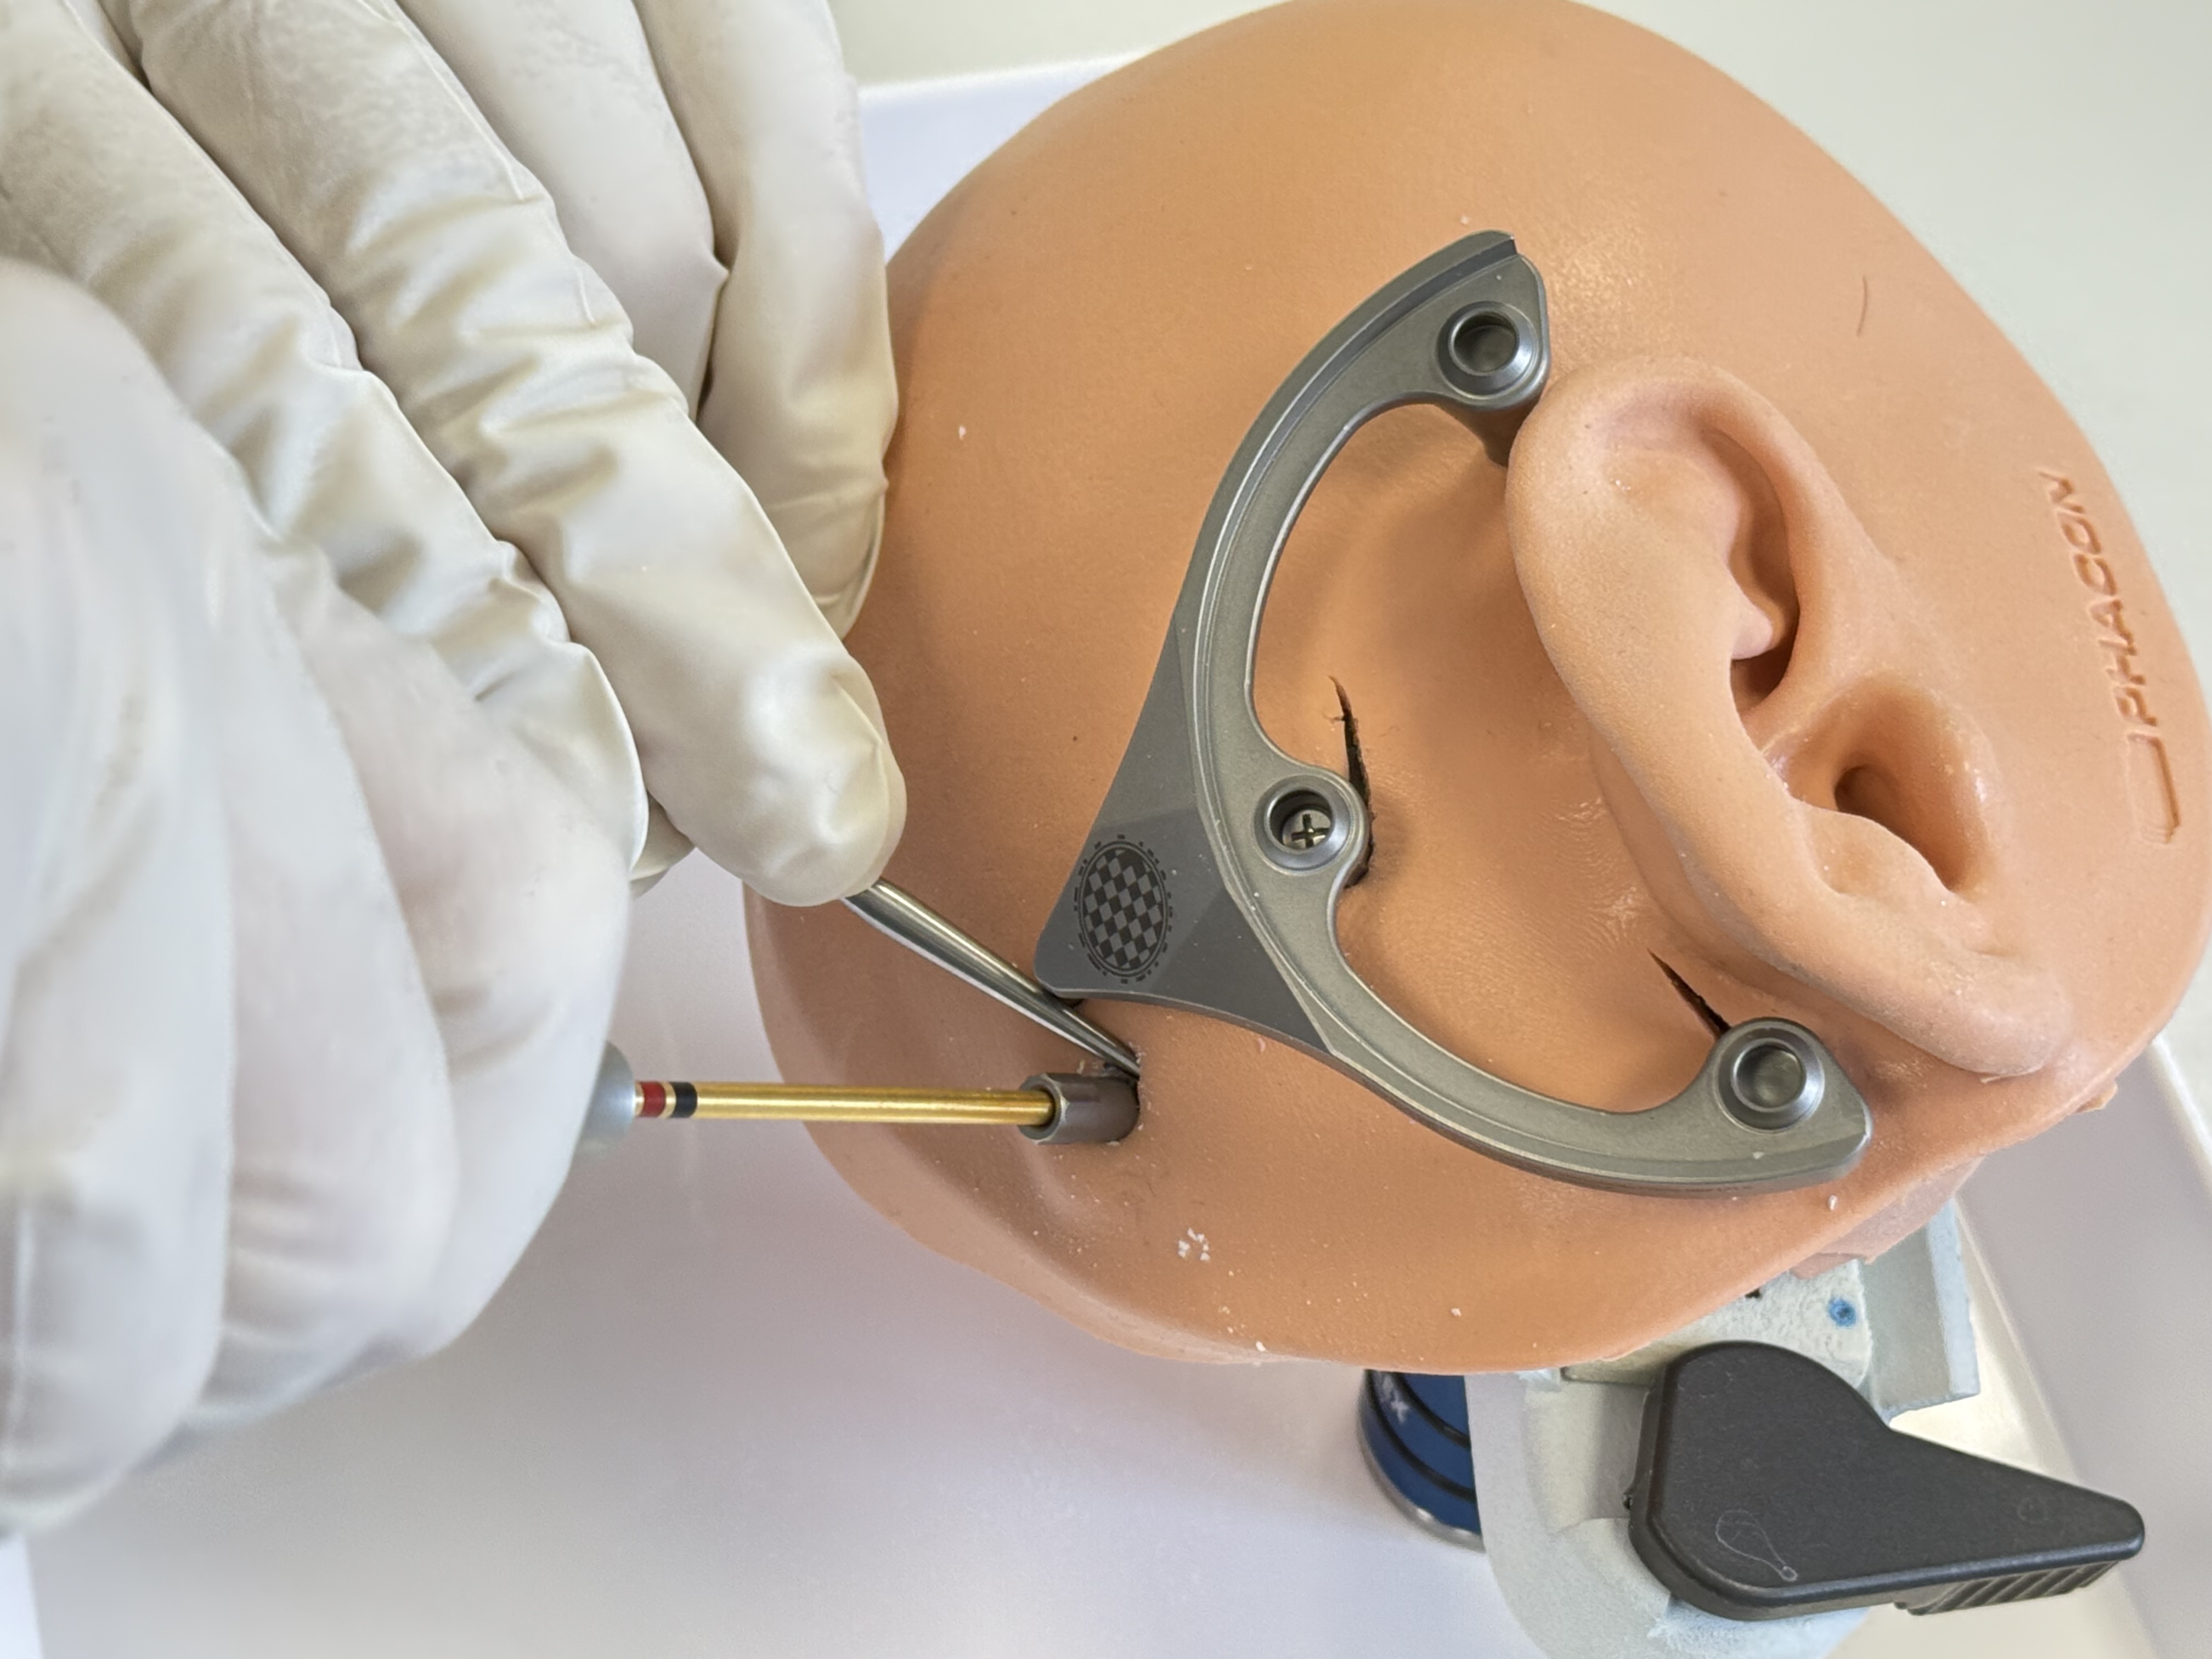
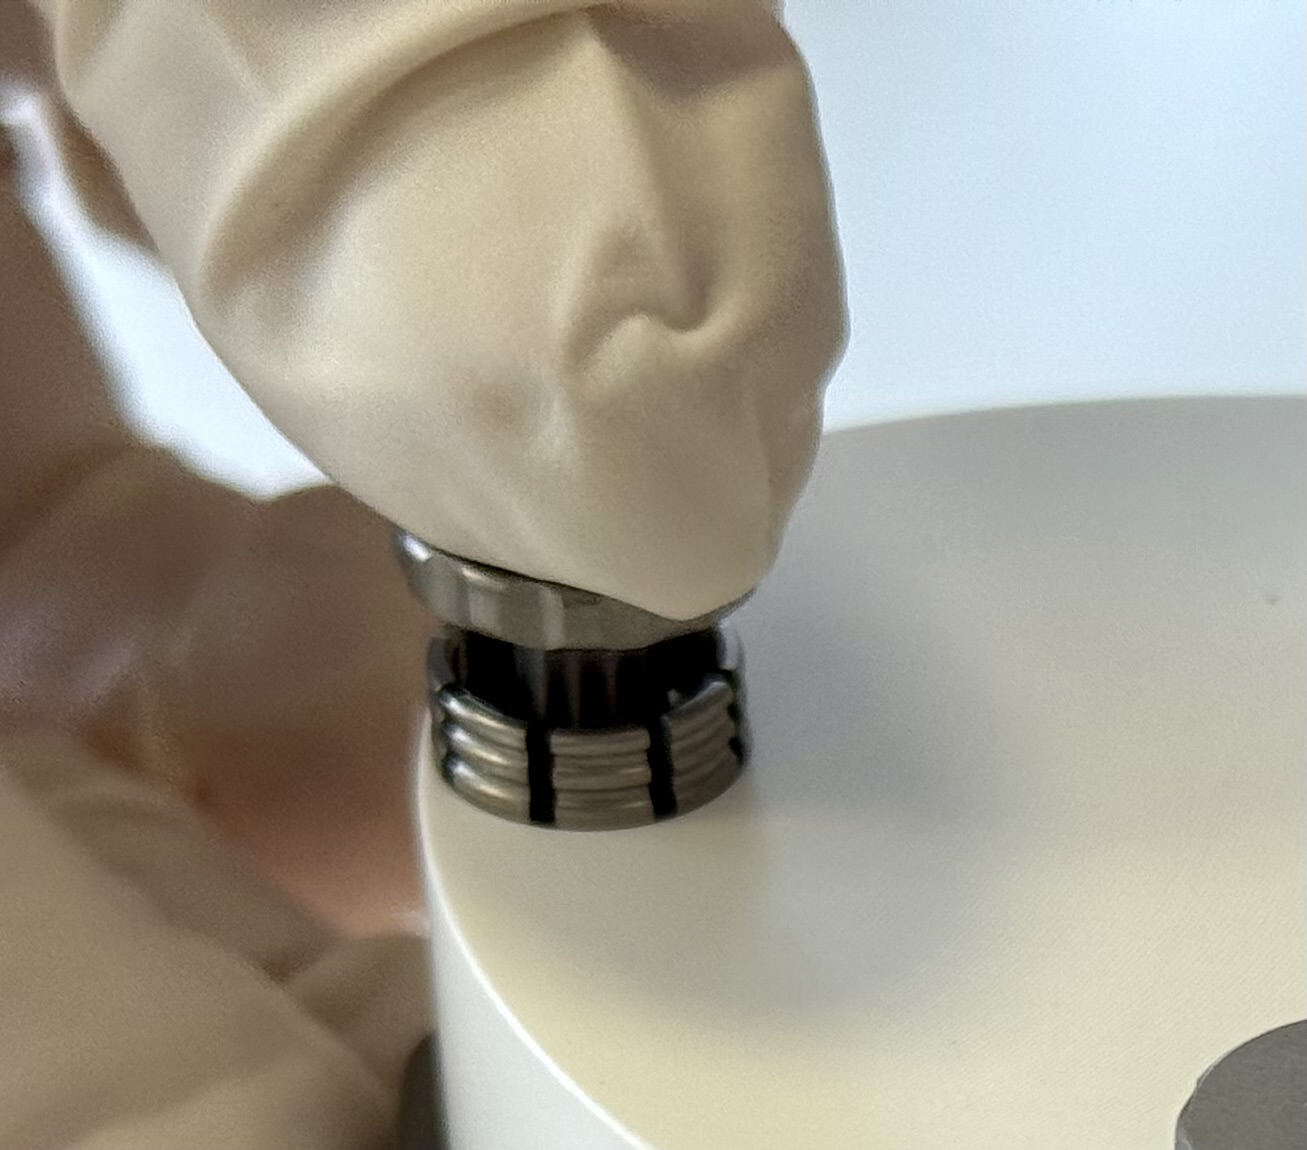
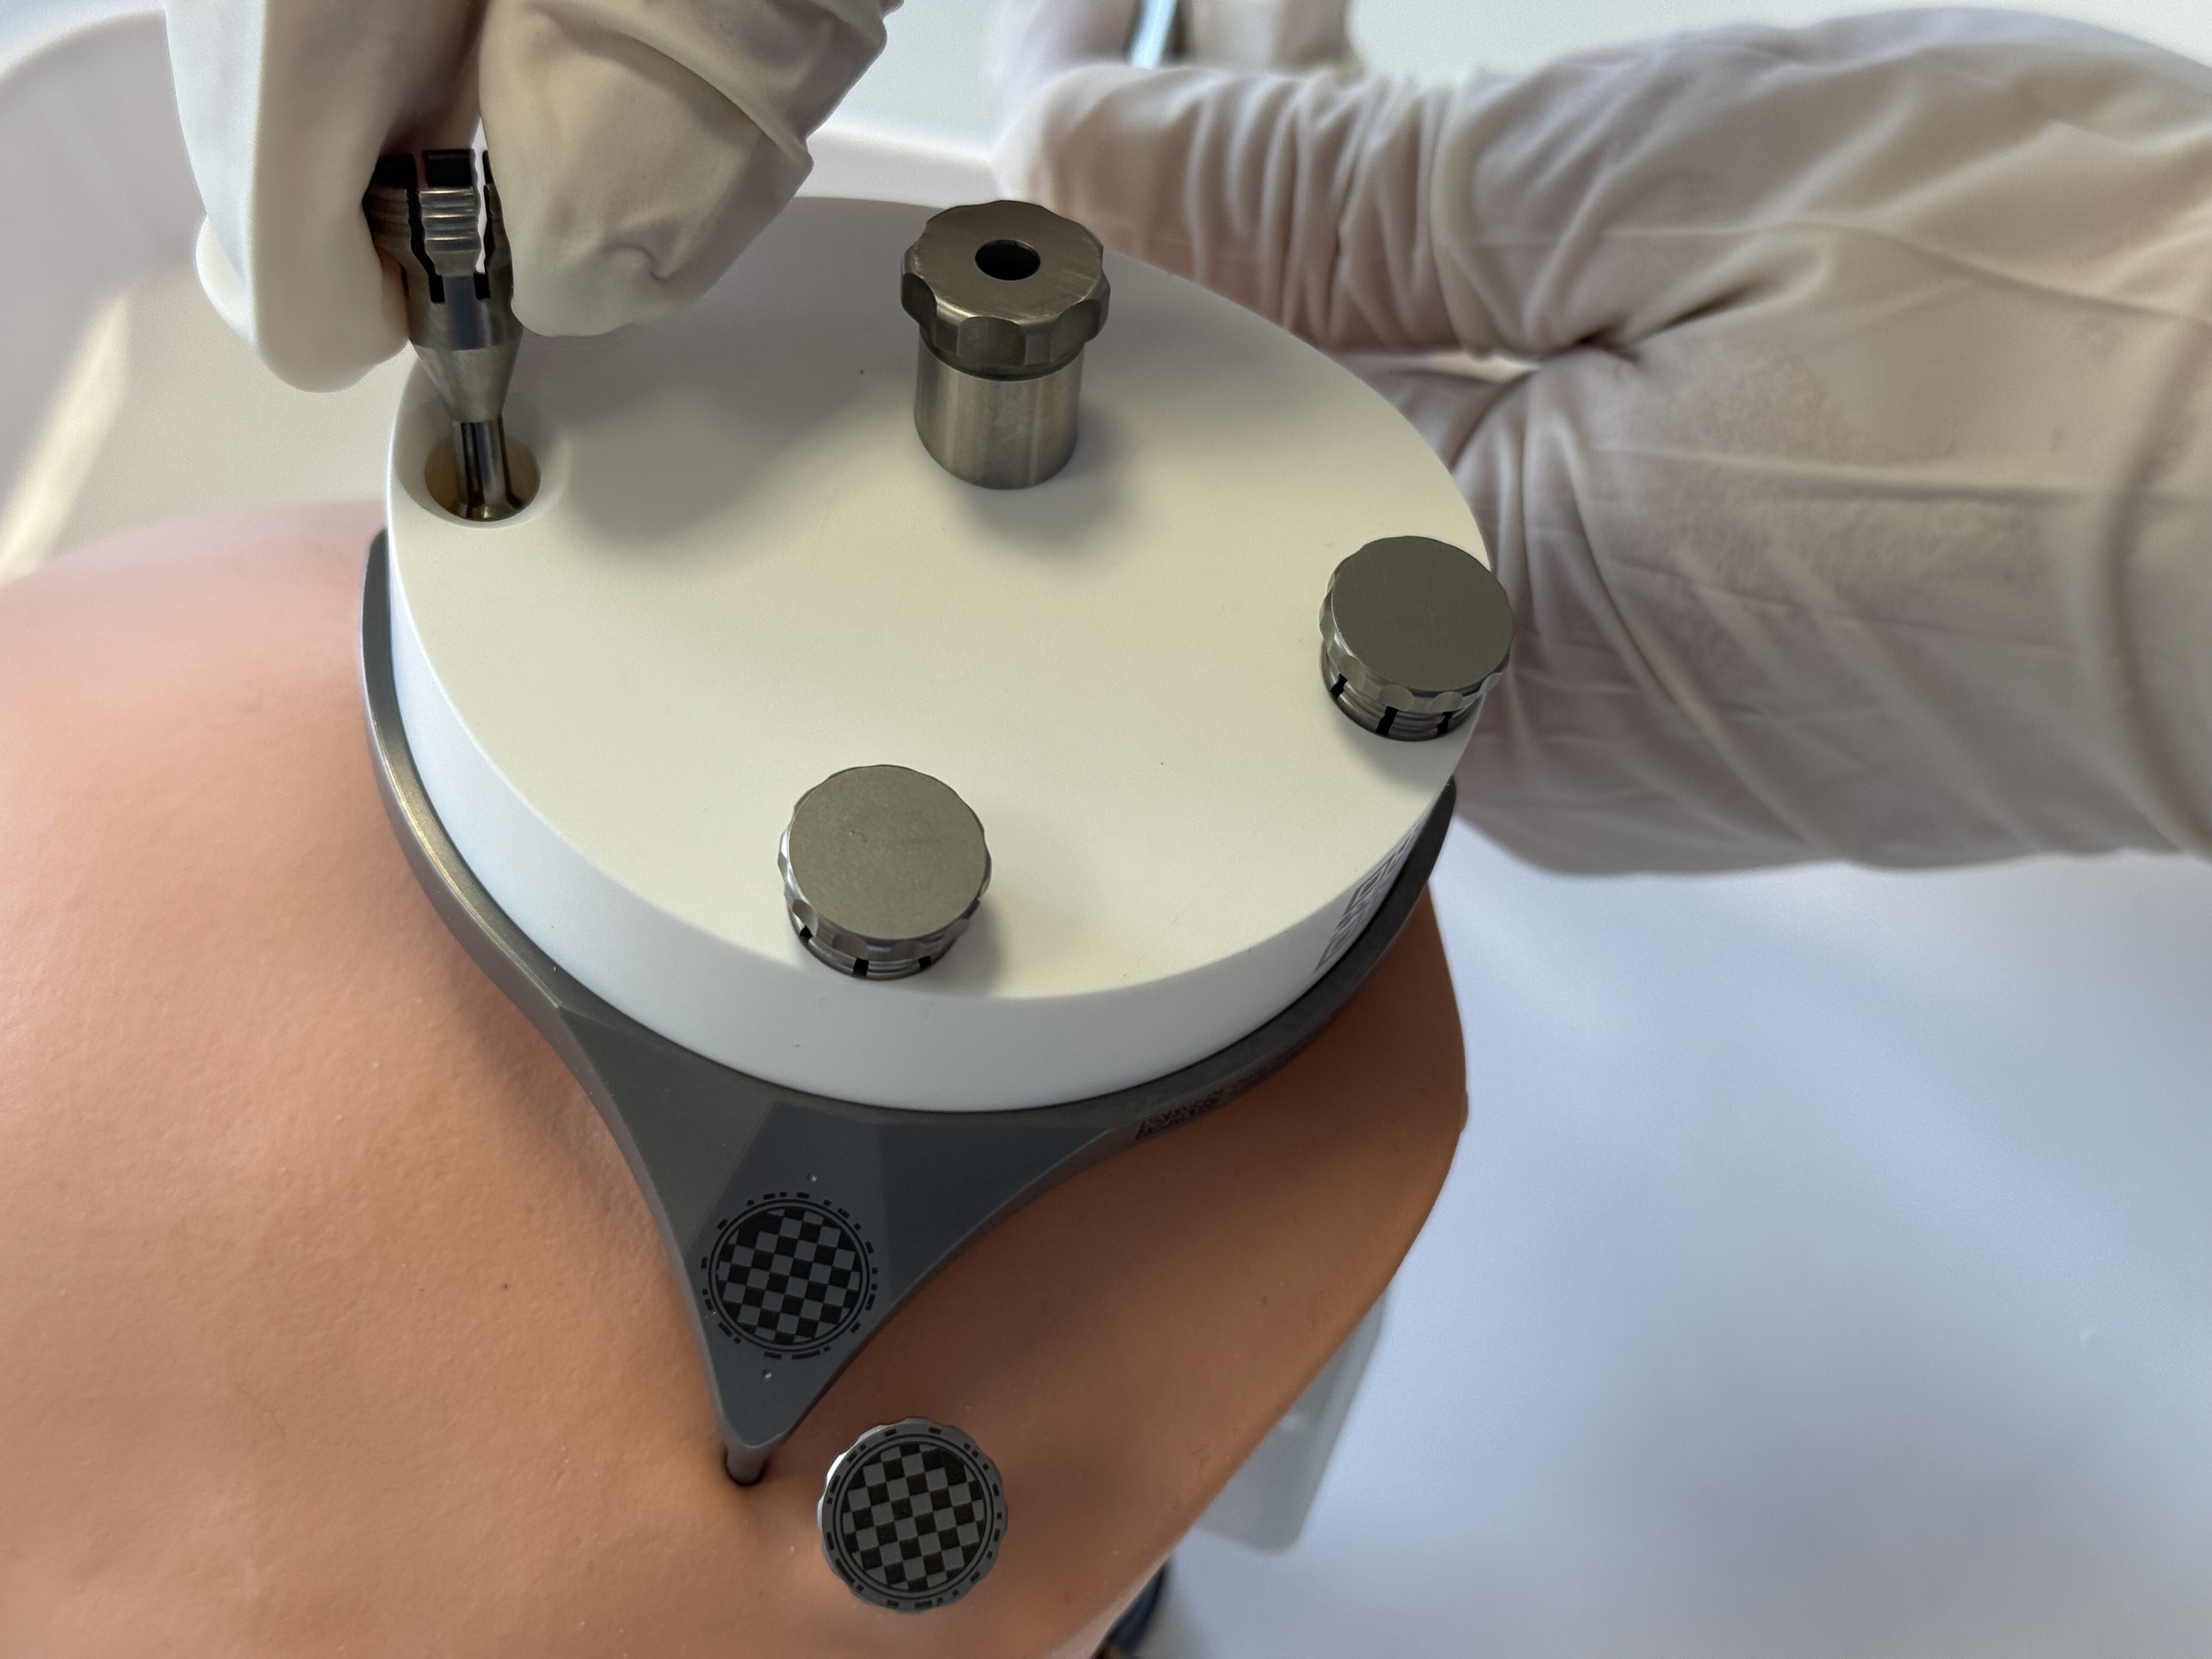
Mount an X-Ray Marker onto the MSF and fixate it with three Jig Fasteners.
Place the X-Ray Marker on the mounting sockets of the Mini-Stereotactic Frame using gentle pressure so that there is no gap between the X-Ray Marker and the Mini-Stereotactic Frame.
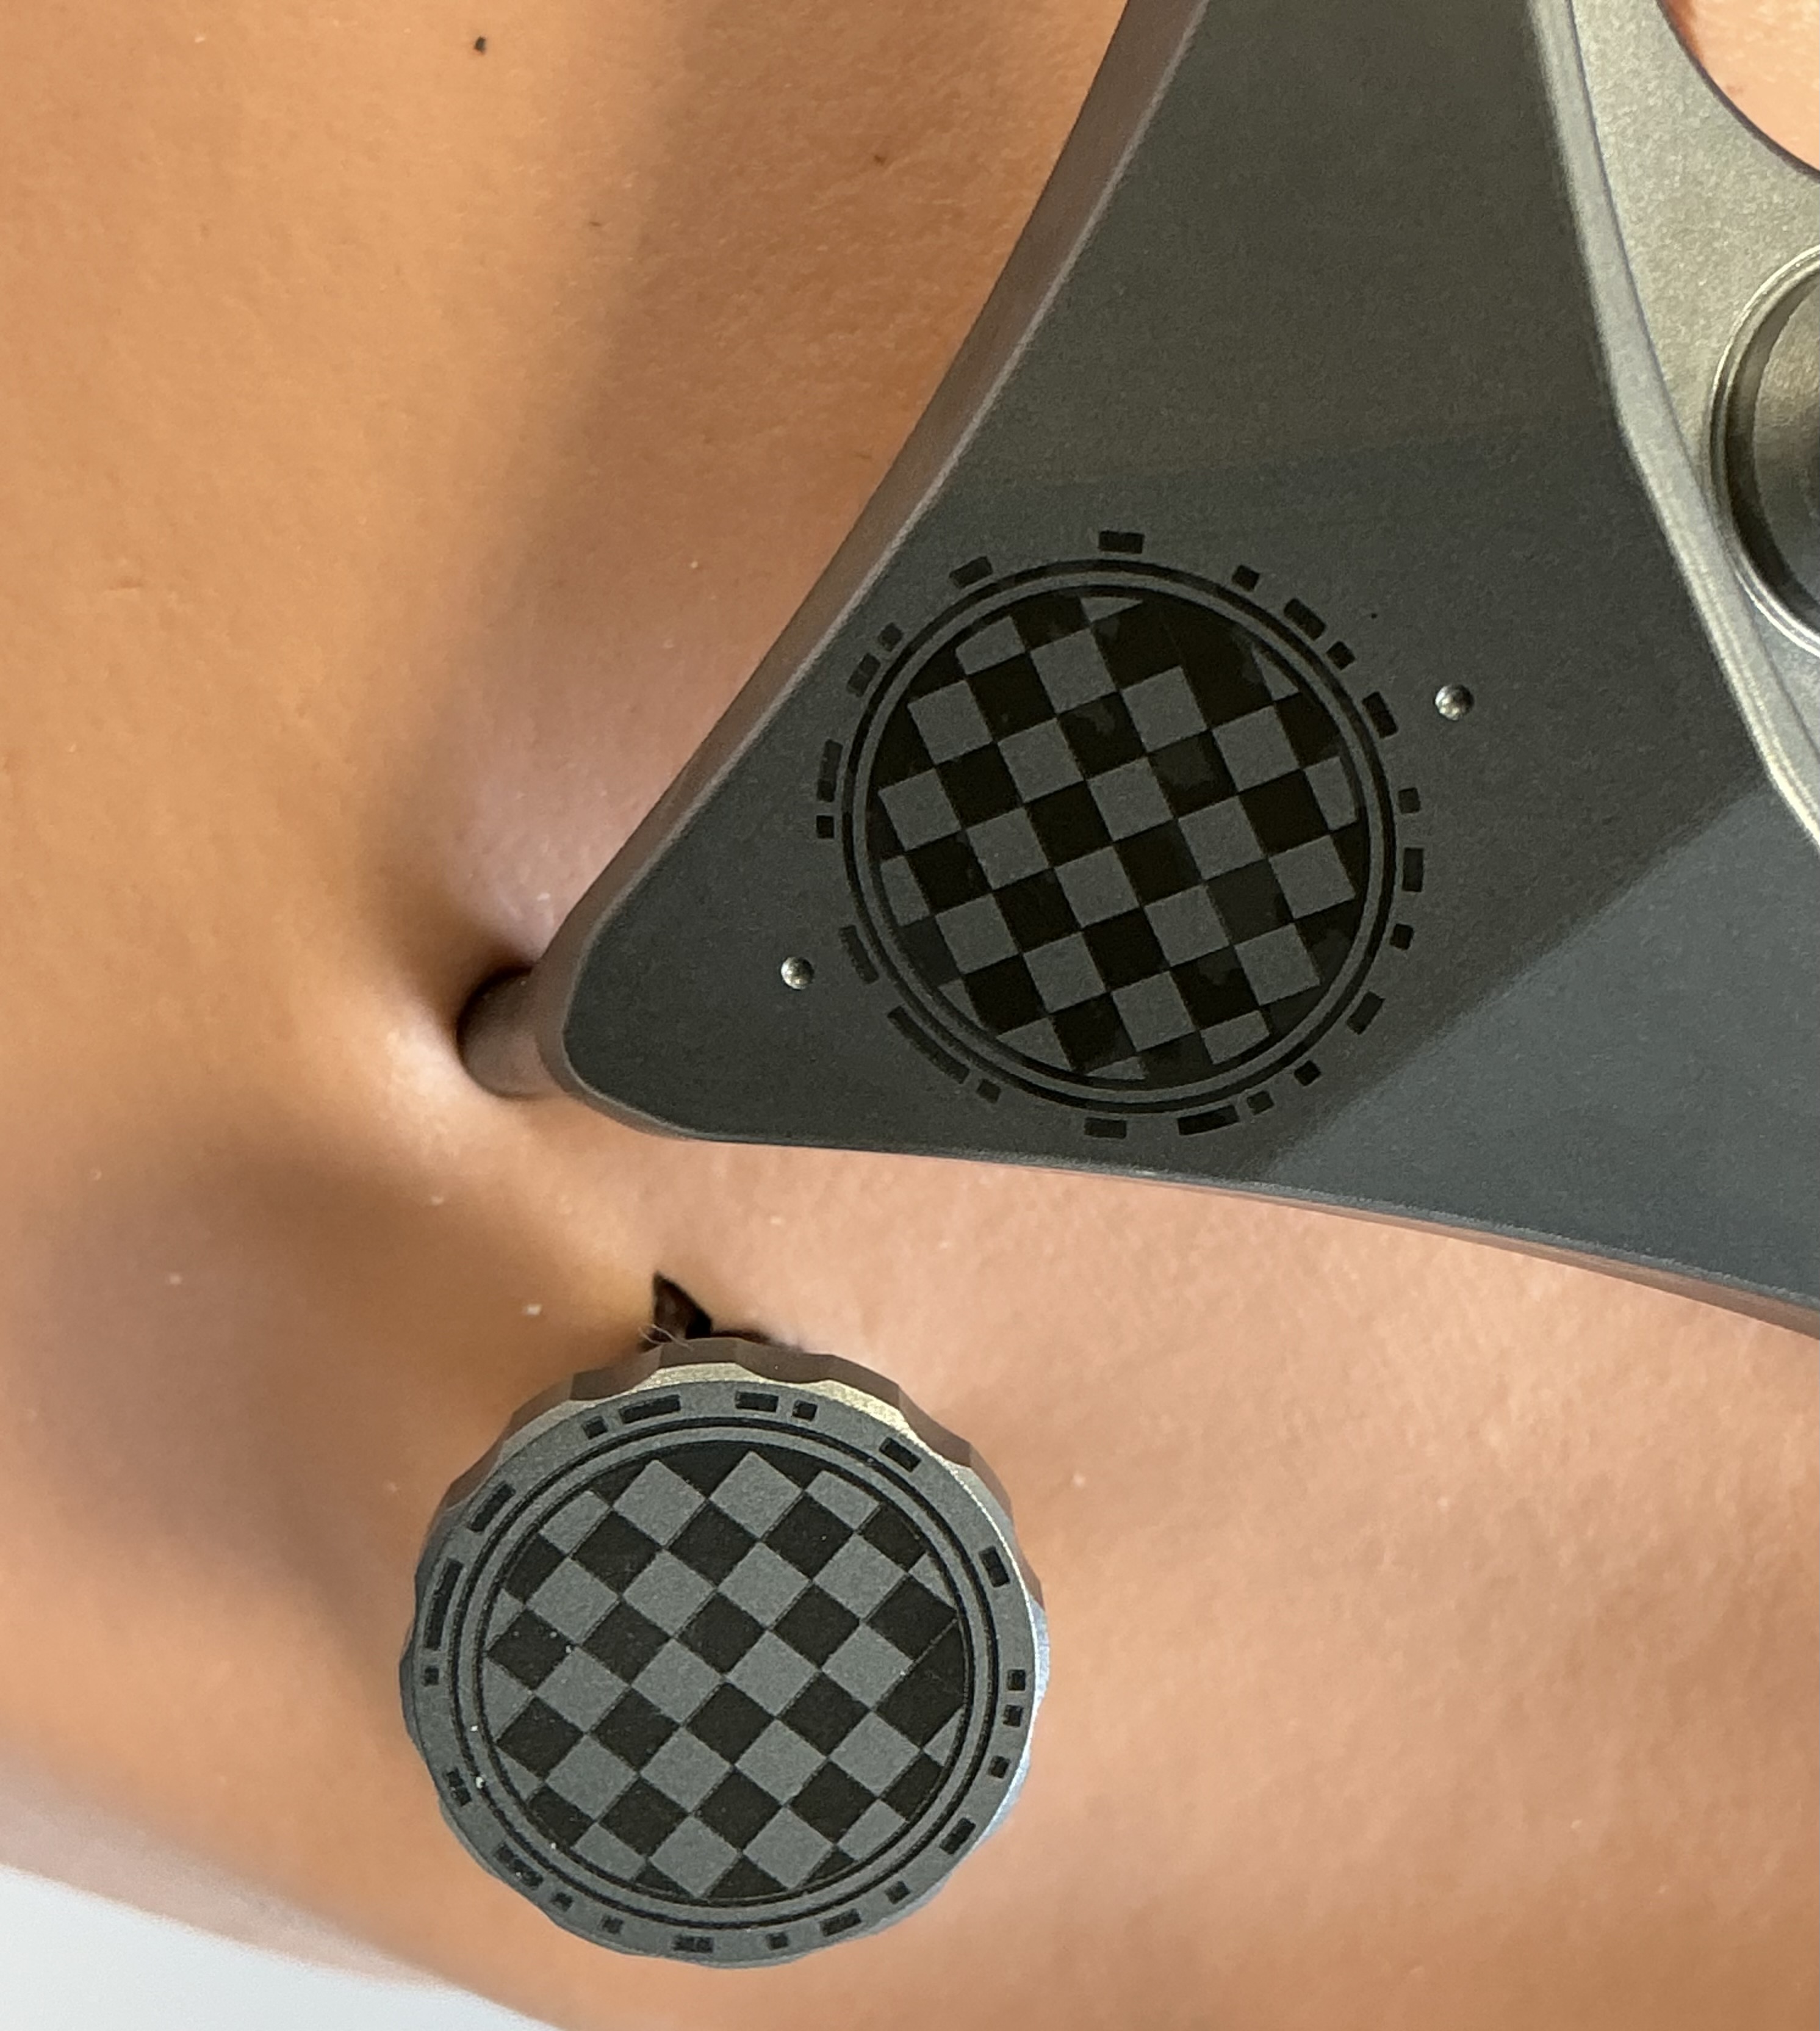
Once the X-Ray Marker is correctly mounted on the Mini-Stereotactic Frame, secure it in place using three Jig Fasteners. To do this,
first insert the Jig Fastener shells into the fixation holes of the X-Ray Marker,
make sure that the shells are aligned with the bevel of the X-Ray Marker,
using minimal force, push the three Jig Fastener pins into the Jig Fastener shells until the Jig Fastener pins engage. When successfully inserted, a slight "click" will be heard and felt.
Caution
Be careful not to damage your gloves when pressing the Jig Fastener pin into the shell.
After assembly, check that the three Jig Fasteners are firmly secured. This can be done by
visually checking that the shells are still aligned with the bevel of the X-Ray Marker and
manually checking that the Jig Fasteners are firmly seated in the X-Ray Marker.
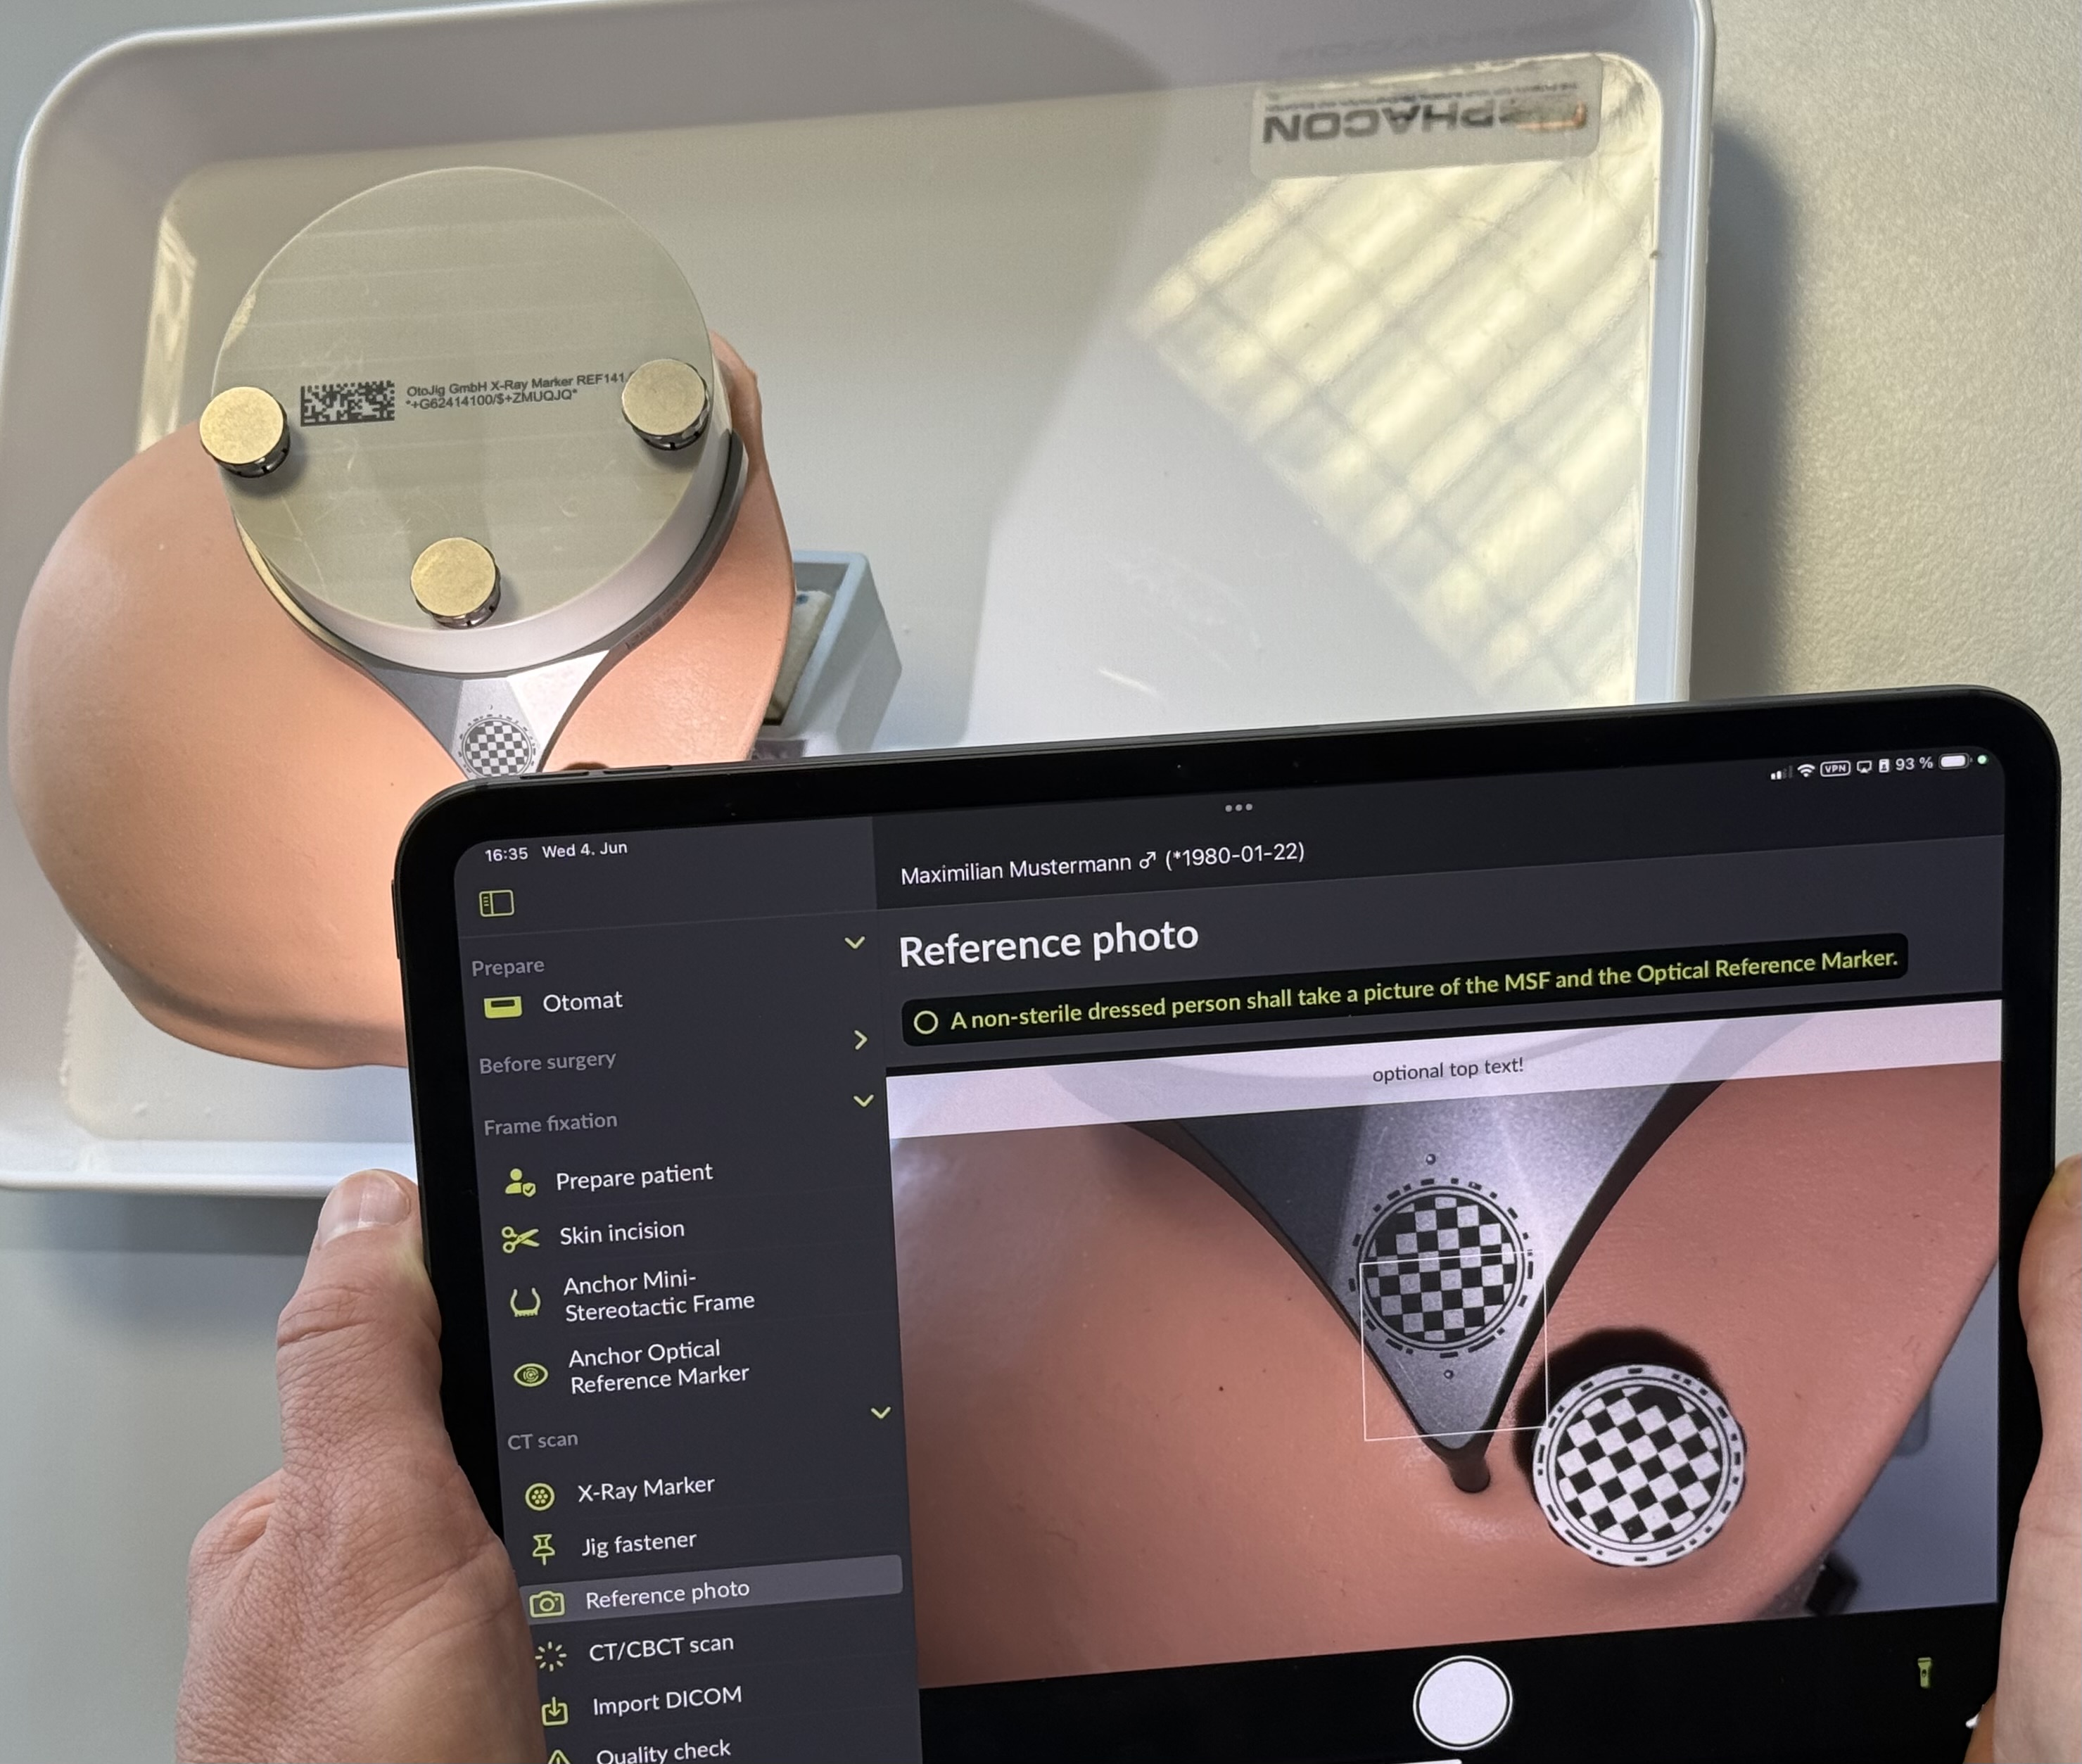
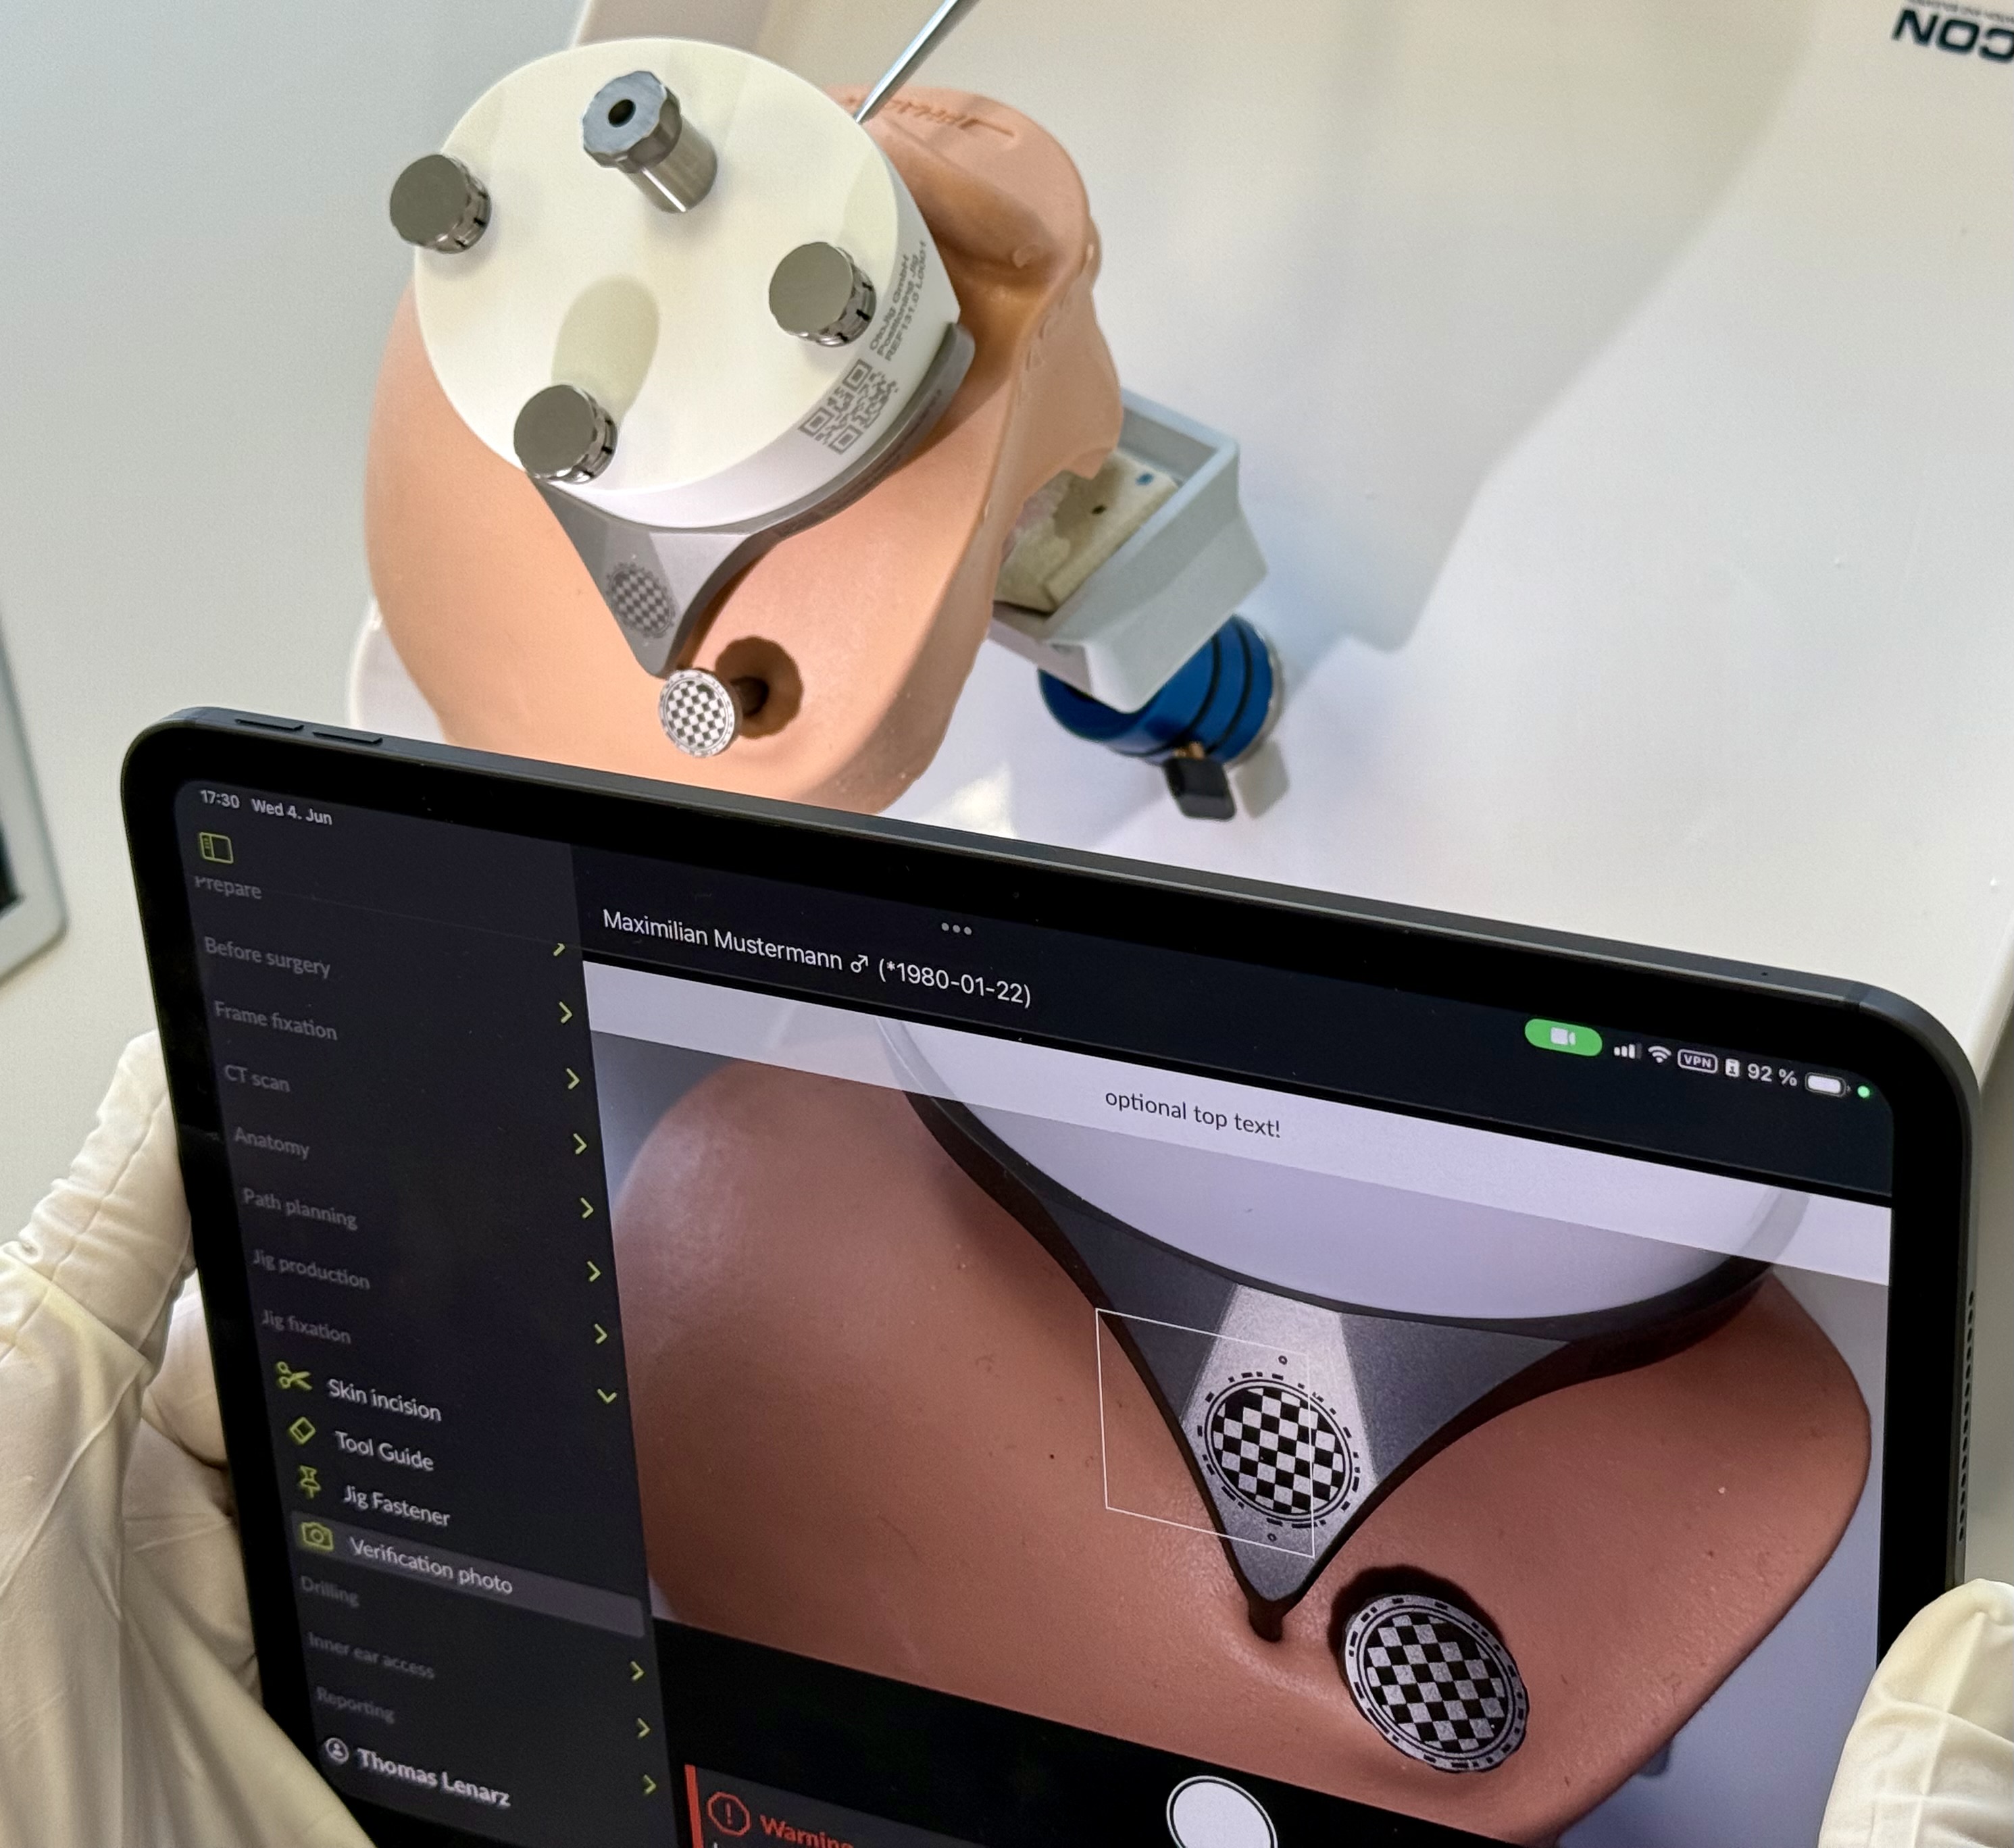
A non-sterile dressed person shall take a picture of the MSF and the Optical Reference Marker according to the instructions in the conCIerge app.
Note
Make sure the iPad (back) camera lenses are free of dirt. Clean dirty camera lenses.
Scan the UDI of the X-Ray Marker using the conCIerge.
CT/CBCT scan
Perform a CT/CBCT volume scan that fully includes the temporal bone area and the X-Ray Marker. For the CT scan, use the highest quality setting (bone protocol, if available) for a multi-planar reconstruction. The reconstructed volume has to be a regular grid with 0.3 × 0.3 × 0.3 mm per voxel, or better. Avoid tilting the gantry (offered by some CT devices). Make sure to avoid movement artifacts.
Recommendation
A CBCT scan in bone protocol is recommended over a CT scan, due to the typically lower radiation dose. Avoid radiation exposure to the eyeballs/lenses. Consider performing a scout scan to adjust the volume of interest (field of view) to avoid repeated radiation exposure.
Caution
No metal clips or similar shall be attached in close proximity to the situs during the CT scan.
Recommendation
To avoid any contaminations during the CT/CBCT scan, cover the whole Mini-Stereotactic Frame including the X-Ray Marker according to standard of care. Avoid load on the Optical Reference Marker.
Export the reconstructed volume in DICOM format, e.g. to an USB drive.
Import DICOM into conCIerge
Please consult the eIFU of conCIerge in latest version at https://otojig.com/IFU in order to:
Import the DICOM scan into conCIerge.
An automated check for suitability of the scan is performed. If the scan is found not to be suitable, a new CT/CBCT scan can be performed.
Remove X-Ray Marker
Remove the Jig Fastener and the X-Ray Marker and put them aside for further use.
Recommendation
The best way to remove a Jig Fastener pin from the shell is with a simultaneous twisting and pulling motion.
Path planning
Please consult the eIFU of conCIerge in latest version at https://otojig.com/IFU and
follow the onscreen instructions in conCIerge to plan and approve a virtual access tunnel.
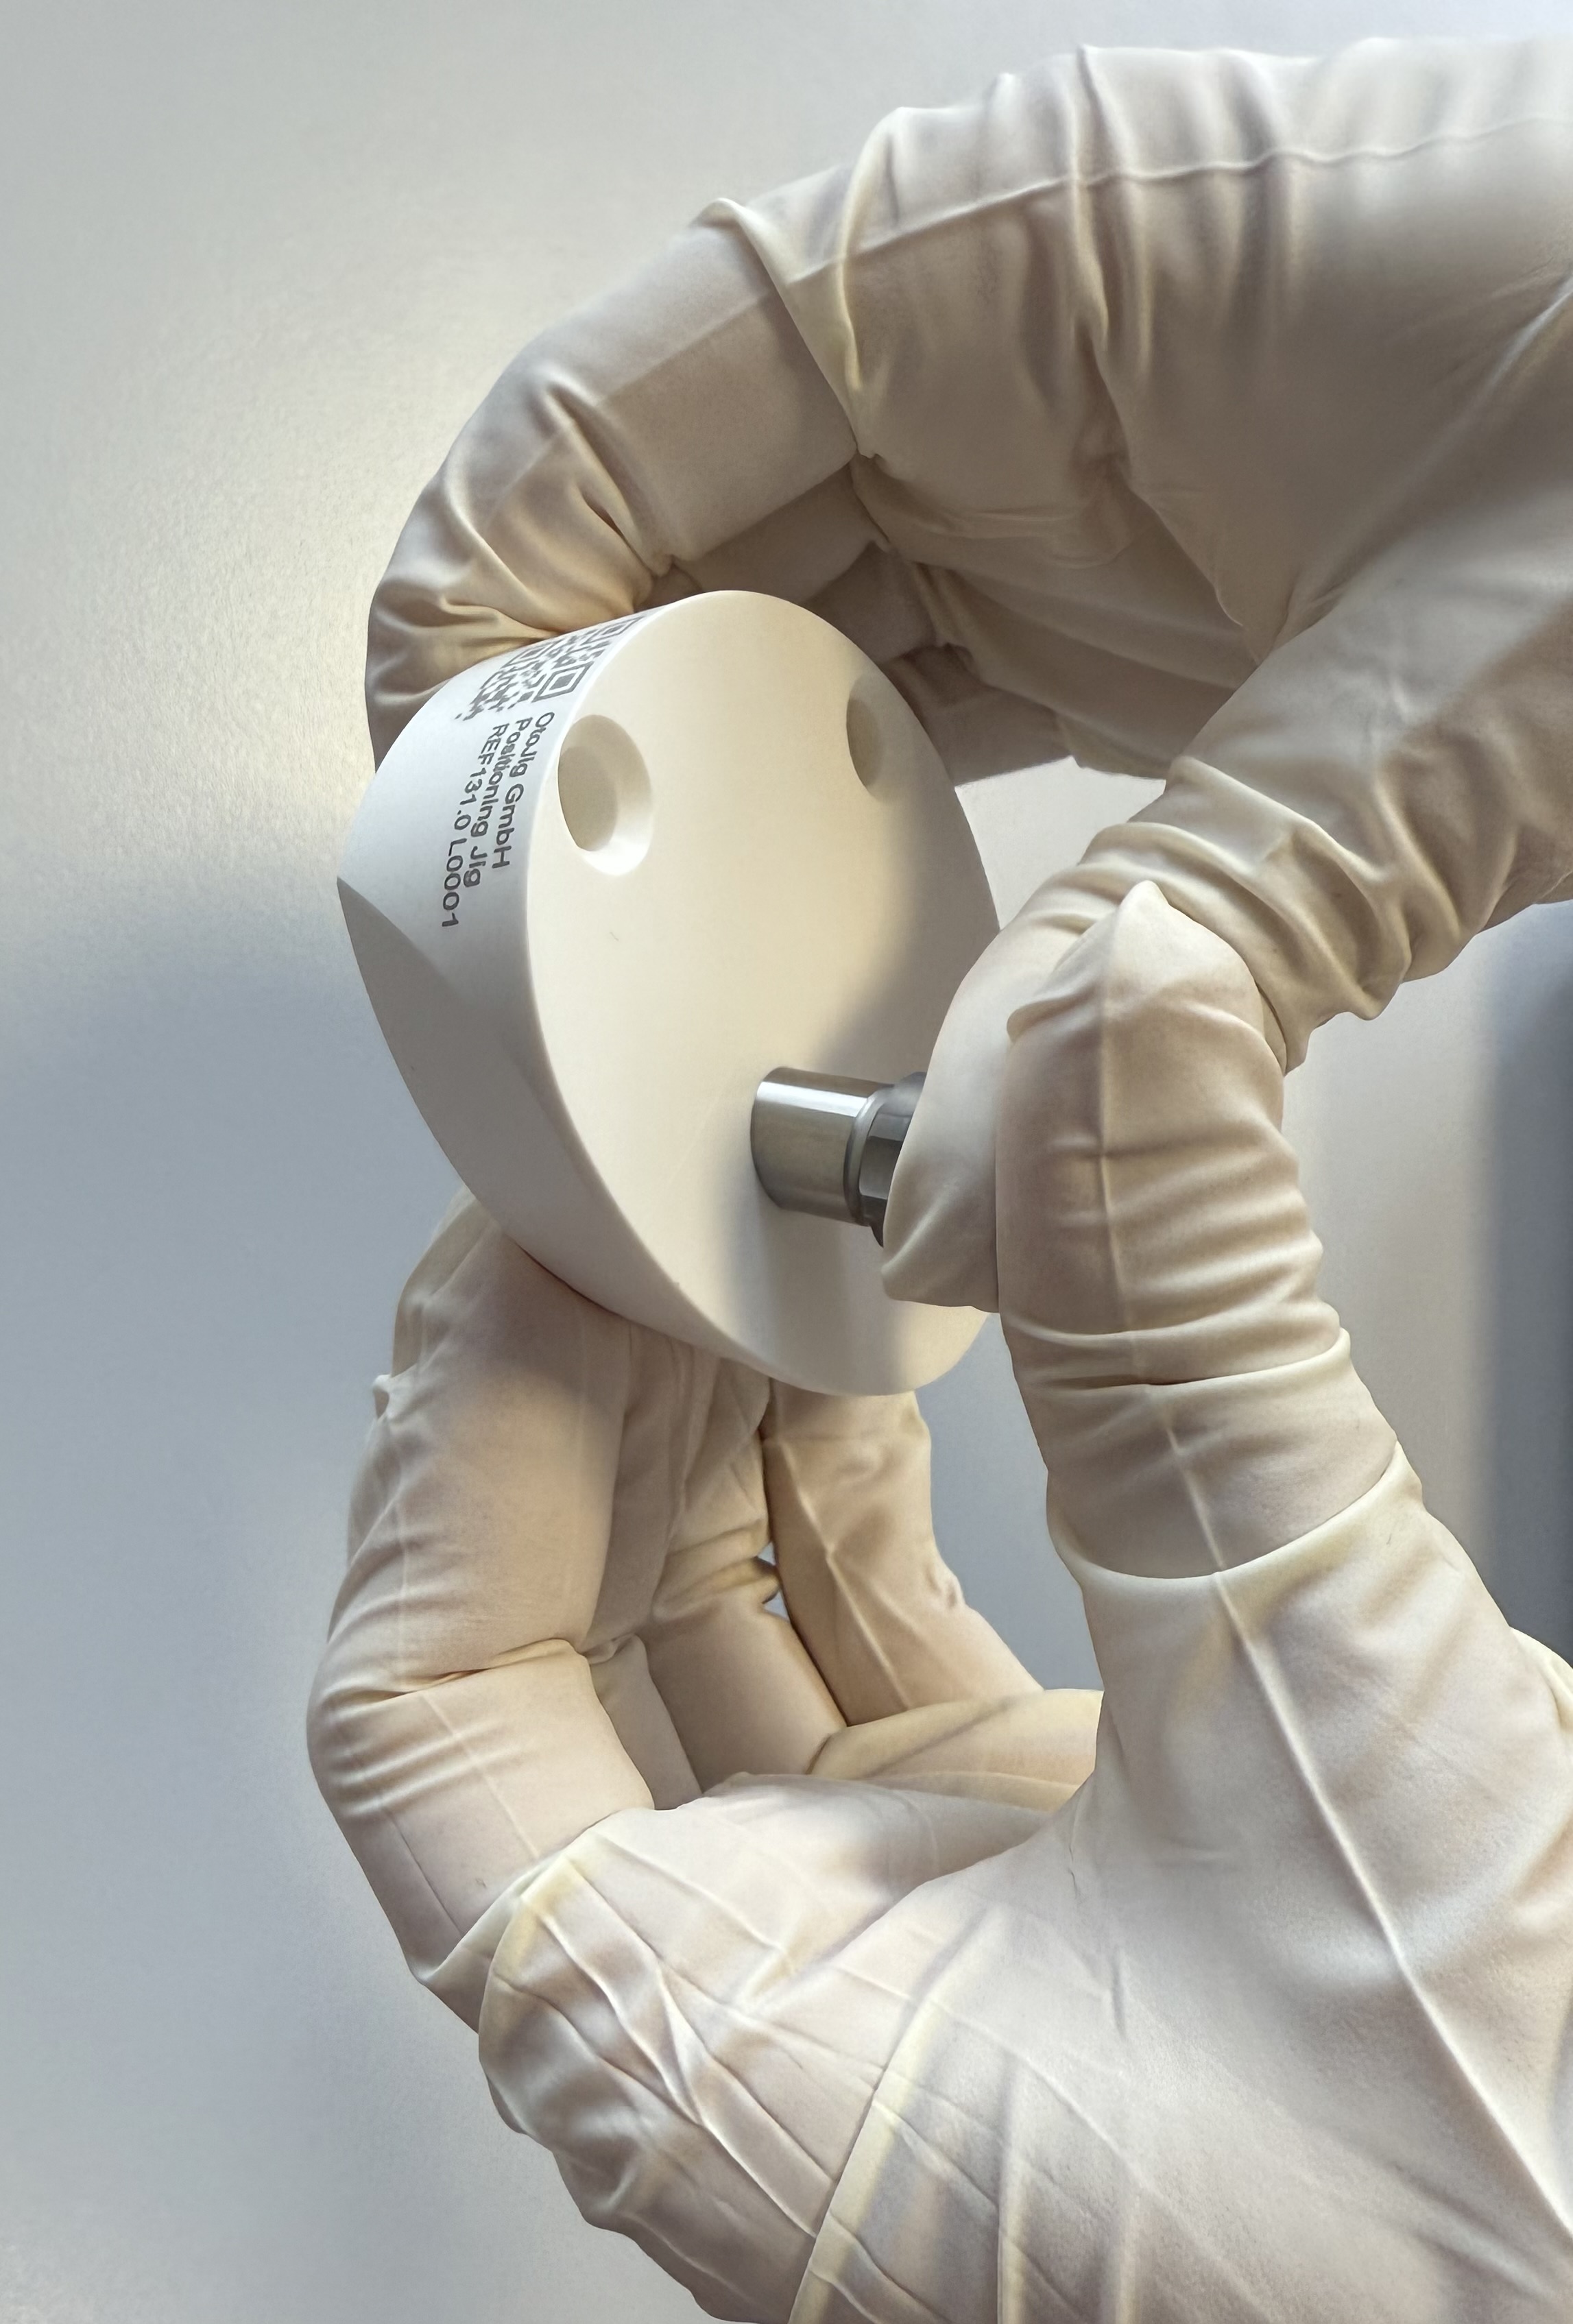
Individualization of Positioning Jig
Send the planned access tunnel to the Otomatic app for production of a patient individualized Positioning Jig.
Operate the Otomat and clean the individualized Positioning Jig according to the IFU of the Otomat.
Sterilize the Positioning Jig in accordance with the sterilization instructions.
Mount Positioning Jig
Recommendation
The Positioning Jig may be hot after sterilization. Ensure that the Positioning Jig has reached ambient temperature before use, e.g. by cooling the Positioning Jig in a water bath.
Mark (e.g. with a surgical pen) the position of the planned access tunnel on the skin, using the through hole of the Positioning Jig.
Warning
Make sure the position of the path and its direction as seen through the attached Positioning Jig is approximately as expected for a path that is planned in the mastoid part of the temporal bone.
Remove the Positioning Jig and put it aside for further use.
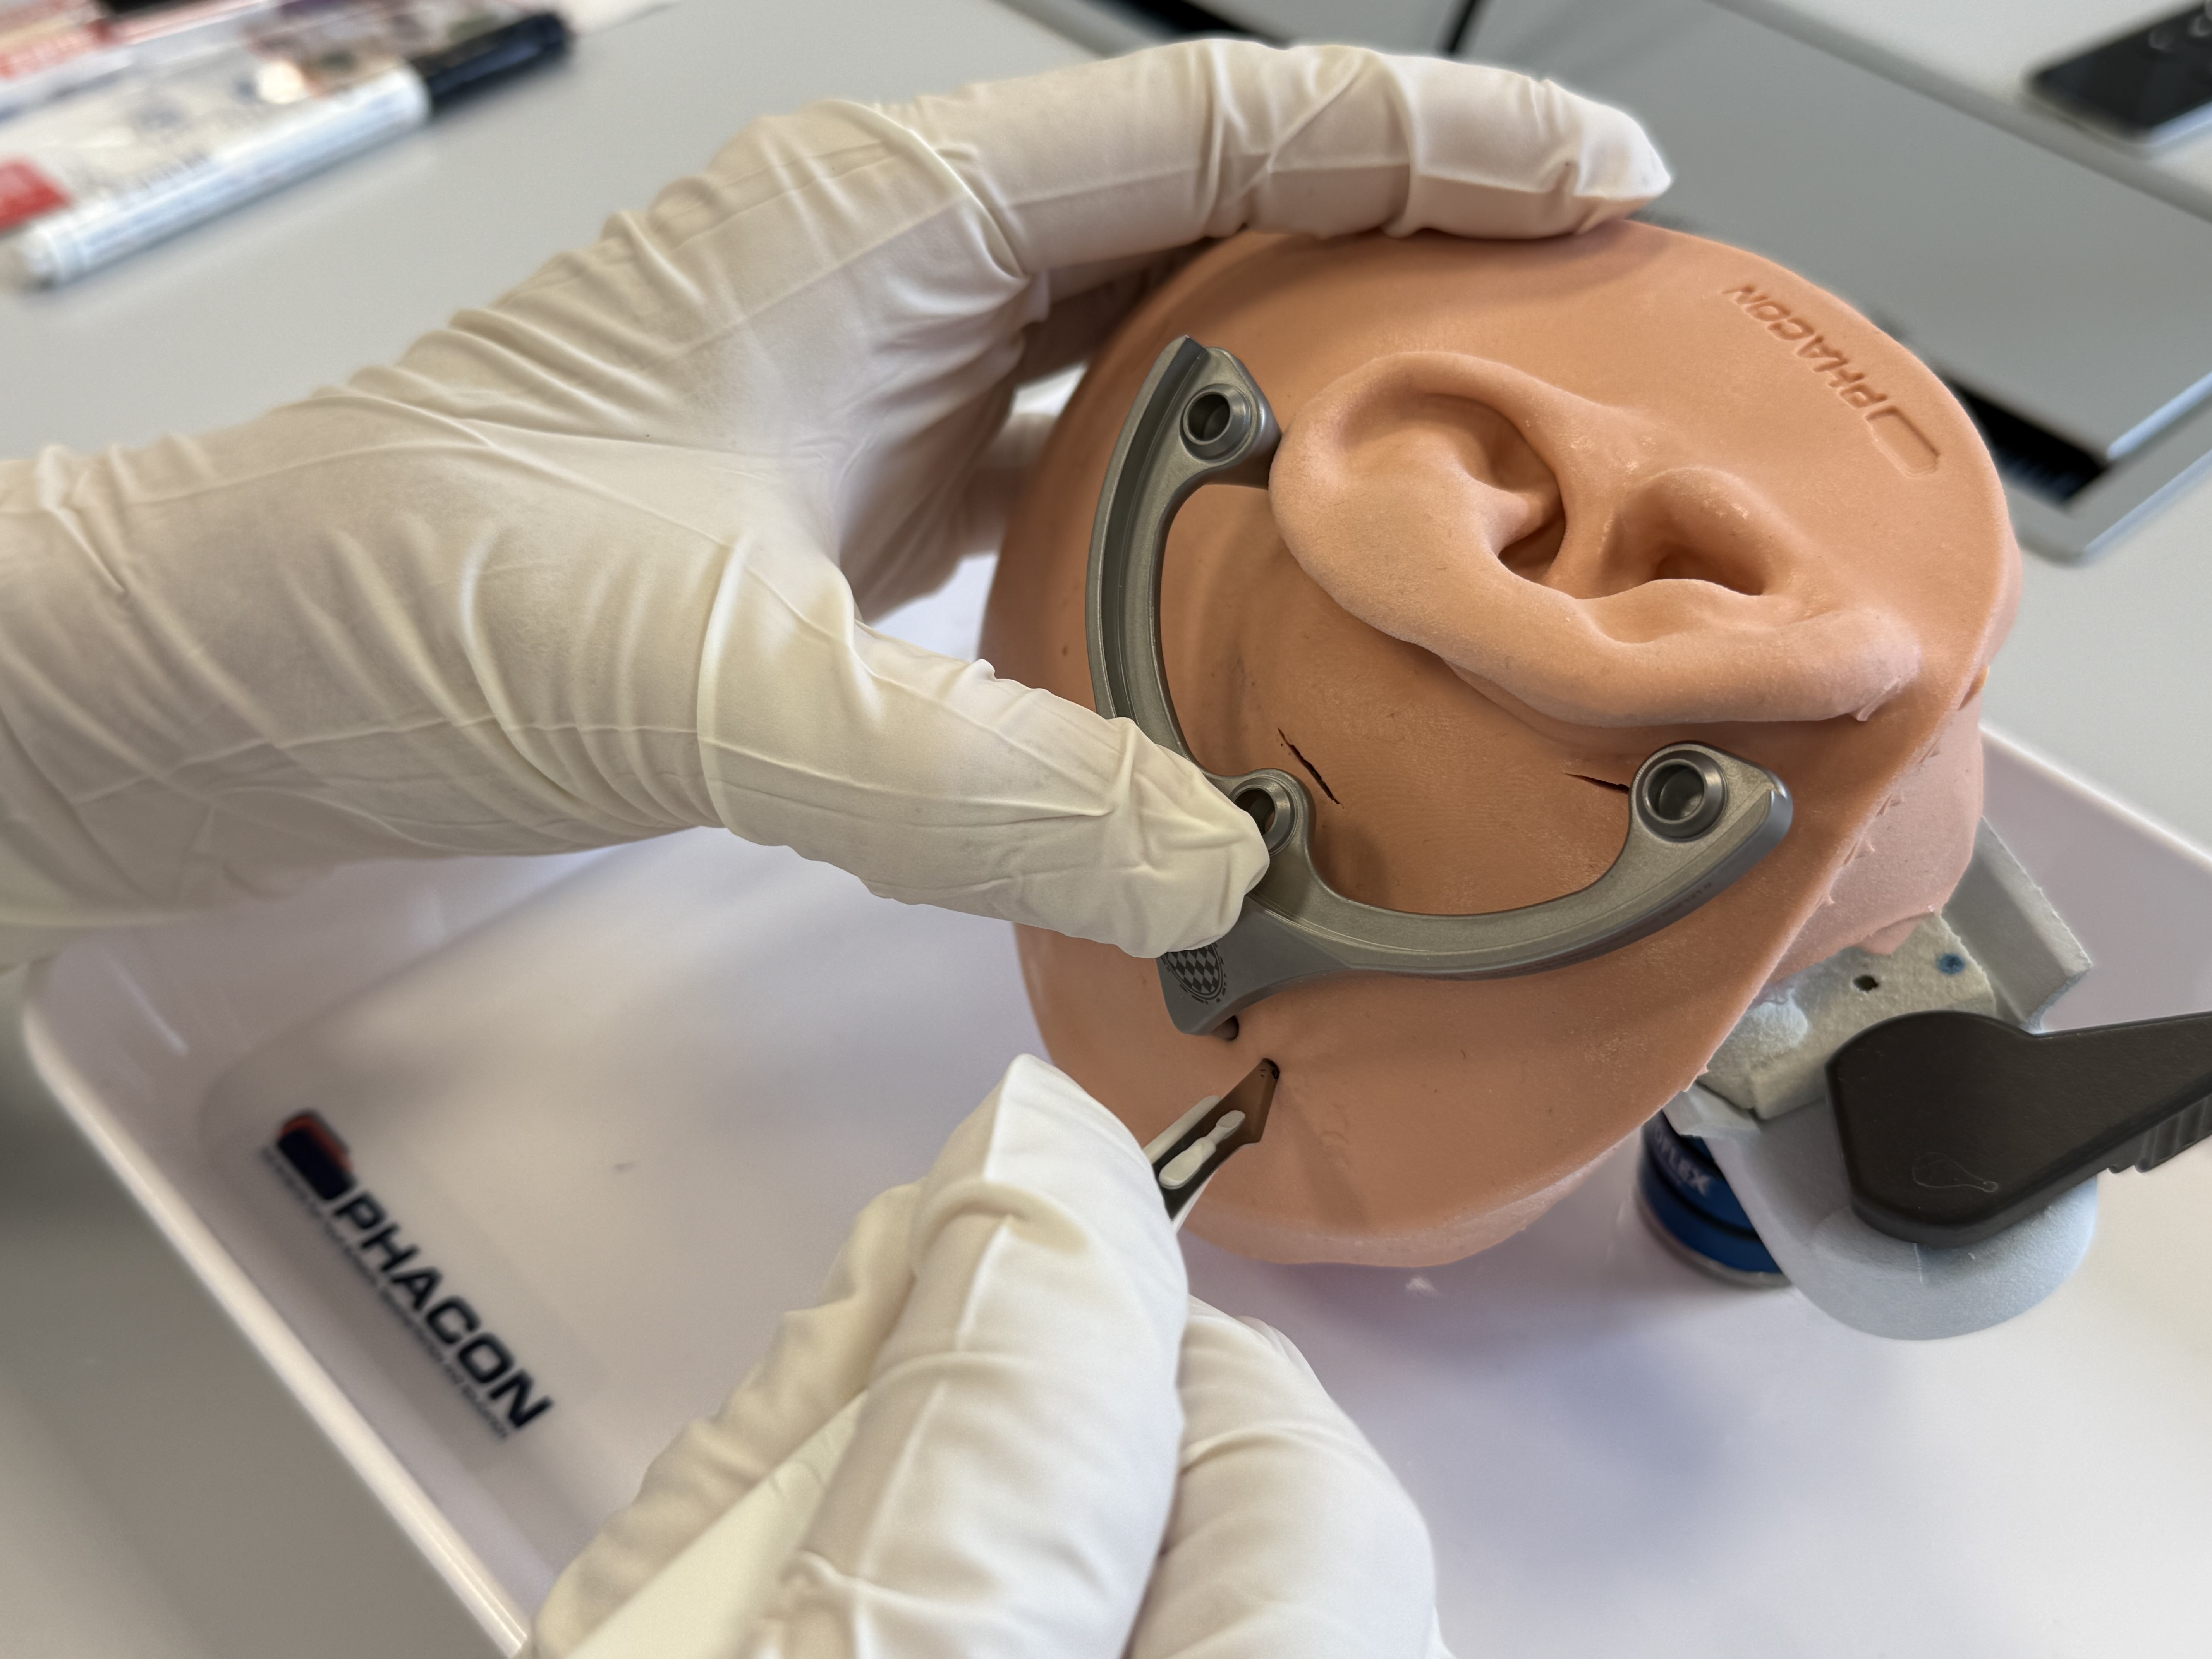
Make a skin incision at the marked position and spread the wound with a small spreader. Ensure that the spreader fits under the Positioning Jig without pressing against the Mini-Stereotactic Frame.
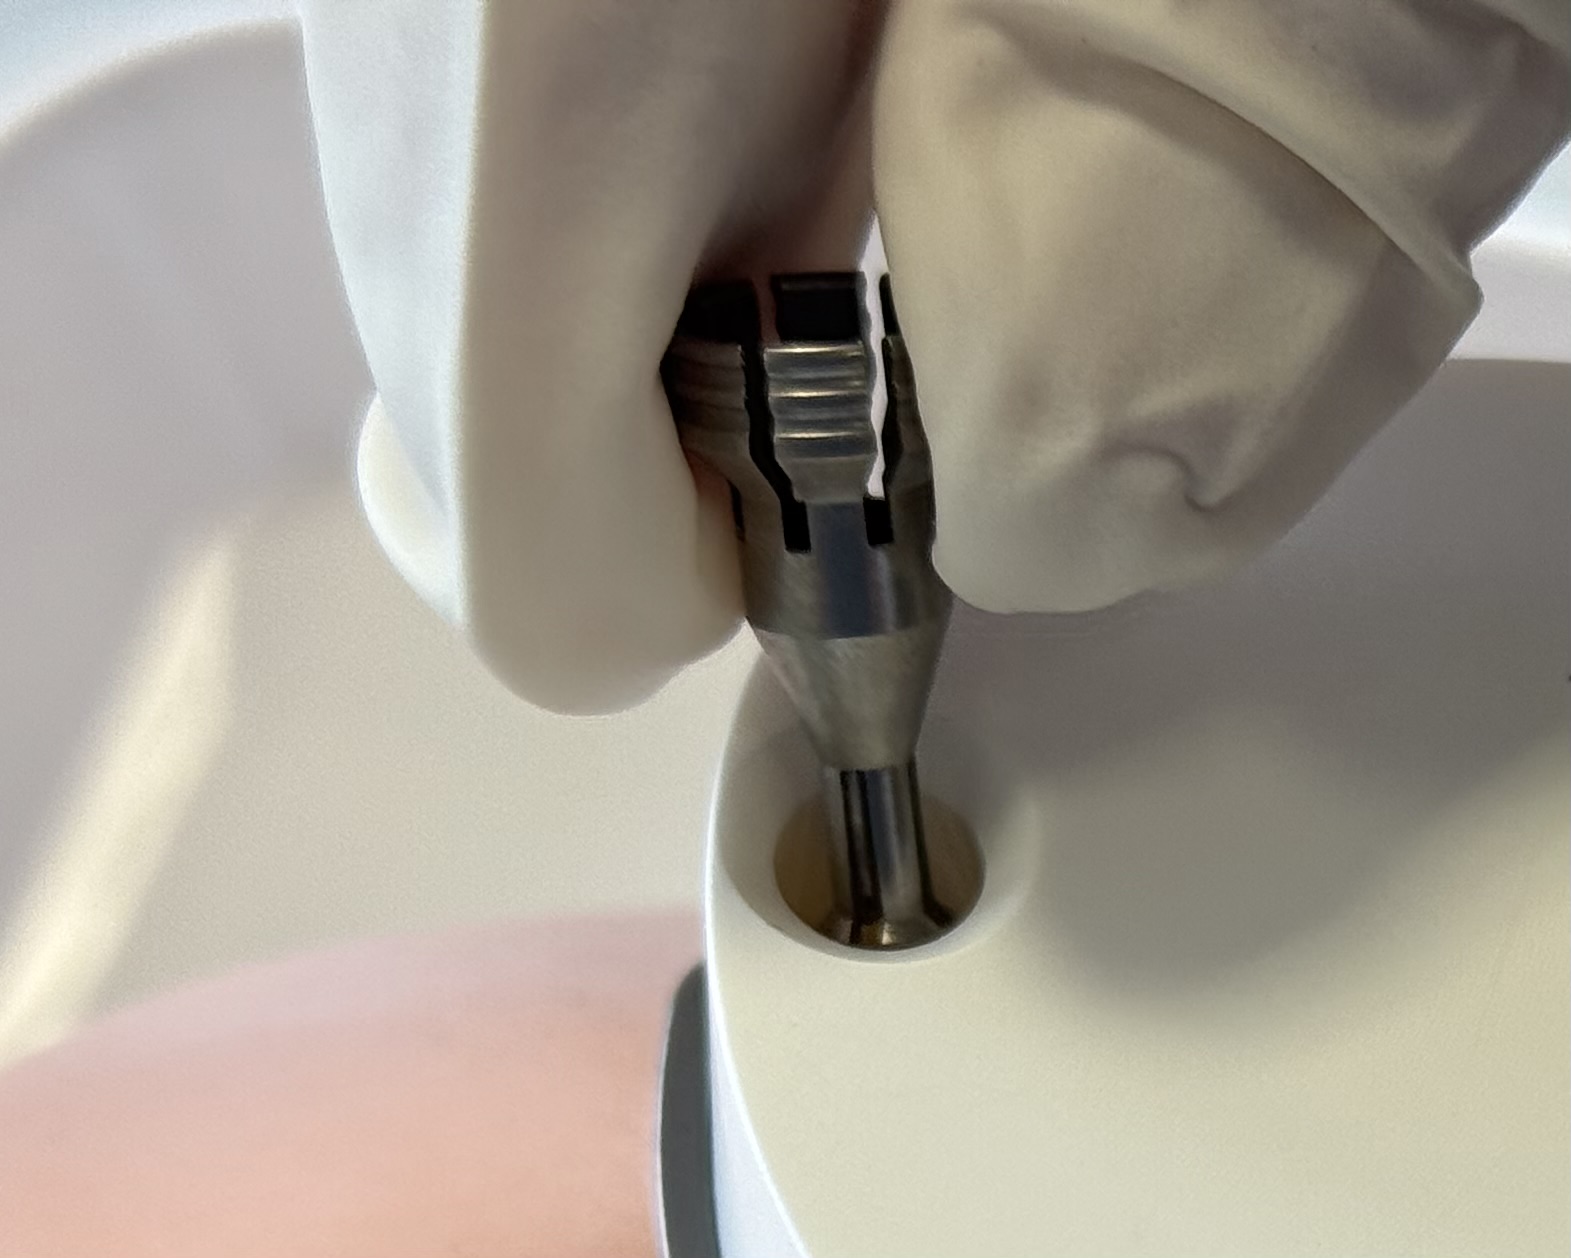
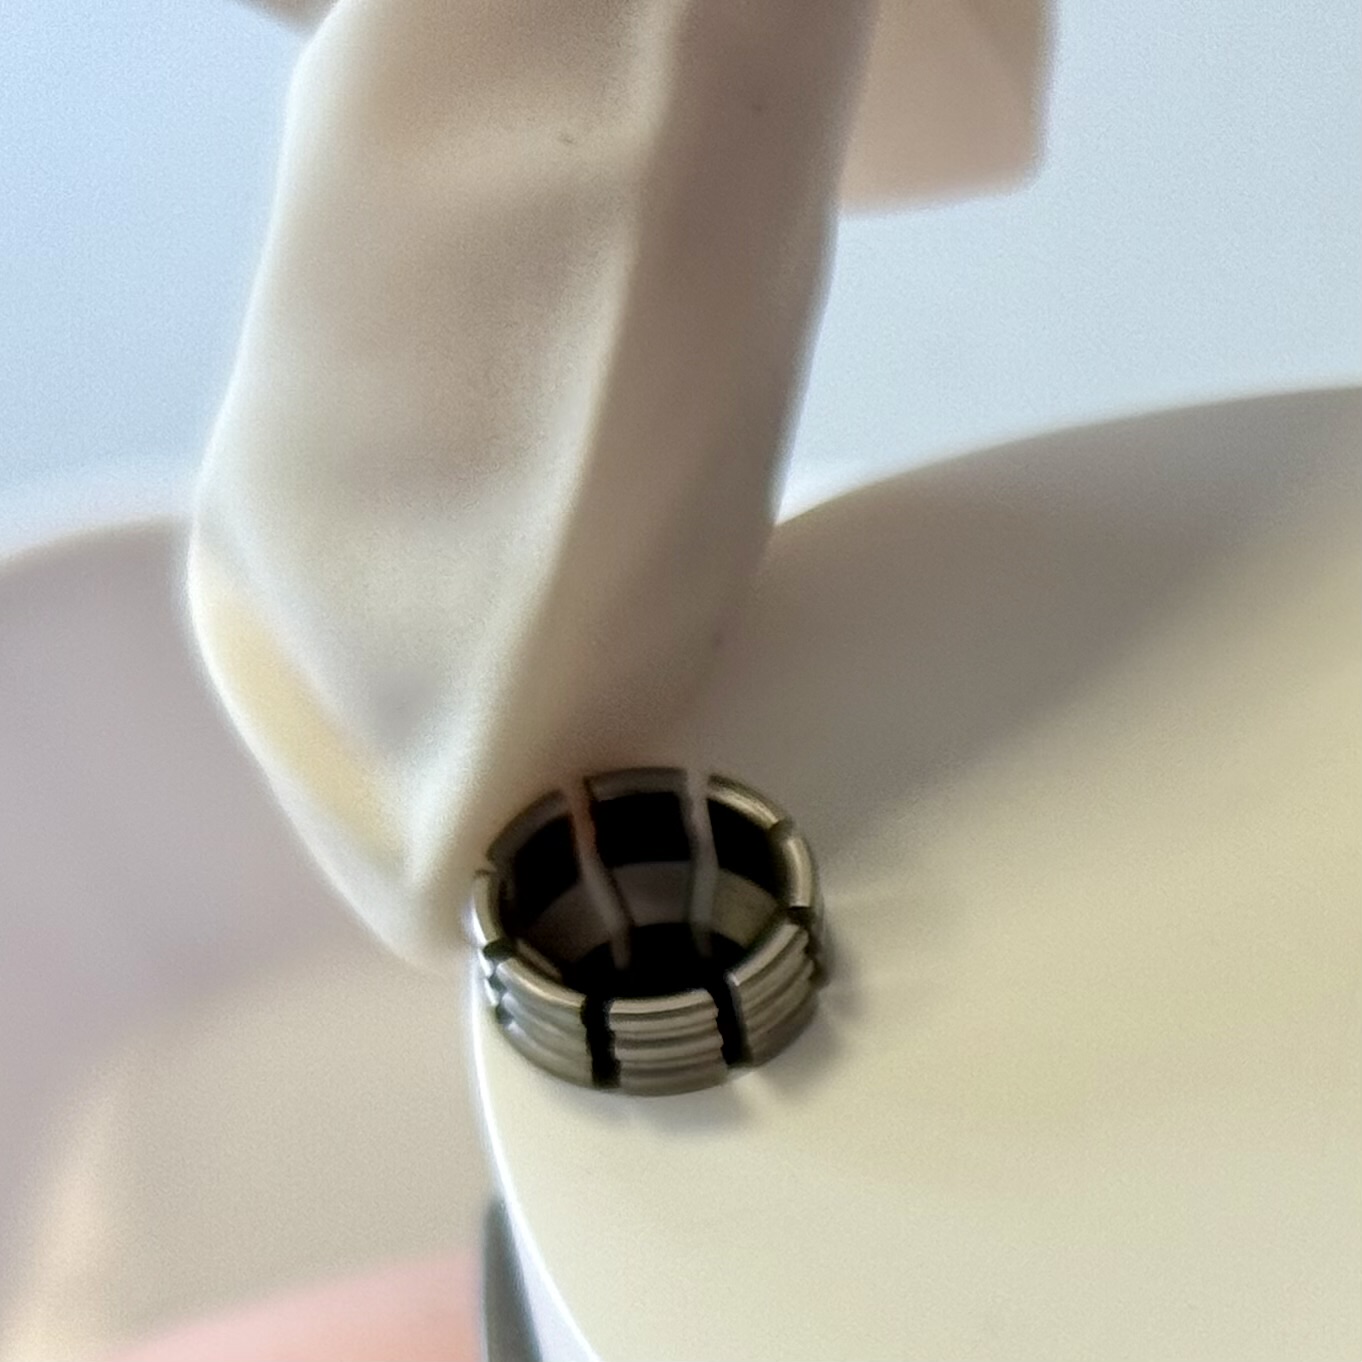
Insert the Tool Guide into the created hole of the Positioning Jig and press it firmly in until it reaches the stop of the stepped hole.
Caution
First press the Tool Guide in, then attach the Positioning Jig to avoid forces to the Mini-Stereotactic frame.
Mount the individualized Positioning Jig, including the inserted Tool Guide, onto the MSF and fixate it with the three Jig Fasteners.
Visually check that the Tool Guide does not come into contact with the skull bone when mounting it on the Mini-Stereotactic Frame. If contact cannot be avoided due to the planned trajectory, the corresponding area of the skull must be recessed slightly manually, e.g. using a bur.
Caution
The contact surfaces of the Positioning Jig with the MSF must be clean and free of debris to ensure accurate fit.
A non-sterile dressed person shall take a picture of the MSF and the Optical Reference Marker according to the instructions in the conCIerge app. The software checks the relative position between MSF and Optical Reference Marker.
Warning
In case the bone fixation of the MSF has loosened, the surgery must not be continued.
To assure the correct Positioning Jig is used, a non-sterile dressed person shall scan the QR-code of the Positioning Jig, according to the instructions in the conCIerge app.
Drilling — access tunnel
Important
Insertion and drilling should be performed while standing or at a similar level as the patient. One way to achieve this is by lowering the operating table.
OtoDrill 1
Insert the OtoDrill 1 carefully into the Tool Guide. Make sure that the OtoDrill 1 does not tilt.
Recommendation
Once the OtoDrill is fully inserted into the Tool Guide, it is recommended to move the OtoDrill up and down slightly without rotating it in the drilling axis (with the Unium Motor off) to get a better sense of its position in relation to the Tool Guide and the patient.
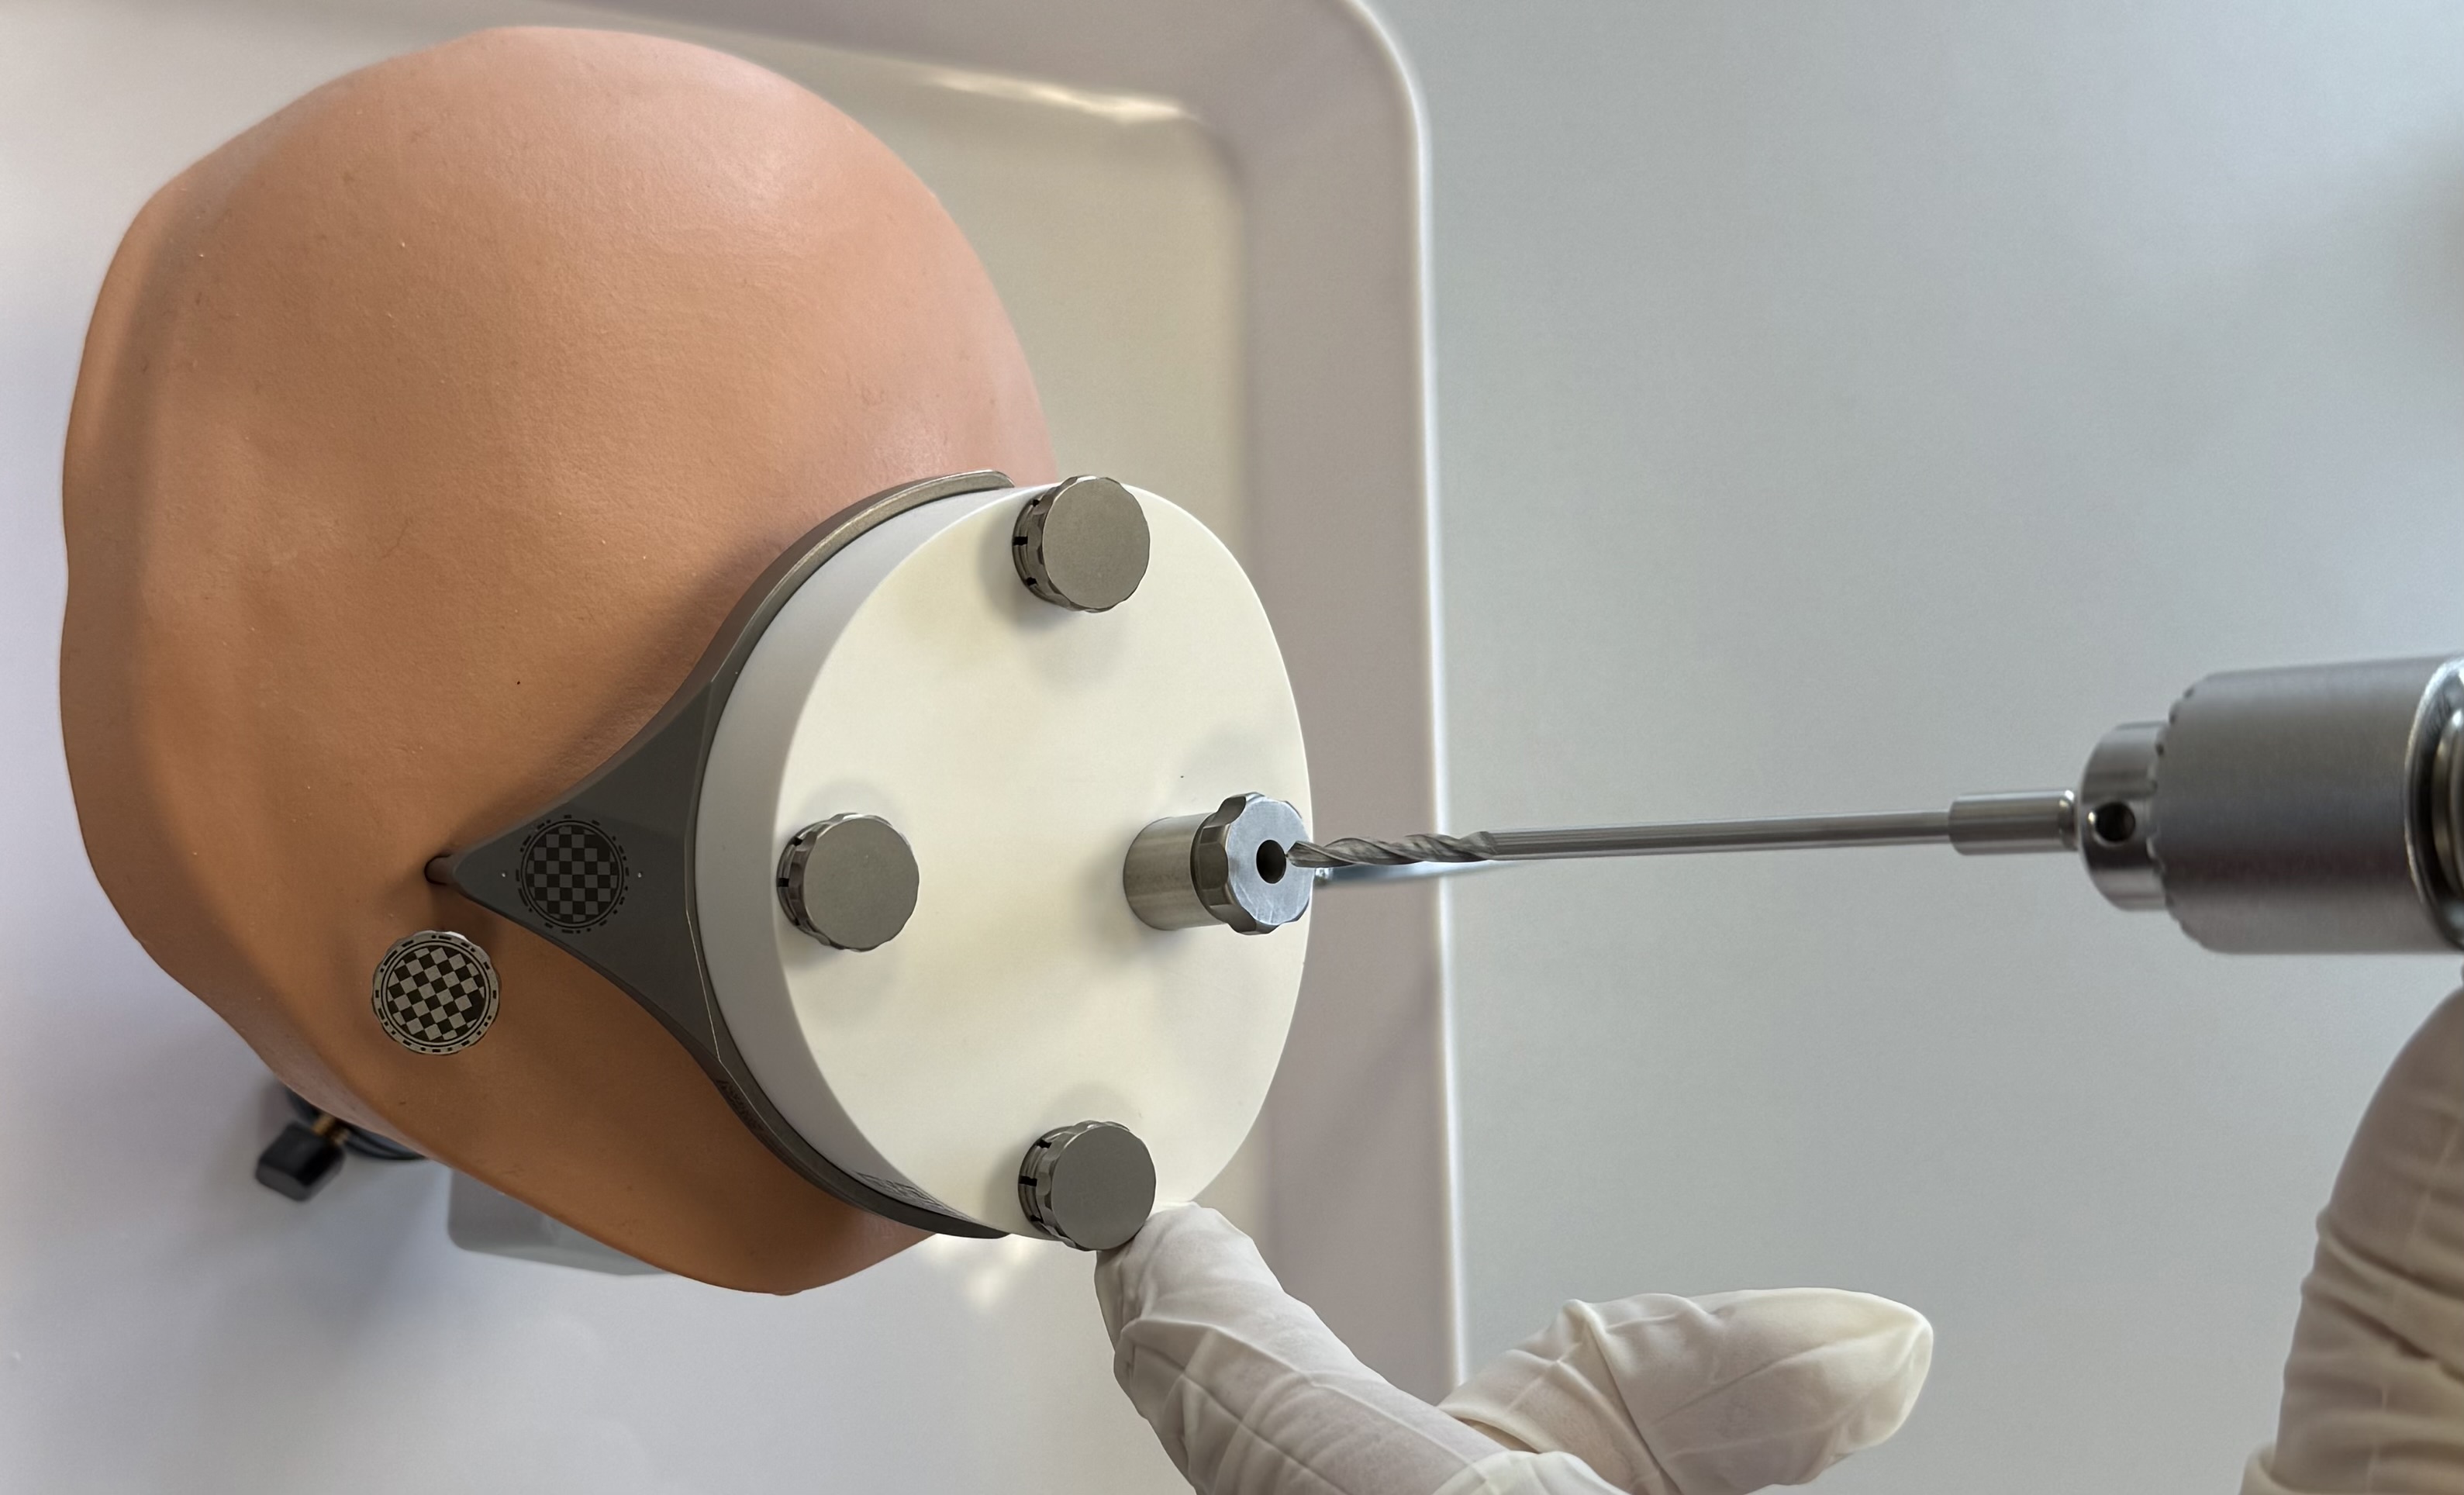
When the OtoDrill 1 reaches the hard bone surface, use a high rotational speed but little force. Avoid non-axial (sidewards) forces.
Continue drilling through the bone in ~2-3 second intervals. Retract the OtoDrill 1 from the drilled canal and apply cooling water into the canal between the intervals.
When the depth stop of the OtoDrill 1 reaches the Tool Guide surface, immediately retract the drill bit.
Flood the drilled canal with water.
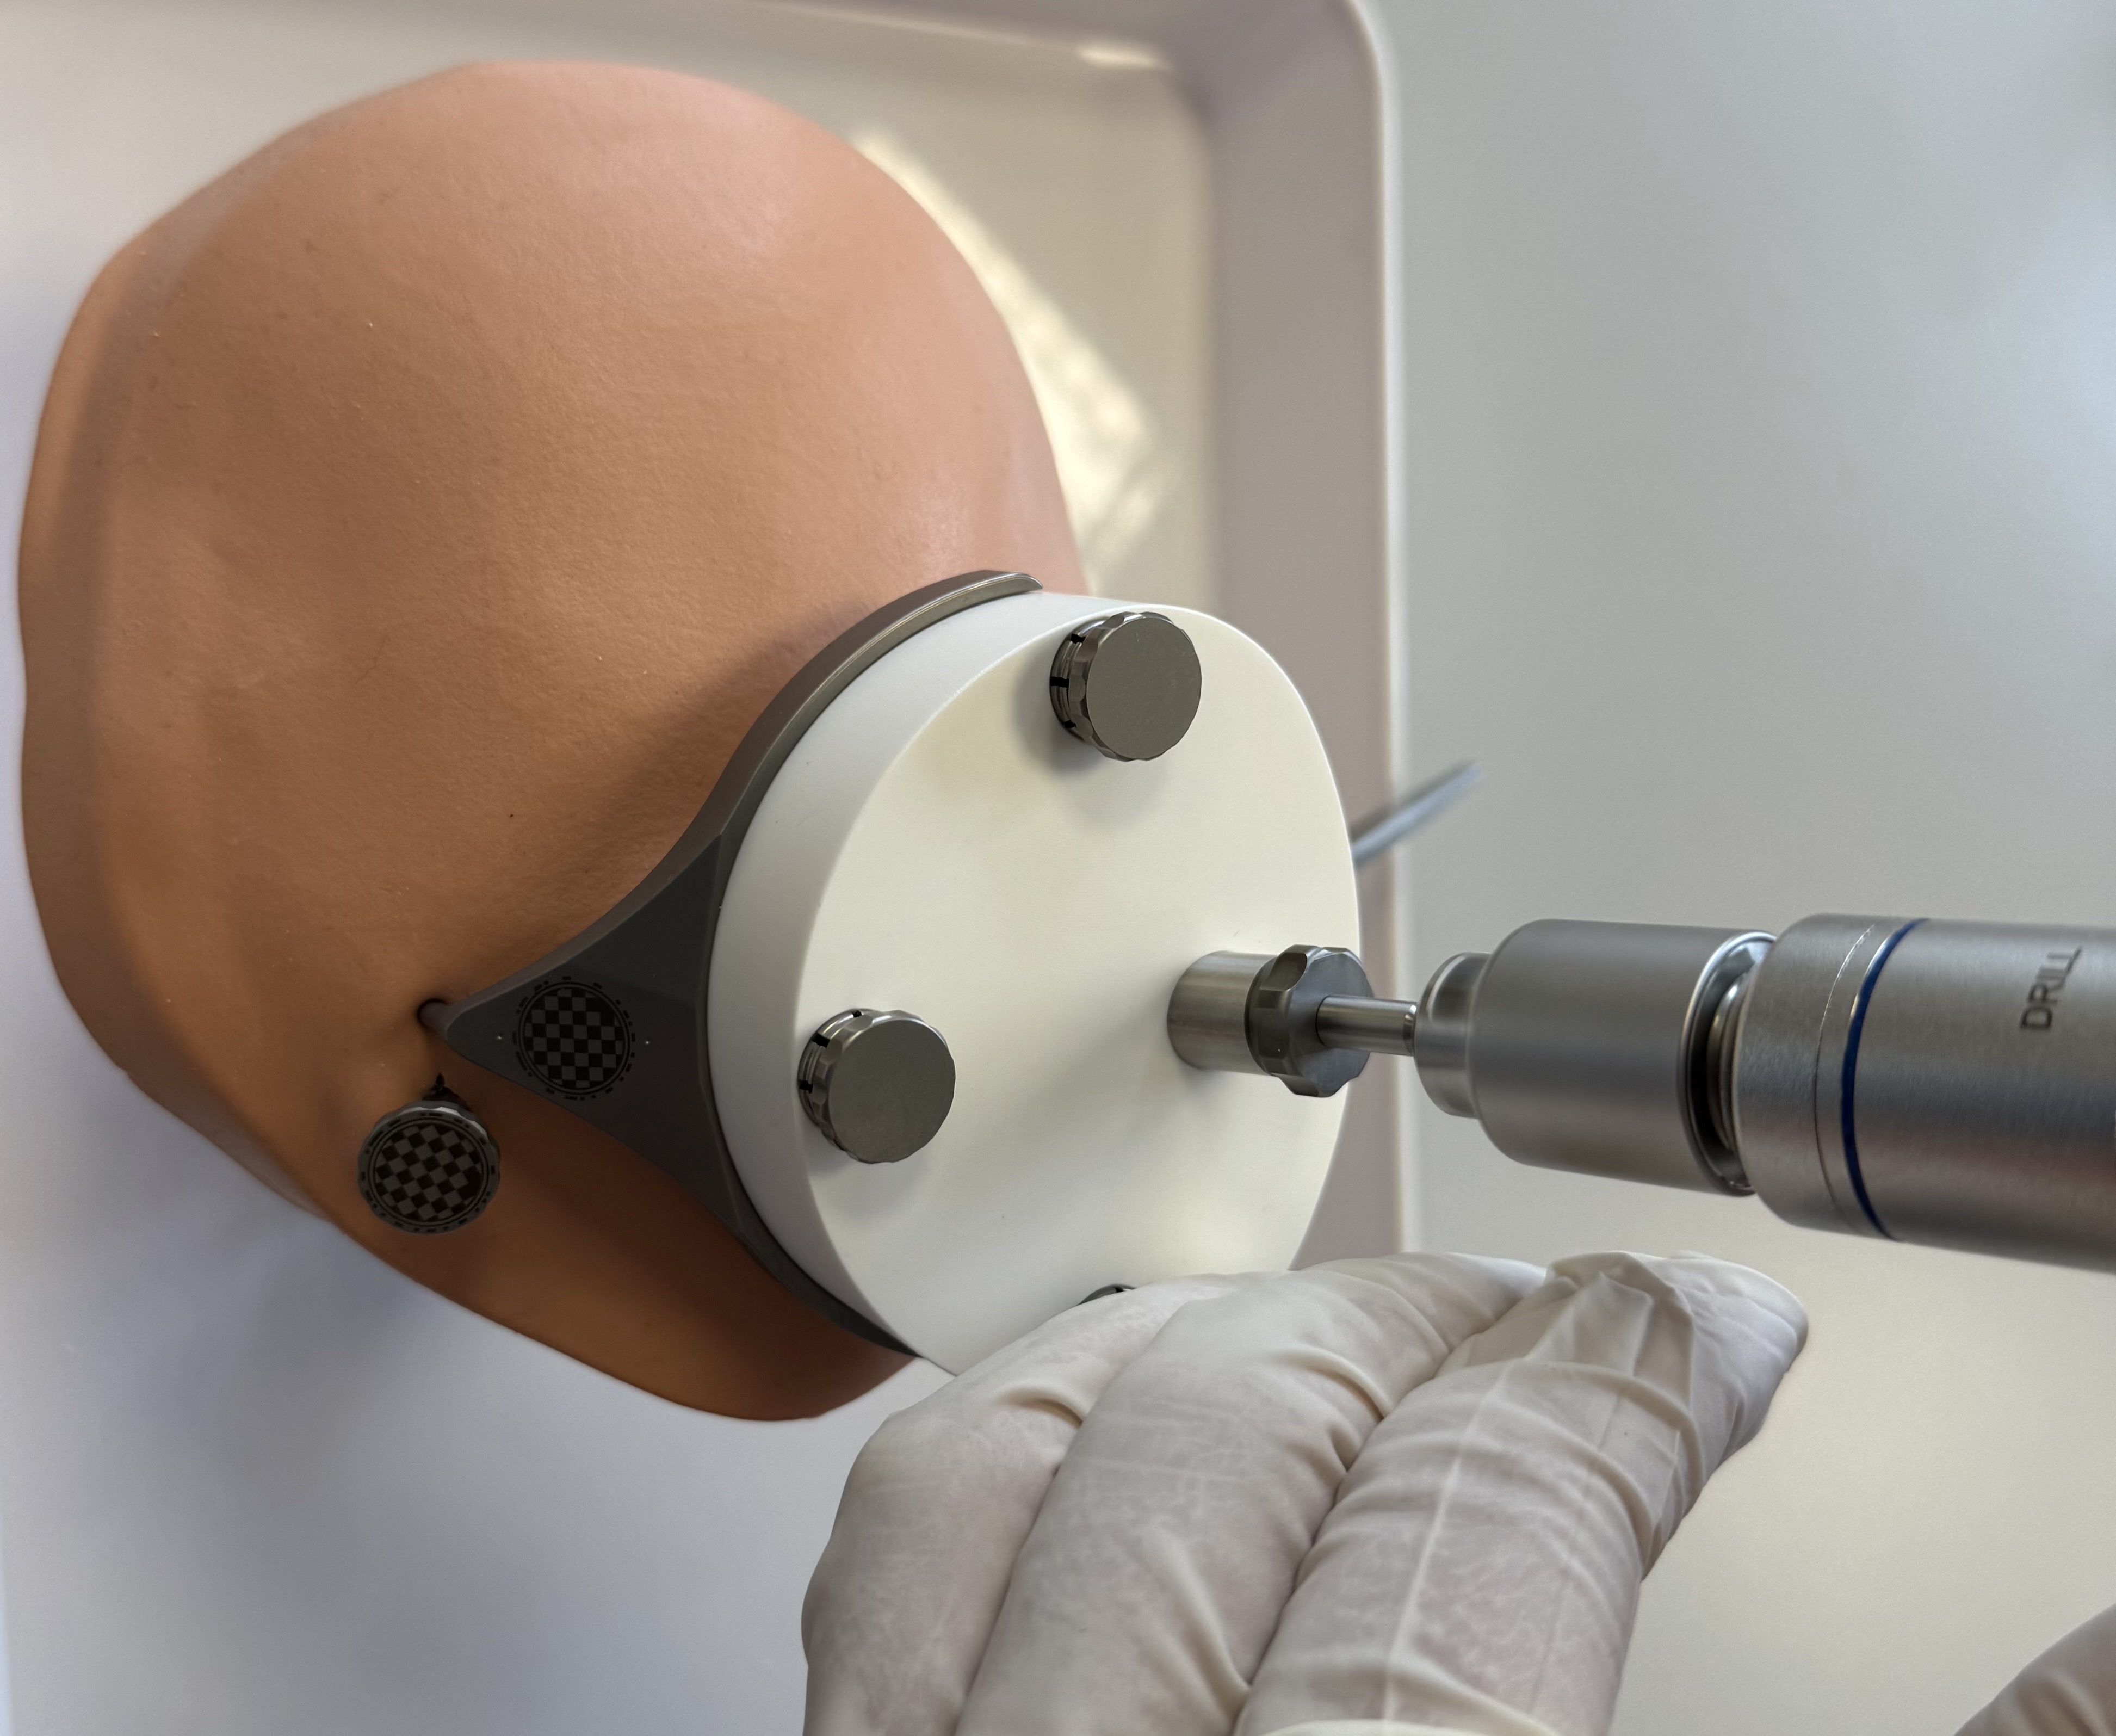
OtoDrill 2
A non-sterile dressed person shall take a picture of the MSF and the Optical Reference Marker according to the instructions in the conCIerge app. The software checks the relative position between MSF and Optical Reference Marker.
Insert the OtoDrill 2 carefully into the Tool Guide. Make sure that the OtoDrill 2 does not tilt.
Recommendation
Once the OtoDrill is fully inserted into the Tool Guide, it is recommended to move the OtoDrill up and down slightly without rotating it in the drilling axis (with the Unium Motor off) to get a better sense of its position in relation to the Tool Guide and the patient.
Drill through the bone in intervals of approximately 2-3 seconds and retract the OtoDrill 2 from the drilled canal and apply cooling water into the canal between the intervals.
When the depth stop of the OtoDrill 2 reaches the Tool Guide surface, immediately retract the drill bit.
Flood the drilled canal with water.
Access to the middle ear cavity (or any other planned and reachable target in the temporal bone) is now established. Clean the drilled canal and perform any desired surgical/medical steps that are now made possible with the minimally invasive access tunnel. For inner ear access, follow the steps marked by 🌀 or else continue with the Removal of OtoJig devices.
Bony overhang removal - OtoDrill 3 🌀
If, in addition to the middle ear access, inner ear access is desired, continue as follows:
Insert the OtoDrill 3 carefully into the Tool Guide.
Use the OtoDrill 3 to remove the bony overhang until the depth stop of the OtoDrill 3 reaches the Tool Guide surface.
Implant bed and groove for CI 🌀
For CI, remove the Positioning Jig and create a small groove in the skull at the entry of the drilled tunnel for cochlea implant electrode lead fixation. The groove shall point towards the direction of the intended cochlea implant bed and will serve to fixate the electrode lead. Use a conventional ⌀ 0.8 mm surgical bur to create the groove.
Create the implant bed and space to store excess electrode lead.
Clean the surgical site from bone dust and flush the drilled tunnel and the middle ear cavity with sterile water and clean it with a suction device (use a suction tube ⌀ ≤ 1.5 mm to reach the middle ear). Repeat this cleaning 2-3 times to avoid bone dust entering the inner ear in the next step of the procedure.
Caution
Avoid damaging the round window membrane with the suction tube.
Round window opening 🌀
For the opening of the round window membrane, mount and fixate the Positioning Jig (with the Tool Guide still inserted) onto the Mini-Stereotactic Frame.
Open the round window membrane by advancing the Round Window Opener through the Tool Guide and rotating it slightly until it reaches the depth stop.
Caution
In the case of local anesthesia: pay attention to possible movements of the patient's head when using the Round Window Opener. Movements of the patient's head near the tip of the Round Window Opener can lead to injuries.
The Positioning Jig can be removed and an endoscopic inspection of the round window opening can be performed. If necessary, re-attach the Positioning Jig (with the Tool Guide still inserted) and advance the Round Window Opener again. When the depth stop is reached, you can perform a slight rotation movement. Remove the Round Window Opener.
Removal of OtoJig devices
Remove the OtoJig devices from the patient by:
Removing the Jig Fastener and unmount the Positioning Jig
Remove the Optical Reference Marker manually by a counter-clockwise rotation.
Unscrew the Mounting Screw, using a compatible screw driver.
Remove the MSF.
Unscrew the two bone screws using a compatible screw driver and remove the two Anchor(s).
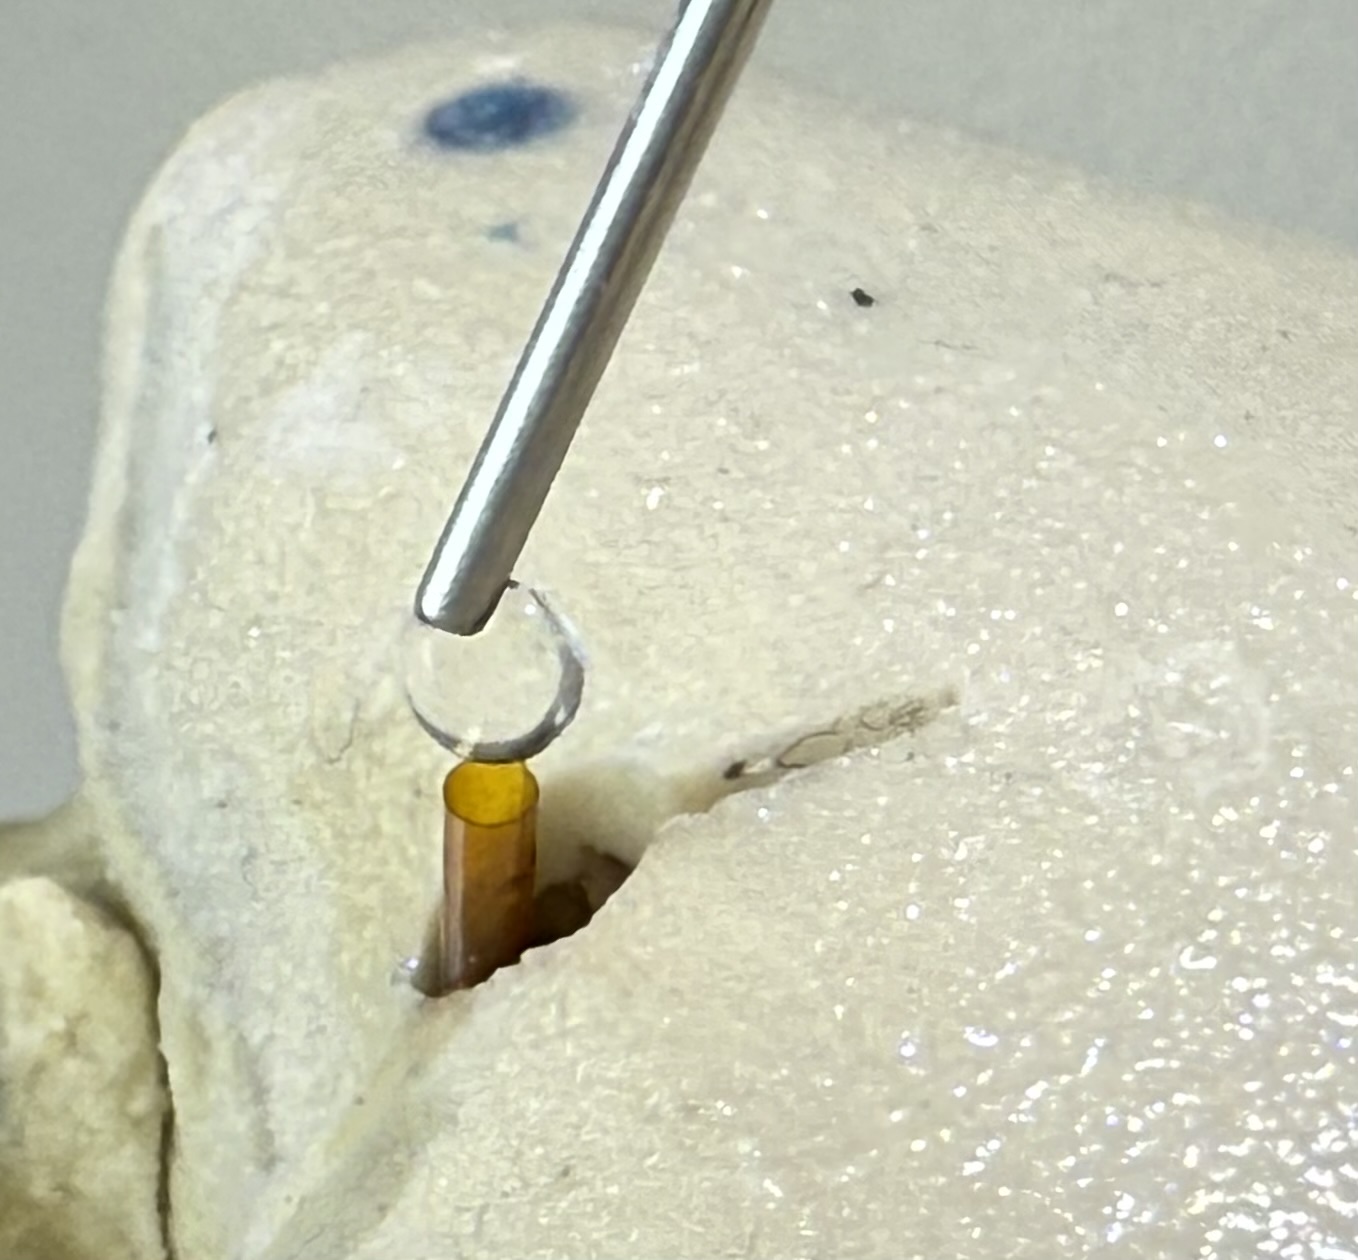
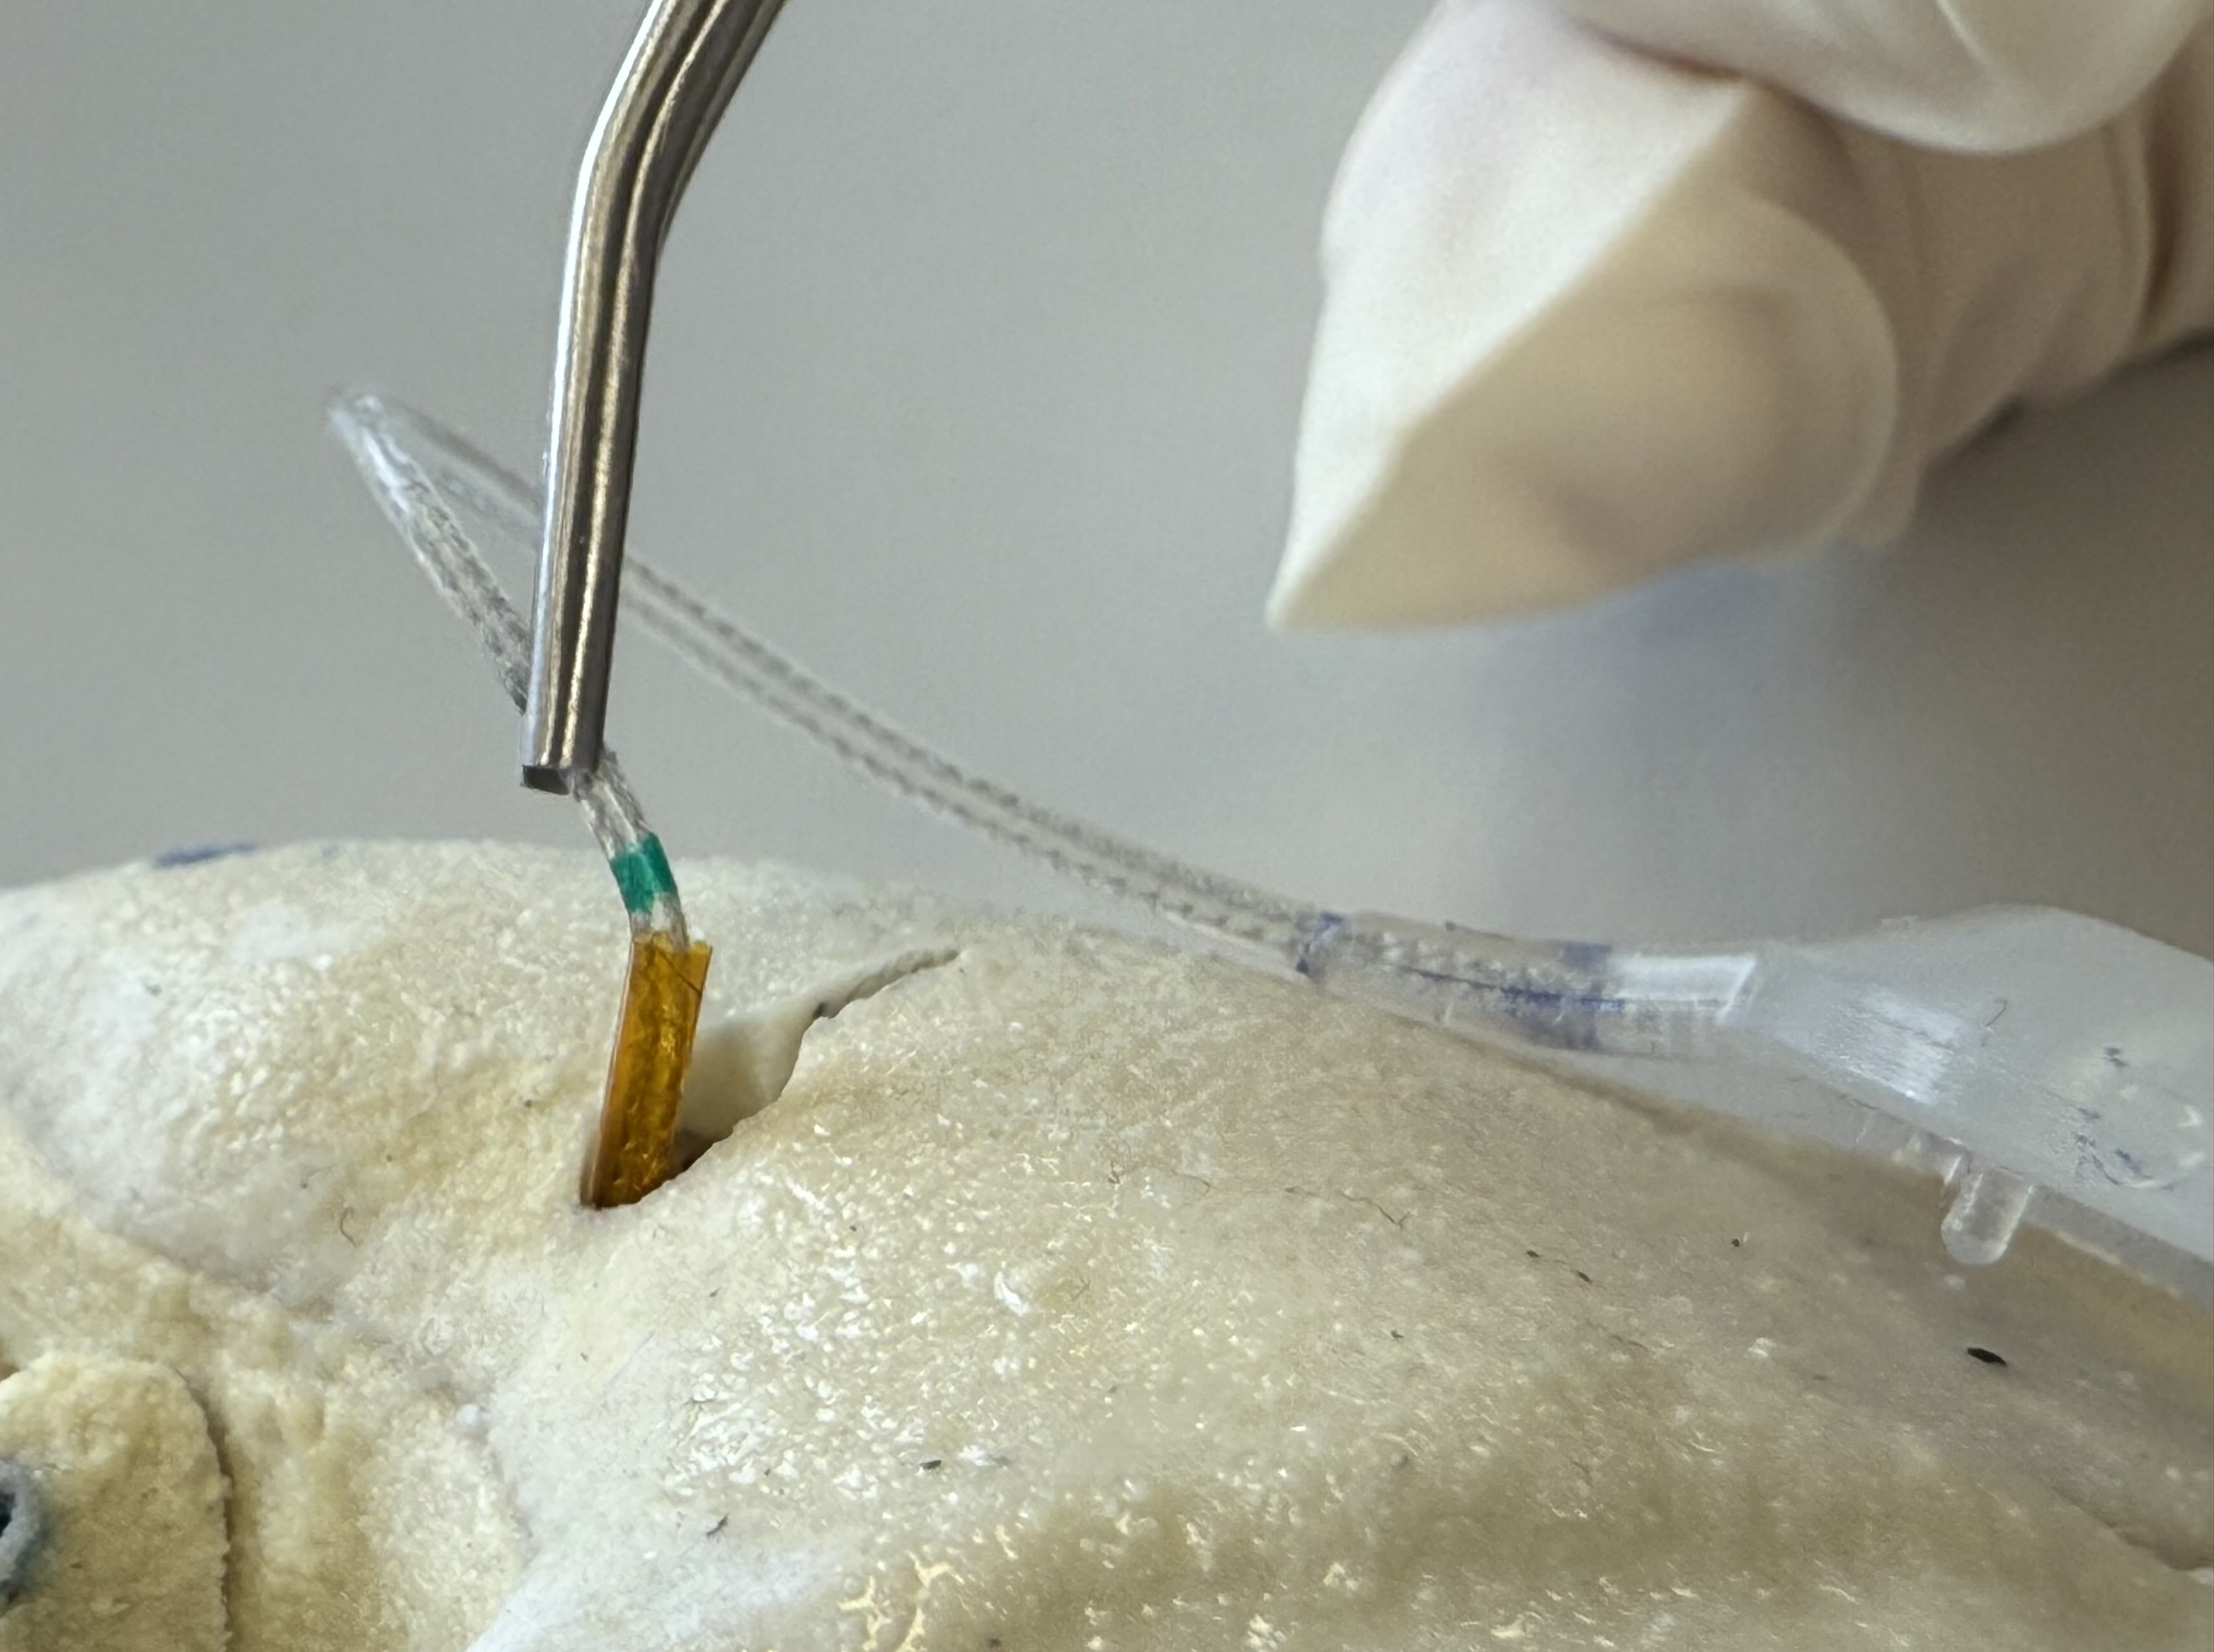
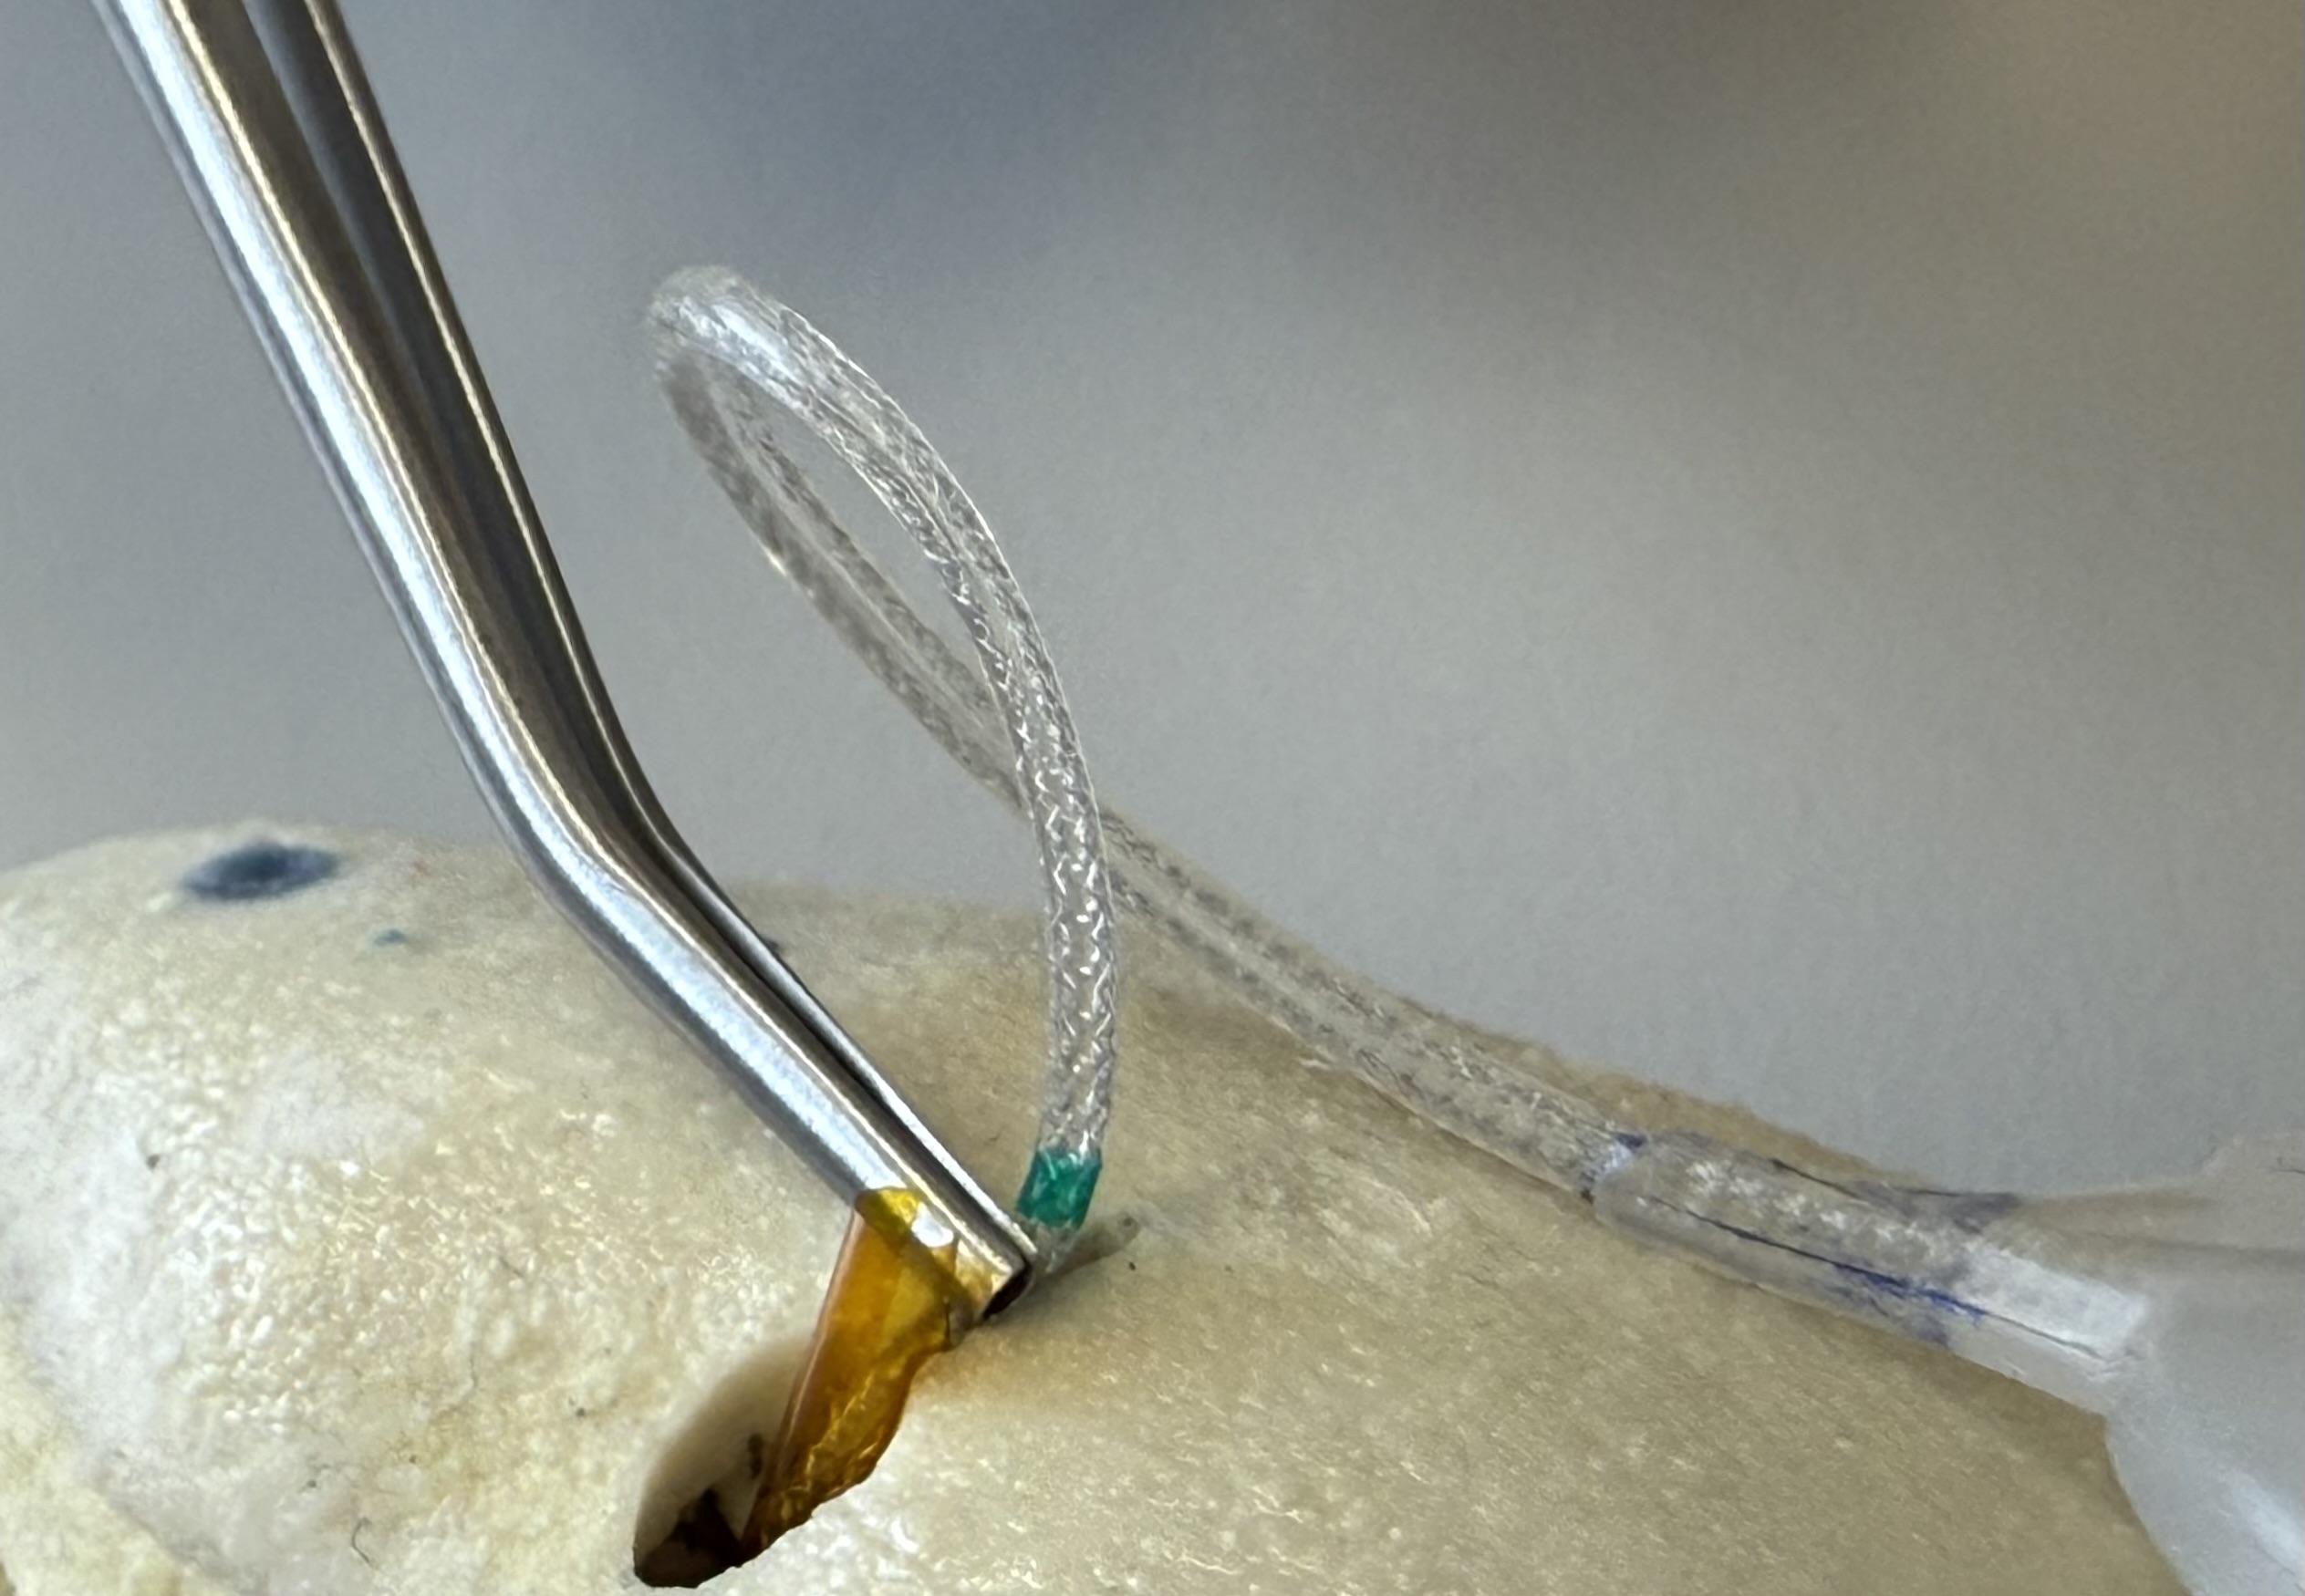
Covering the canal using the Insertion Tube 🌀
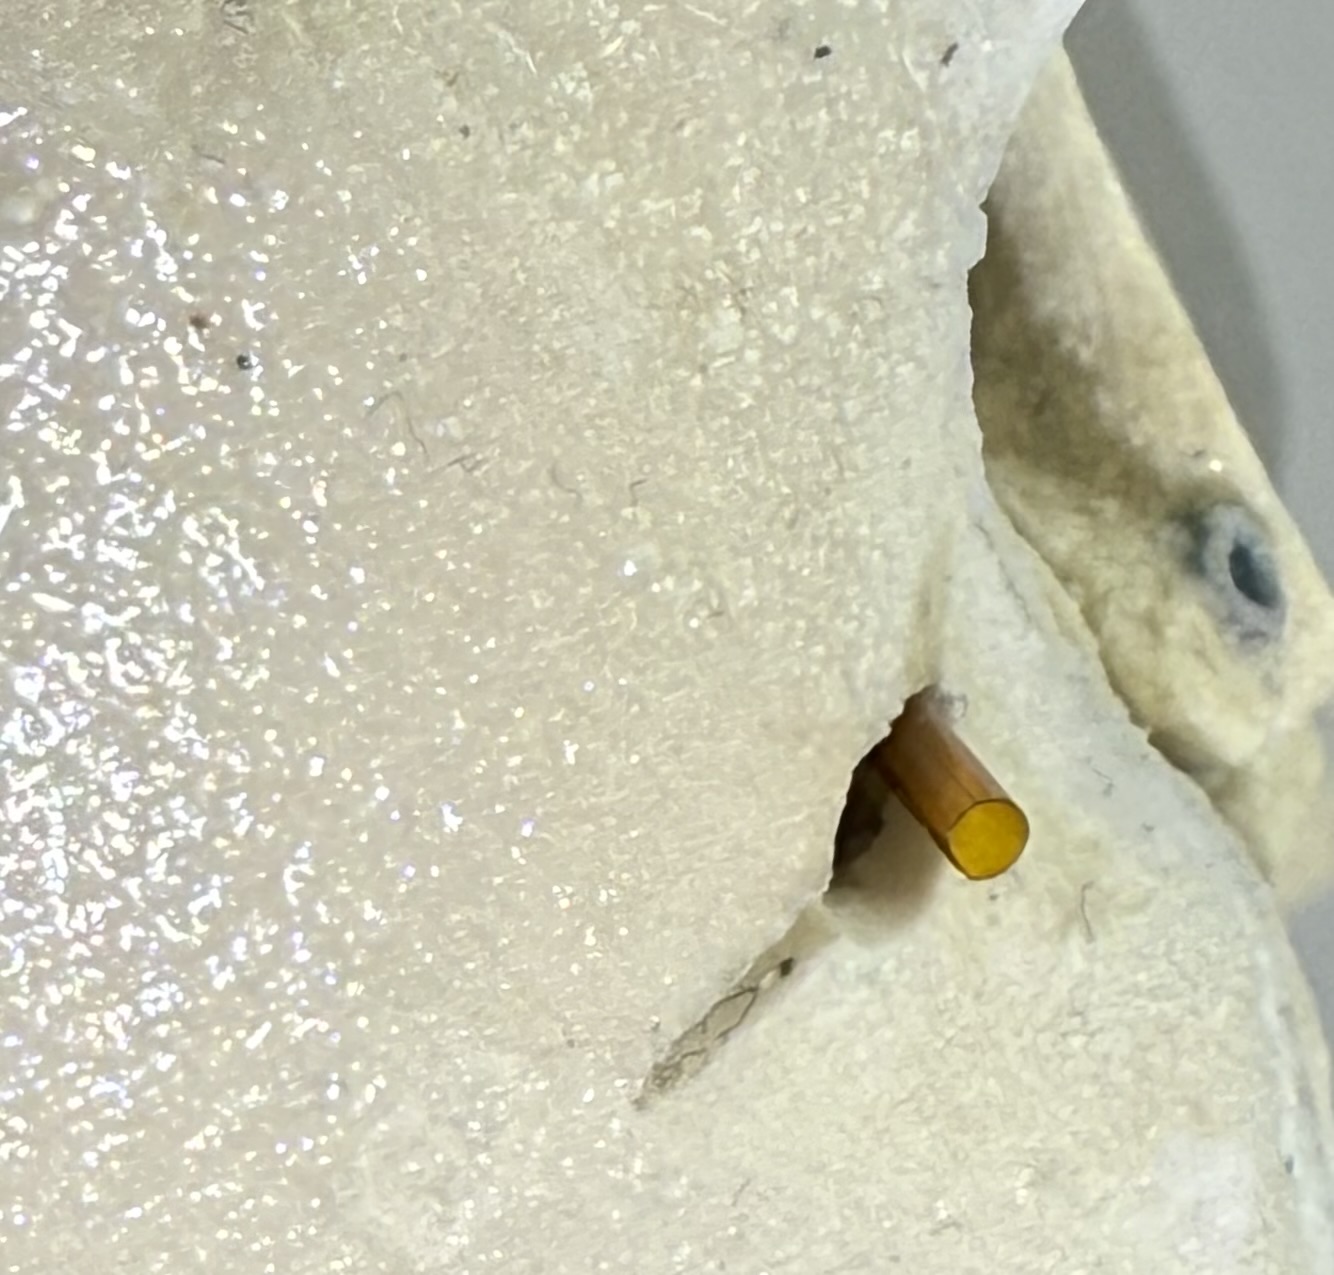
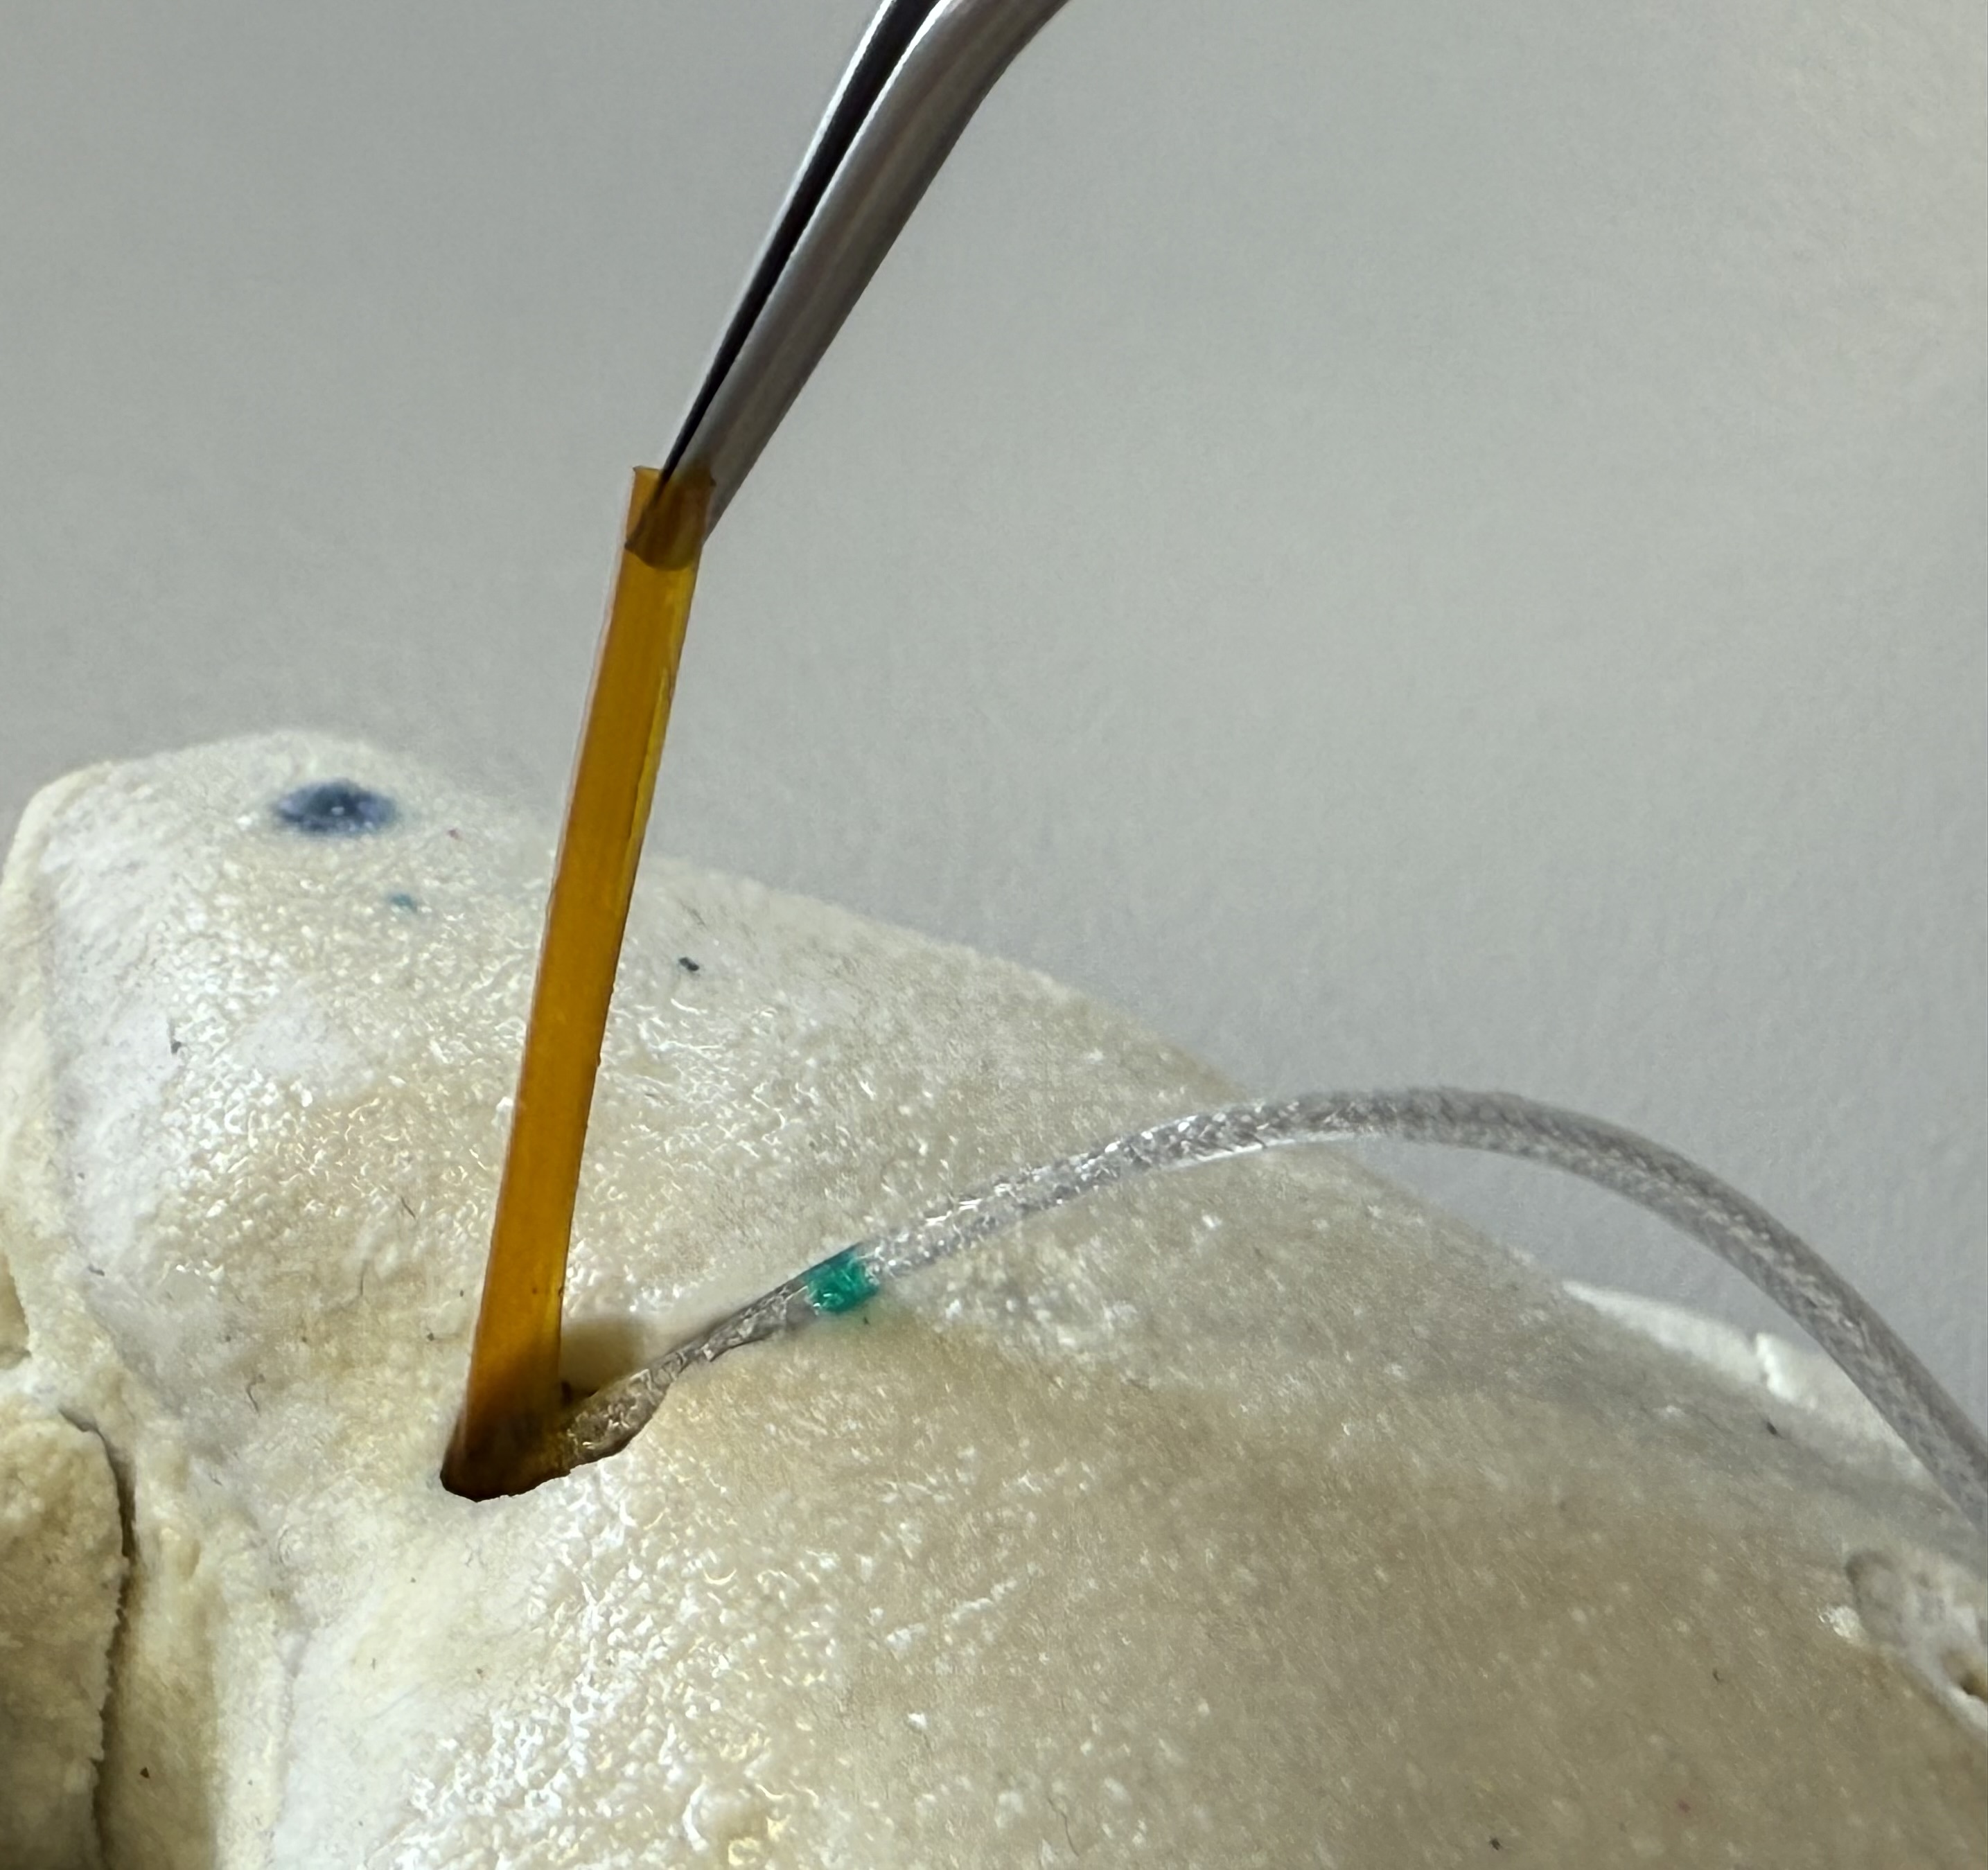
Note
The Insertion Tube has a typical lumen of 1.27 mm and outside diameter of 1.33 mm. Devices larger than the lumen of the Insertion Tube cannot be used in the covered canal.
The Insertion Tube has a length of 31 mm and its inserted depth can be estimated by comparing the remaining non-inserted length with the planning in software conCIerge.
Aseptically remove the device from the sterile barrier system for presentation. Use the pull tab to remove the pouch and blister lid.
For covering a canal in the temporal bone, insert the Insertion Tube into the drilled canal until the target is reached. The Insertion Tube has a length of 31 mm and its inserted depth can be estimated by comparing the remaining non-inserted length with the planning in software conCIerge.
Caution
Do not apply large forces on the Insertion Tube as this may damage the device or tissue. Stop inserting the Insertion Tube when resistance is felt or the tube has reached the desired depth.
For cochlear implantation:
Consult the instructions for use of the cochlear implant.
Orient the slit of the Insertion Tube towards the created bone groove and place the cochlear implant into the desired position.
Advance the electrode through the Insertion Tube into the cochlea. Lubricants can be used to reduce friction between the electrode and the Insertion Tube.
Fixate the electrode lead into the groove.
Carefully remove the slitted Insertion Tube with forceps. Make sure that the slit of the Insertion Tube slides past the electrode and that the electrode is not pulled by the Insertion Tube.
Complete the surgery as in for conventional CI surgery.
Note
If preferred or deemed necessary, an optional tympanic flap can be performed to open a view towards the middle ear and allow the micro manipulation with manual instruments.
The Insertion Tube can also be used in a conventional surgical setting outside of this minimally invasive OtoJig surgical procedure.
Glossary of symbols
| Symbol | Title | Description | Reference |
|---|---|---|---|
 | Manufacturer | Indicates the medical device manufacturer | ISO 15223-1 |
 | Date of manufacture | Indicates the date when the medical device was manufactured | ISO 15223-1 |
 | Use-by date | Indicates the date after which the medical device is not to be used | ISO 15223-1 |
 | Batch code | Indicates the manufacturer’s batch code so that the batch or lot can be identified | ISO 15223-1 |
 | Catalogue number | Indicates the manufacturer’s catalogue number so that the medical device can be identified | ISO 15223-1 |
 | Country of manufacture | To identify the country of manufacture of products | ISO 15223-1 |
 | Sterilized using irradiation | Indicates a medical device that has been sterilized using irradiation | ISO 15223-1 |
 | Do not use if package is damaged and consult instructions for use | Indicates that a medical device that should not be used if the package has been damaged or opened and that the user should consult the instructions for use for additional information | ISO 15223-1 |
 | Double sterile barrier system | Indicates two sterile barrier systems | ISO 15223-1 |
 | Single sterile barrier system with protective packaging outside | Indicates a single sterile barrier system with protective packaging outside | ISO 15223-1 |
 | Keep away from sunlight | Indicates a medical device that needs protection from light sources | ISO 15223-1 |
 | Keep dry | Indicates a medical device that needs to be protected from moisture | ISO 15223-1 |
 | Do not re-use | Indicates a medical device that is intended for one single use only | ISO 15223-1 |
 | Consult instructions for use or consult electronic instructions for use | Indicates the need for the user to consult the instructions for use | ISO 15223-1 |
 | Caution | Indicates that caution is necessary when operating the device or control close to where the symbol is placed, or that the current situation needs operator awareness or operator action in order to avoid undesirable consequences | ISO 15223-1 |
 | Medical device | Indicates the item is a medical device | ISO 15223-1 |
 | Unique device identifier | Indicates a carrier that contains unique device identifier information | ISO 15223-1 |
 | CE marking | ‘CE marking’ means a marking by which a manufacturer indicates that a device is in conformity with the applicable requirements set out in Regulation (EU) 2017/745 and other applicable Union harmonization legislation providing for its affixing | Regulation (EU) 2017/745 |
| ℞only | Prescription use only | Caution: Federal law restricts this device to sale by or on the order of a physician | 21 CFR 801.109 (FDA) |
 | Health Industry Bar Code | The HIBC emblem is a sign for optical marking linear and 2-dimensional bar codes for indicating that the code contains the standard HIBC structure. | HIBC suggestion |
| 🌀 | Steps necessary for inner ear access. | If additionally to a minimally invasive access tunnel in the temporal bone, an access to the cochlear is desired, these steps and devices are required. | Custom. Used in this IFU. |
Contact & legal
Reporting of serious incidents
Any serious incident that has occurred in relation to a device should be reported to the manufacturer and the competent authority of the Member State in which the user and/or patient is established. Serious incident means any incident that directly or indirectly led, might have led or might lead to any of the following:
the death of a patient, user, or other person,
the temporary or permanent serious deterioration of a patient’s, user’s or other person’s state of health, or
a serious public health threat.
Use the following contact for reporting of serious incidents: reporting@otojig.com or call +49 511 53859999
Contact
Address:
xxxxxxxxxxOtoJig GmbHFeodor-Lynen-Straße 3530625 HannoverGermany
Email: hello@otojig.com
The pictures provided in this material are for illustration purposes only and may not represent an actual device specification.
The trademarks used herein are trademarks of OtoJig GmbH, KLS Martin SE & Co. KG, Synthes GmbH, and MED-EL Elektromedizinische Geräte GmbH, respectively.